Canon CONSOLE Image Control & Storage Software v1.1 Console Software Operation - Page 37
Recording a Movie File
 |
View all Canon CONSOLE Image Control & Storage Software v1.1 manuals
Add to My Manuals
Save this manual to your list of manuals |
Page 37 highlights
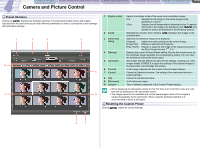
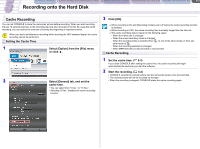
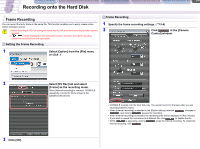
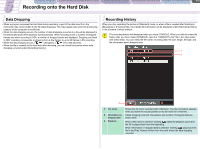
CONSOLE Windows [Option settings] and [Performance check] Camera and Picture Control Recording onto the Hard Disk Playback the Recorded Files 5-2 Recording onto the Hard Disk Recording a Movie File By Operating the Camcorder 1 Press the start/stop button on the camcorder. • Recording starts on both the tape in the camcorder and the hard disk. • When [Save custom preset file when recording start] is selected in the [General] tab setting, the Custom Preset file will be saved in the same folder as the video folder. The name of the Custom Preset file is the same as the recording file name. •[ ] appears on the camcorder screen. • When no tape is inserted, or the tape is write-protected, recording is saved only on the hard disk. • Even when the tape reaches the end, recording onto the hard disk continues. • To stop recording, press the start/stop button on the camcorder again. By Operating CONSOLE 1 Click in the [Camera Control] window. • Recording starts on both the tape in the camcorder and the hard disk. • When [Save custom preset file when recording start] is selected in the [General] tab setting, the Custom Preset file will be saved in the same folder as the video folder. The name of the Custom Preset file is the same as the recording file name. • changes to , and the recording indicator in the [Rec Viewer] window starts rotating. • When no tape is inserted, or the tape is write-protected, recording is saved only on the hard disk. • Even when the tape reaches the end, recording onto the hard disk continues. When you restart the recording by pressing the camcorder's start/stop button after changing the tape, the camcorder will start to record on the tape, and CONSOLE will keep recording onto the hard disk. • When recording in HDV standard on the tape and hard disk, a new file will be created after changing the tape when you restart the recording by pressing the camcorder's Start/Stop button. The computer stops the recording and restarts recording onto the new file. • To record the next scene as another file in [Sequence] or [Frame] mode, finalize the file by clicking in recording or when recording is stopped. When the frame rate was changed during recording, recording stops, and a new file will be created when recording is resumed. When using a laptop computer, the recording will not stop even if the display is closed.p
-
 1
1 -
2
-
3
-
4
-
5
-
6
-
7
-
8
-
9
-
10
-
11
-
12
-
13
-
14
-
15
-
16
-
17
-
18
-
19
-
20
-
21
-
22
-
23
-
24
-
25
-
26
-
27
-
28
-
29
-
30
-
31
-
 32
32 -
 33
33 -
 34
34 -
 35
35 -
 36
36 -
 37
37 -
 38
38 -
 39
39 -
 40
40 -
 41
41 -
 42
42 -
43
-
44
-
45
-
46
-
47
-
48
-
49
-
50
-
51
-
52
-
53
 |
 |
