Canon CONSOLE Image Control & Storage Software v1.1 Console Software Operation - Page 22
Overlaying Marker
 |
View all Canon CONSOLE Image Control & Storage Software v1.1 manuals
Add to My Manuals
Save this manual to your list of manuals |
Page 22 highlights
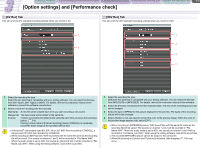
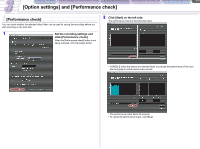
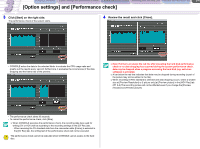
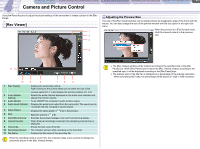
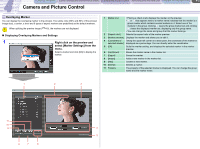
CONSOLE Windows [Option settings] and [Performance check] Camera and Picture Control Recording onto the Hard Disk Playback the Recorded Files 4-2 Camera and Picture Control Overlaying Marker You can display the overlaying marker in the preview. The safety zone (90% and 80% of the preview image size), a center, a level and 8 types of aspect markers are predefined as the default markers. When splitting the preview image ( 4-5), the markers are not displayed. „ Displaying Overlaying Markers and Settings 1 Right click on the preview and select [Marker Settings] from the menu. Select a marker and click [OK] to display the marker. 1 Marker List • Placing a check mark displays the marker on the preview. • or that appears next to a marker name indicates that the marker is a group marker which contains several markers in it. Select one of the markers in the group. Clicking opens the group marker set and clicking closes the displayed marker set, displaying only the group name. • You can change the name and group that the marker belongs. 2 [Aspect ratio] Selects the aspect ratio of the marker preview. 3 [Marker preview] Displays the marker and allows you to edit it. 4 [Coordinate of Taking the upper left corner as a base point, the coordinate of the marker is selected marker] displayed as a percentage. You can directly enter the coordinates. 5 [OK] Quits the marker setting, and displays the selected marker in the marker preview. 6 [Up]/[Down] Moves the marker name in the marker list. 7 [Export] Saves the marker. 8 [Import] Adds a new marker in the marker list. 9 [Add] Creates a new marker. 10 [Delete] Deletes a marker. 11 Property The property of the selected marker is displayed. You can change the group name and the marker name. 1 2 3 11 10 9 4 5 8 7 6
-
 1
1 -
2
-
3
-
4
-
5
-
6
-
7
-
8
-
9
-
10
-
11
-
12
-
13
-
14
-
15
-
16
-
 17
17 -
 18
18 -
 19
19 -
 20
20 -
 21
21 -
 22
22 -
 23
23 -
 24
24 -
 25
25 -
 26
26 -
 27
27 -
28
-
29
-
30
-
31
-
32
-
33
-
34
-
35
-
36
-
37
-
38
-
39
-
40
-
41
-
42
-
43
-
44
-
45
-
46
-
47
-
48
-
49
-
50
-
51
-
52
-
53
 |
 |
