Canon CONSOLE Image Control & Storage Software v1.1 Console Software Operation - Page 32
Importing the Custom Preset
 |
View all Canon CONSOLE Image Control & Storage Software v1.1 manuals
Add to My Manuals
Save this manual to your list of manuals |
Page 32 highlights
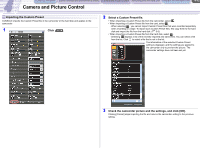
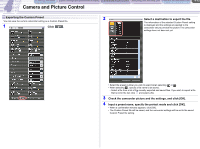
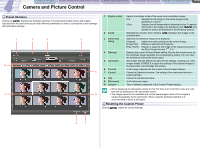
CONSOLE Windows [Option settings] and [Performance check] Camera and Picture Control Recording onto the Hard Disk Playback the Recorded Files Camera and Picture Control 4-12 Importing the Custom Preset CONSOLE imports the Custom Preset file in the camcorder or the hard disk and applies to the camcorder. 1 Click . 2 Select a Custom Preset file. • When importing a Custom Preset file from the camcorder, select . • When importing a Custom Preset file from the card, select . - When selecting , you cannot import Custom Preset files that were recorded separately when recording on a tape. To import such Custom Preset files, first copy them to the hard disk and import the file from the hard disk. ( 6-3) • When importing a Custom Preset file from the hard disk, select . - Selecting displays a list of the recently imported and saved files. You can select a file from the list. Click to select a file that is not in the list. The information of the selected Custom Preset setting is displayed, and the settings are applied to the camcorder only to preview the picture. The camcorder settings have not been set yet. 3 Check the camcorder picture and the settings, and click [OK]. Clicking [Cancel] stops importing the file and returns the camcorder setting to the previous setting.
-
 1
1 -
2
-
3
-
4
-
5
-
6
-
7
-
8
-
9
-
10
-
11
-
12
-
13
-
14
-
15
-
16
-
17
-
18
-
19
-
20
-
21
-
22
-
23
-
24
-
25
-
26
-
 27
27 -
 28
28 -
 29
29 -
 30
30 -
 31
31 -
 32
32 -
 33
33 -
 34
34 -
 35
35 -
 36
36 -
 37
37 -
38
-
39
-
40
-
41
-
42
-
43
-
44
-
45
-
46
-
47
-
48
-
49
-
50
-
51
-
52
-
53
 |
 |
