Canon CONSOLE Image Control & Storage Software v1.1 Console Software Operation - Page 21
Rec Viewer]
 |
View all Canon CONSOLE Image Control & Storage Software v1.1 manuals
Add to My Manuals
Save this manual to your list of manuals |
Page 21 highlights
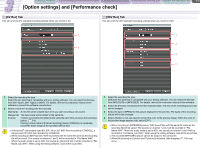
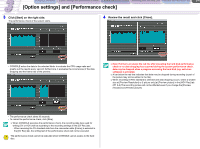
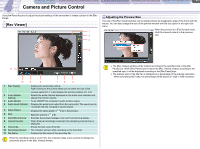
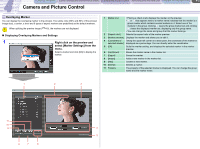
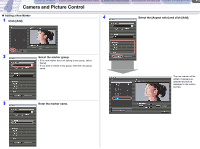
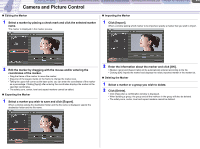
CONSOLE Windows [Option settings] and [Performance check] Camera and Picture Control Recording onto the Hard Disk Playback the Recorded Files 4-1 Camera and Picture Control Using the Recording tool to adjust the picture settings of the camcorder to create a picture in the [Rec Panel]. [Rec Viewer] 1 2 3 Adjusting the Preview Size The size of the [Rec Viewer] window can be adjusted freely by dragging the edge of the frame with the mouse. You can also change the size of the preview window with the size option in the right-click menu. When the preview is in [Full Screen] mode, click the mouse to return to the previous size. 4 11 10 9 8 7 6 5 1 [Rec Viewer] 2 Audio Monitor Settings 3 Audio Monitor 4 Audio Level Indicator 5 Zebra Pattern 6 Split 7 Color/Monochrome 8 Interval Counter 9 Time Code 10 Recording Indicator 11 File Name Displays the camcorder picture. Right-clicking on the picture allows you to select the size of the preview panel ( 4-1) and display the overlay markers ( 4-2). Selects the audio channel displayed on the audio level indicator and adjusts the monitor volume. Turns ON/OFF the computer's audio monitor output. Displays the audio level output from the camcorder. The sound can be monitored with the computer's sound system. Displays the zebra pattern ( 4-5) in the preview. Splits the preview ( 4-5). Switches the preview between color and monochrome display. When [Interval recording] is selected, the remaining interval time is displayed. Shows the time code of the file. The indicator will turn while recording on the hard disk. Displays the file name of the recording file. When the recording mode is set to HDV, the computer takes a few seconds to display the camcorder picture in the [Rec Viewer] window. The [Rec Viewer] window will be resized according to the specified size or the [Rec Panel] size. When [Rec Panel] cannot resize the [Rec Viewer] window according to the specified size, it will be displayed according to the [Rec Panel] size. The preview size on the title bar is displayed as a percentage of the preview resolution. - When previewing HDV data, the percentage will be based on 1920 x 1080 resolution.
-
 1
1 -
2
-
3
-
4
-
5
-
6
-
7
-
8
-
9
-
10
-
11
-
12
-
13
-
14
-
15
-
 16
16 -
 17
17 -
 18
18 -
 19
19 -
 20
20 -
 21
21 -
 22
22 -
 23
23 -
 24
24 -
 25
25 -
 26
26 -
27
-
28
-
29
-
30
-
31
-
32
-
33
-
34
-
35
-
36
-
37
-
38
-
39
-
40
-
41
-
42
-
43
-
44
-
45
-
46
-
47
-
48
-
49
-
50
-
51
-
52
-
53
 |
 |
