Canon CONSOLE Image Control & Storage Software v1.1 Console Software Operation - Page 27
Control] Tab
 |
View all Canon CONSOLE Image Control & Storage Software v1.1 manuals
Add to My Manuals
Save this manual to your list of manuals |
Page 27 highlights
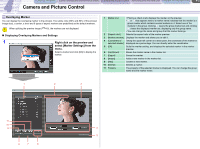
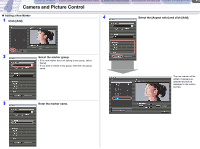
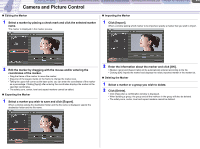
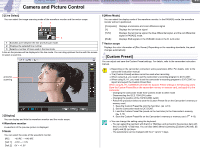
CONSOLE Windows [Option settings] and [Performance check] Camera and Picture Control Recording onto the Hard Disk Playback the Recorded Files 4-7 Camera and Picture Control [Control] Tab When the camcorder is set to the Camera mode, you cannot control all settings on [Control] tab. Set the camcorder's recording program to EXT.CONT. 1 [WHITE BALANCE] You can adjust the white balance by clicking the indicated marks. Placing the mouse cursor on the panel and right clicking the mouse turns the pointer to the right; left clicking the mouse turns the pointer to the left. The panel image differs depending on the camcorder you are connecting. The screen shots below will be displayed when connecting XL H1. 12 3 8 1 6 5 4 1 Auto Automated adjustment of the white balance. 7 2 2 Preset 1-2 / Adjust the white balance to the preset setting. 3 3 4 4 5 Custom White Balance While one of the presets is being selected, clicking on this button registers the white balance setting. For details about saving the white balance settings, refer to the camcorder instruction manual. Color Temperature Specifies the color temperature. Clicking or increases and decreases the value by 100K. You can enter a new value by clicking the Kelvin text box with the mouse and pressing the [Enter] key on the keyboard. Click the [Enter] key again to apply the new value. Indoor (3200K) Incandescent light. 6 Outdoor (5600K) Bright sunlight. 6 5 2 [IRIS] You can set an aperture value. 3 [SHUTTER] You can set the shutter speed.
-
 1
1 -
2
-
3
-
4
-
5
-
6
-
7
-
8
-
9
-
10
-
11
-
12
-
13
-
14
-
15
-
16
-
17
-
18
-
19
-
20
-
21
-
 22
22 -
 23
23 -
 24
24 -
 25
25 -
 26
26 -
 27
27 -
 28
28 -
 29
29 -
 30
30 -
 31
31 -
 32
32 -
33
-
34
-
35
-
36
-
37
-
38
-
39
-
40
-
41
-
42
-
43
-
44
-
45
-
46
-
47
-
48
-
49
-
50
-
51
-
52
-
53
 |
 |
