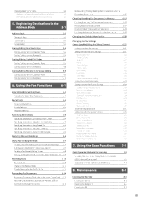
Canon Color imageCLASS MF8350Cdn Color imageCLASS MF8350Cdn/MF8050Cn Basic Ope - Page 7
Canon Color imageCLASS MF8350Cdn Manual
 |
View all Canon Color imageCLASS MF8350Cdn manuals
Add to My Manuals
Save this manual to your list of manuals |
Page 7 highlights
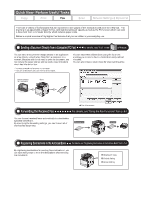
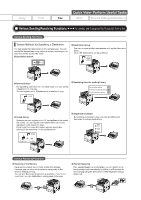
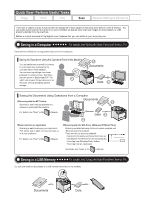
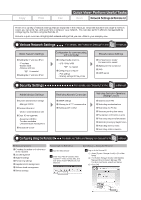
Quick View- Perform Useful Tasks Copy Print Fax Scan Network Settings & Remote UI There are a variety of network settings that are explained in the e-Manual. Since the machine has a built-in network board, you can print, fax, and scan from a computer via a network. You can also perform efficient management by configuring the machine using the Remote UI. Below is a quick overview of highlighted network settings that you can utilize in your everyday use. Various Network Settings Basic Network Settings Setting the IP address (IPv4) - IP address - Subnet mask - Gateway address As needed Setting the IP address (IPv6) For details, see "Network Settings" in the Configuration for communicating with a computer Configuring the machine - LPD, RAW, WSD As needed Configuring a computer - Port settings - Sharing settings for the printer e-Manual. Miscellaneous Settings Communication mode/ Communication speed Waiting time for connection DNS WINS server Security Settings Administration Settings System administrator settings - Manager ID/PIN Device information - Device name/Installation site Dept. ID management - Department ID/PIN/ Function restriction - Unknown ID job management Remote UI On/Off For details, see "Security" in the e-Manual. Restricting Network Connection SNMP settings Allowing the HTTP communication Setting a port number Restricting Destination Operations/ Sending Functions Address book PIN Restricting new destinations Restricting the PC fax Restricting sending from history Fax number confirmation re-entry Restricting sequential broadcast Restricting displaying the job history Restricting memory media Restricting USB connection Configuring Using the Remote UI Remote UI Functions Checking the status and information of the machine Job Management System settings Forwarding settings Department ID management Address book management Device settings For details, see "Setting and Managing from Computer" in the e-Manual → Starting the Remote UI e-Manual. How to start the Remote UI 1 Start the web browser. 2 Enter "http:///" in the address field, and then press the [ENTER] key on your keyboard. 3 Log on to the Remote UI. (1) Select [System Manager Mode] or [End-User Mode]. (2) For [System Manager Mode], enter [System Manager ID] and [System Manager PIN]. For [End-User Mode], enter [User Name]. (3) Click [OK]. (1) (1) (2) (3)
-
 1
1 -
 2
2 -
 3
3 -
 4
4 -
 5
5 -
 6
6 -
 7
7 -
 8
8 -
 9
9 -
 10
10 -
 11
11 -
 12
12 -
13
-
14
-
15
-
16
-
17
-
18
-
19
-
20
-
21
-
22
-
23
-
24
-
25
-
26
-
27
-
28
-
29
-
30
-
31
-
32
-
33
-
34
-
35
-
36
-
37
-
38
-
39
-
40
-
41
-
42
-
43
-
44
-
45
-
46
-
47
-
48
-
49
-
50
-
51
-
52
-
53
-
54
-
55
-
56
-
57
-
58
-
59
-
60
-
61
-
62
-
63
-
64
-
65
-
66
-
67
-
68
-
69
-
70
-
71
-
72
-
73
-
74
-
75
-
76
-
77
-
78
-
79
-
80
-
81
-
82
-
83
-
84
-
85
-
86
-
87
-
88
-
89
-
90
-
91
-
92
-
93
-
94
-
95
-
96
-
97
-
98
-
99
-
100
-
101
-
102
-
103
-
104
-
105
-
106
-
107
-
108
-
109
-
110
-
111
-
112
-
113
-
114
-
115
-
116
-
117
-
118
-
119
-
120
-
121
-
122
-
123
-
124
-
125
-
126
-
127
-
128
-
129
-
130
-
131
-
132
-
133
-
134
-
135
-
136
-
137
-
138
-
139
-
140
-
141
-
142
-
143
-
144
-
145
-
146
-
147
-
148
-
149
-
150
-
151
-
152
-
153
-
154
-
155
-
156
-
157
-
158
-
159
 |
 |
