Canon FAX-JX210P User's Guide - Page 10
Installing the Printer Driver, Notes on the Print Head Alignment
 |
View all Canon FAX-JX210P manuals
Add to My Manuals
Save this manual to your list of manuals |
Page 10 highlights
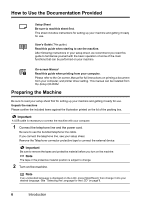
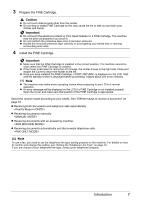
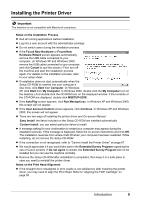
Installing the Printer Driver Important The machine is not compatible with Macintosh computers. Notes on the Installation Process z Quit all running applications before installation. z Log into a user account with the administrator privilege. z Do not switch users during the installation process. z If the Found New Hardware or Found New Hardware Wizard screen appears automatically, remove the USB cable connected to your computer. (In Windows XP and Windows 2000, remove the USB cable connected to your computer and click Cancel to quit the screen.) Then turn off the machine and start the installation process again. For details on the installation process, refer to your setup sheet. z If installation does not start automatically when the Setup CD-ROM is inserted into your computer's disc drive, click Start then Computer. (In Windows XP, click Start then My Computer. In Windows 2000, double-click the My Computer icon on the desktop.) And double-click the CD-ROM icon on the displayed window. If the contents of the CD-ROM are displayed, double-click MSETUP4.EXE. z If the AutoPlay screen appears, click Run Msetup4.exe. In Windows XP and Windows 2000, this screen will not appear. z If the User Account Control screen appears, click Continue. In Windows XP and Windows 2000, this screen will not appear. z There are two ways of installing the printer driver and On-screen Manual: Easy Install: the items included on the Setup CD-ROM are installed automatically Custom Install: you can select particular items to install z A message asking for your confirmation to restart your computer may appear during the installation process. If this message is displayed, follow the on-screen instructions and click OK. The installation resumes from where it left off when your computer has been restarted. While restarting, do not remove the Setup CD-ROM. z If the connection is not recognized, refer to "Cannot Install the Printer Driver" on page 67. z We would appreciate it if you would take part in the Extended Survey Program regarding the use of Canon printers. If Do not agree is clicked, the Extended Survey Program will not be installed but you can use the machine normally. z Remove the Setup CD-ROM after installation is completed, then keep it in a safe place in case you need to reinstall the printer driver. Notes on the Print Head Alignment z If the straight line is misaligned or print quality is not satisfactory after installing the printer driver, you may need to align the Print Head. Refer to "Aligning the FINE Cartridge" on page 55. Introduction 9
-
 1
1 -
2
-
3
-
4
-
 5
5 -
 6
6 -
 7
7 -
 8
8 -
 9
9 -
 10
10 -
 11
11 -
 12
12 -
 13
13 -
 14
14 -
 15
15 -
16
-
17
-
18
-
19
-
20
-
21
-
22
-
23
-
24
-
25
-
26
-
27
-
28
-
29
-
30
-
31
-
32
-
33
-
34
-
35
-
36
-
37
-
38
-
39
-
40
-
41
-
42
-
43
-
44
-
45
-
46
-
47
-
48
-
49
-
50
-
51
-
52
-
53
-
54
-
55
-
56
-
57
-
58
-
59
-
60
-
61
-
62
-
63
-
64
-
65
-
66
-
67
-
68
-
69
-
70
-
71
-
72
-
73
-
74
-
75
-
76
-
77
-
78
-
79
-
80
-
81
-
82
-
83
-
84
-
85
-
86
 |
 |
