Canon FAX-JX210P User's Guide - Page 49
Activity Reports, CALLER ID, How to Print a Report
 |
View all Canon FAX-JX210P manuals
Add to My Manuals
Save this manual to your list of manuals |
Page 49 highlights
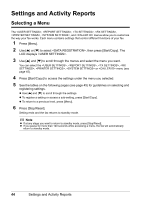
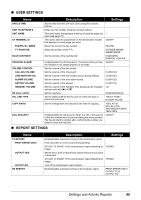
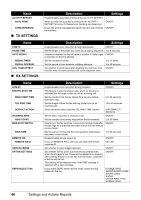
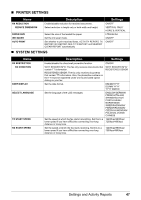
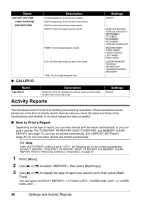
Name DAYLGHT SAV TIME START DATE/TIME END DATE/TIME Description Enable/disable the summer time system. Set the beginning of the summer time period. Set the end of the summer time period. MONTH: Set the beginning/end month. WEEK: Set the beginning/end week. DAY: Set the beginning/end day of the week. „ CALLER ID TIME: Set the beginning/end time. Settings ON/OFF - - MARCH/APRIL/MAY/ JUNE/JULY/AUGUST/ SEPTEMBER/ OCTOBER/ NOVEMBER/ DECEMBER/ JANUARY/FEBRUARY SECOND WEEK/ THIRD WEEK/ FOURTH WEEK/ LAST WEEK/ FIRST WEEK SUNDAY/MONDAY/ TUESDAY/ WEDNESDAY/ THURSDAY/FRIDAY/ SATURDAY - Name CALLER ID Description Determine if the fax displays the caller's name and phone/fax number when receiving a call. Activity Reports Settings ON/OFF Your fax keeps track of most of its sending and receiving operations. These operations can be printed out in the form of activity reports that can help you check the dates and times of fax transmissions and whether or not each transaction was successful. „ How to Print a Report Depending on the type of report, you can have the fax print the report automatically, or you can print it directly. The TX REPORT, RX REPORT, MULTI TX REPORT, and MEMORY CLEAR REPORT (see page 73) can only be printed automatically. See (page 45) on how and when reports are printed automatically. Note If the setting is set to , the following will not be printed automatically: ACTIVITY REPORT, TX REPORT, RX REPORT, MULTI TX REPORT and MEMORY CLEAR REPORT. Refer to "Receiving to Memory Temporarily" on page 37. 1 Press [Menu]. 2 Use [{] or [}] to select , then press [Start/Copy]. 3 Use [{] or [}] to display the type of report you want to print, then press [Start/ Copy]. You can select , , , or . 48 Settings and Activity Reports
-
 1
1 -
2
-
3
-
4
-
5
-
6
-
7
-
8
-
9
-
10
-
11
-
12
-
13
-
14
-
15
-
16
-
17
-
18
-
19
-
20
-
21
-
22
-
23
-
24
-
25
-
26
-
27
-
28
-
29
-
30
-
31
-
32
-
33
-
34
-
35
-
36
-
37
-
38
-
39
-
40
-
41
-
42
-
43
-
 44
44 -
 45
45 -
 46
46 -
 47
47 -
 48
48 -
 49
49 -
 50
50 -
 51
51 -
 52
52 -
 53
53 -
 54
54 -
55
-
56
-
57
-
58
-
59
-
60
-
61
-
62
-
63
-
64
-
65
-
66
-
67
-
68
-
69
-
70
-
71
-
72
-
73
-
74
-
75
-
76
-
77
-
78
-
79
-
80
-
81
-
82
-
83
-
84
-
85
-
86
 |
 |
