Canon FAX-JX210P User's Guide - Page 53
Replacing a FINE Cartridge, Remove the empty FINE Cartridge. - fax machine ink cartridge
 |
View all Canon FAX-JX210P manuals
Add to My Manuals
Save this manual to your list of manuals |
Page 53 highlights
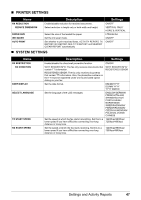
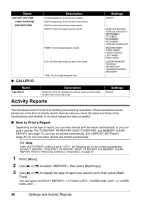
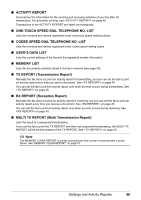
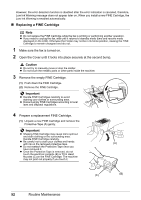
However, the error detection function is disabled after the error indication is canceled, therefore, Low Ink Warning message does not appear later on. When you install a new FINE Cartridge, the Low Ink Warning is enabled automatically. „ Replacing a FINE Cartridge Note z Do not replace the FINE Cartridge while the fax is printing or performing another operation. z If you need to unplug the fax, wait until it returns to standby mode (time and receive mode displayed on the LCD). Otherwise the Holder may not be in its home position, causing the FINE Cartridge to remain uncapped and dry out. 1 Make sure the fax is turned on. 2 Open the Cover until it locks into place securely at the second bump. Caution z Do not try to manually move or stop the Holder. z Do not touch the metallic parts or other parts inside the machine. 3 Remove the empty FINE Cartridge. (1) Push down the FINE Cartridge. (2) Remove the FINE Cartridge. (1) Important z Handle FINE Cartridges carefully to avoid staining your clothes or surrounding area. z Discard empty FINE Cartridges according to local (2) laws and disposal regulations. 4 Prepare a replacement FINE Cartridge. (1) Unpack a new FINE Cartridge and remove the Protective Tape (A) gently. Important z Shaking FINE Cartridge may cause ink to spill out and stain clothing or the surrounding area. Handle FINE Cartridge carefully. z Be careful not to stain your clothes and hands with ink on the removed protective tape. (A) z Do not reattach the Protective Tape once you have removed it. z Once the Protective Tape is removed, do not touch the electrical contacts (B) or Print Head Nozzles (C) on the FINE Cartridge. The machine may not print out properly if you touch it. (C) (B) 52 Routine Maintenance
-
 1
1 -
2
-
3
-
4
-
5
-
6
-
7
-
8
-
9
-
10
-
11
-
12
-
13
-
14
-
15
-
16
-
17
-
18
-
19
-
20
-
21
-
22
-
23
-
24
-
25
-
26
-
27
-
28
-
29
-
30
-
31
-
32
-
33
-
34
-
35
-
36
-
37
-
38
-
39
-
40
-
41
-
42
-
43
-
44
-
45
-
46
-
47
-
 48
48 -
 49
49 -
 50
50 -
 51
51 -
 52
52 -
 53
53 -
 54
54 -
 55
55 -
 56
56 -
 57
57 -
 58
58 -
59
-
60
-
61
-
62
-
63
-
64
-
65
-
66
-
67
-
68
-
69
-
70
-
71
-
72
-
73
-
74
-
75
-
76
-
77
-
78
-
79
-
80
-
81
-
82
-
83
-
84
-
85
-
86
 |
 |
