Canon Microfilm Scanner 350II MS-350II Instruction Manual. 3.01 MB - Page 40
Border removal
 |
View all Canon Microfilm Scanner 350II manuals
Add to My Manuals
Save this manual to your list of manuals |
Page 40 highlights
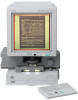
■ SETTING THE SCANNER ■ For example, the illustration shows the vertical set for 4 and the horizontal set for 7. The shaded area is the area trimmed and selected for scanning. 3. To save the setting, press the Border Button. The setting remains in effect even after the power is turned off and turned again. ■ Using the area setting cursors (optional) With the optional Framing kit installed, you can set an area for printing, using the guides on the right side and the bottom of the screen. The area framed by 4 cursors will be scanned. 38 CE-IE-335-01 38 Border removal Border removal allows you either to remove all the black border around the image or to leave a narrow black margin around the image. ■ Removing the entire border Press the border key on the operation panel until the ( tor lights and then scan the image. ) indica- ■ Leaving a margin around the image Press the border key on the operation panel until the( ) indicator lights and then scan the image. The margin is specified in the application software. • Border removal may not operate correctly for images with ill-defined borders. • This function cannot be used when any part of the image is outside the specified range. • If multiple images are displayed on the screen at the same time, the wrong image may be scanned. • This function can only operate if there is a clear area of at least 5 mm around the image. 07.5.14, 14:19
-
 1
1 -
2
-
3
-
4
-
5
-
6
-
7
-
8
-
9
-
10
-
11
-
12
-
13
-
14
-
15
-
16
-
17
-
18
-
19
-
20
-
21
-
22
-
23
-
24
-
25
-
26
-
27
-
28
-
29
-
30
-
31
-
32
-
33
-
34
-
 35
35 -
 36
36 -
 37
37 -
 38
38 -
 39
39 -
 40
40 -
 41
41 -
 42
42 -
 43
43 -
 44
44 -
 45
45 -
46
-
47
-
48
-
49
-
50
-
51
-
52
-
53
-
54
-
55
-
56
-
57
-
58
-
59
-
60
-
61
-
62
 |
 |
