Canon Microfilm Scanner 350II MS-350II Instruction Manual. 3.01 MB - Page 51
Maintenance And, Troubleshooting
 |
View all Canon Microfilm Scanner 350II manuals
Add to My Manuals
Save this manual to your list of manuals |
Page 51 highlights
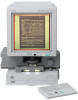
CE-IE-335-01 49 ■ MAINTENANCE AND TROUBLESHOOTING ■ MAINTENANCE AND TROUBLESHOOTING This part of the manual describes how to replace the halogen lamp, cleaning the scanner and dealing with errors. Regular scanner maintenance is essential to eusure optimum performance and a long service life from your scanner. Replacing the lamp The lamp projects the film image onto the screen, and the procedure for replacing the lamp is described below, along with some precautions to be observed when handling the lamp unit. If the lamp burns out, use the procedure below to replace it. When the lamp burns out, "LP" appears on the Print/Error display. HEAT CAUTION Immediately after the lamp burns out, the lamp and the metal components of the lamp unit are very hot. To avoid being burned, allow the lamp ample time to cool down before touching it. The lamp will cool down more quickly if you leave the scanner switched on for some minutes with "LP" displayed. After checking that the lamp and the metal components have cooled down, proceed with lamp replacement. 1. When the lamp burns out, leave the scanner switched on for several minutes until the lamp has cooled down. After waiting at least 5 minutes, check that the lamp has cooled down and then switch the scanner off. 2. Firmly grip the lamp unit on the right side of the main unit and slowly pull the lamp unit out. When you remove the lamp unit, "L5" appears in the Print/Error display. CAUTION To avoid injury, do not touch the interior of the main unit after you have removed the lamp unit. 3. Push the lever on the side of the lamp and remove the burned out lamp. HEAT CAUTION Immediately after the lamp burns out, the lamp and the metal components of the lamp unit are very hot. Never handle the lamp or lamp unit while they are still hot. 49 07.5.14, 14:20
-
 1
1 -
2
-
3
-
4
-
5
-
6
-
7
-
8
-
9
-
10
-
11
-
12
-
13
-
14
-
15
-
16
-
17
-
18
-
19
-
20
-
21
-
22
-
23
-
24
-
25
-
26
-
27
-
28
-
29
-
30
-
31
-
32
-
33
-
34
-
35
-
36
-
37
-
38
-
39
-
40
-
41
-
42
-
43
-
44
-
45
-
 46
46 -
 47
47 -
 48
48 -
 49
49 -
 50
50 -
 51
51 -
 52
52 -
 53
53 -
 54
54 -
 55
55 -
 56
56 -
57
-
58
-
59
-
60
-
61
-
62
 |
 |
