Canon MultiPASS F50 Reference Guide for the MultiPASS F30 and MultiPASS F50 - Page 19
the stack with the right side of the multi, purpose tray. Pinch the paper guide, then
 |
View all Canon MultiPASS F50 manuals
Add to My Manuals
Save this manual to your list of manuals |
Page 19 highlights
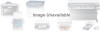
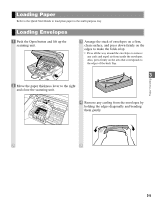
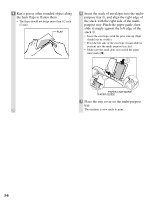
5 Run a pen or other rounded object along the back flaps to flatten them. • The flaps should not bulge more than 0.2 inch (5 mm). FLAP 6 Insert the stack of envelopes into the multipurpose tray ➀, and align the right edge of the stack with the right side of the multipurpose tray. Pinch the paper guide, then slide it snugly against the left edge of the stack ➁. • Insert the envelopes with the print side up (flaps should not be visible). • Feed the left side of the envelope (return address portion) into the multi-purpose tray first. • Make sure the stack does not exceed the paper limit mark (t| ). 1 2 PAPER LIMIT MARK PAPER GUIDE 7 Place the tray cover on the multi-purpose tray. The machine is now ready to print. 3-6
-
 1
1 -
2
-
3
-
4
-
5
-
6
-
7
-
8
-
9
-
10
-
11
-
12
-
13
-
 14
14 -
 15
15 -
 16
16 -
 17
17 -
 18
18 -
 19
19 -
 20
20 -
 21
21 -
 22
22 -
 23
23 -
 24
24 -
25
-
26
-
27
-
28
-
29
-
30
-
31
-
32
-
33
-
34
-
35
-
36
-
37
-
38
-
39
-
40
-
41
-
42
-
43
-
44
-
45
-
46
-
47
-
48
-
49
-
50
-
51
-
52
-
53
-
54
-
55
-
56
-
57
-
58
 |
 |

3-6
5
Run a pen or other rounded object along
the back flaps to flatten them.
•
The flaps should not bulge more than 0.2 inch
(5 mm).
6
Insert the stack of envelopes into the multi-
purpose tray
➀
, and align the right edge of
the stack with the right side of the multi-
purpose tray. Pinch the paper guide, then
slide it snugly against the left edge of the
stack
➁
.
•
Insert the envelopes with the print side up (flaps
should not be visible).
•
Feed the left side of the envelope (return address
portion) into the multi-purpose tray first.
•
Make sure the stack does not exceed the paper
limit mark (|
t
).
7
Place the tray cover on the multi-purpose
tray.
The machine is now ready to print.
1
2
PAPER LIMIT MARK
PAPER GUIDE
FLAP