Canon MultiPASS F50 Reference Guide for the MultiPASS F30 and MultiPASS F50 - Page 36
Replacing an Ink Tank, Quick Start - wrong cartridge
 |
View all Canon MultiPASS F50 manuals
Add to My Manuals
Save this manual to your list of manuals |
Page 36 highlights
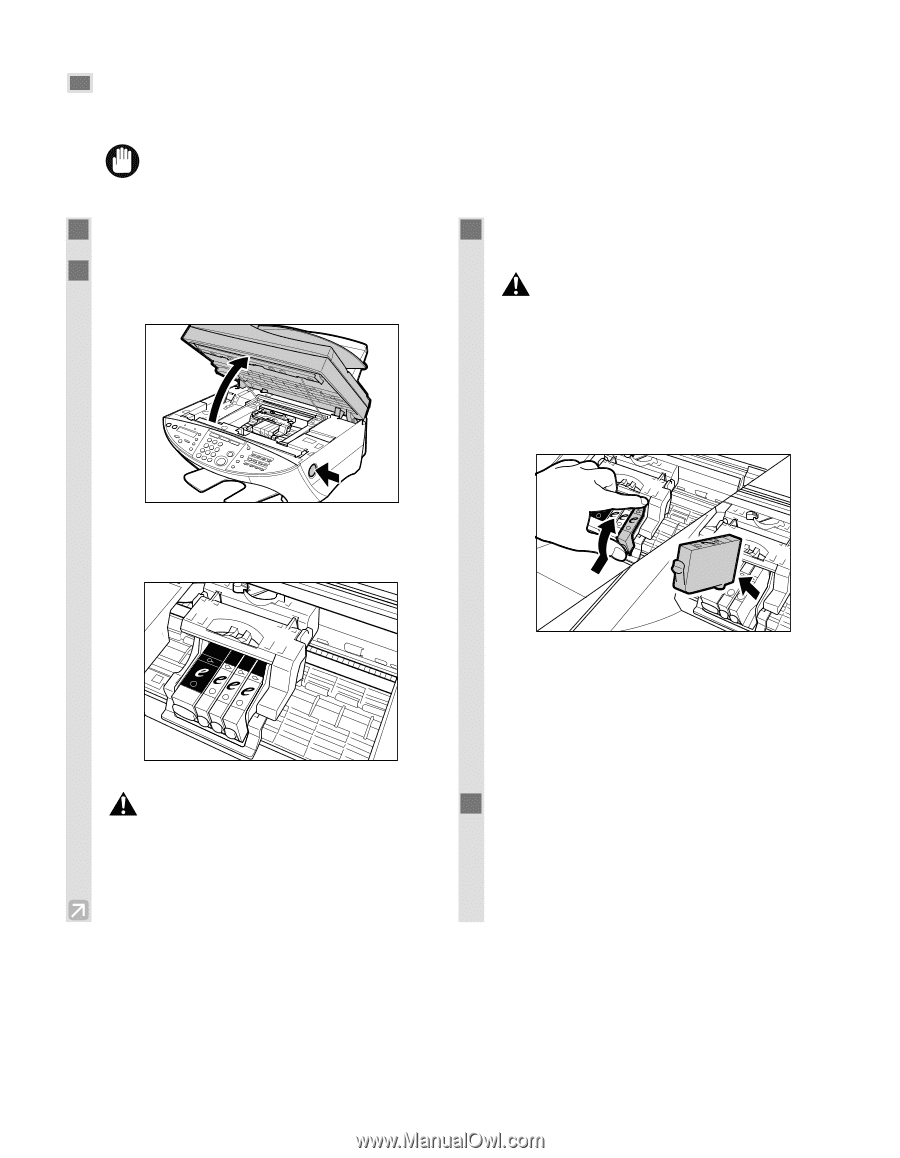
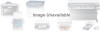
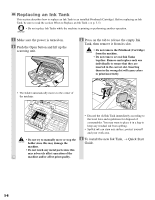
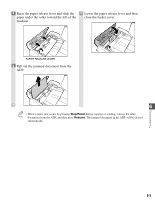
Replacing an Ink Tank This section describes how to replace an Ink Tank in an installed Printhead (Cartridge). Before replacing an Ink Tank, be sure to read the section When to Replace an Ink Tank. (→ p. 5-5) • Do not replace Ink Tanks while the machine is printing or performing another operation. IMPORTANT 1 Make sure the power is turned on. 2 Push the Open button and lift up the scanning unit. 3 Press on the tab to release the empty Ink Tank, then remove it from its slot. • Do not remove the Printhead (Cartridge) CAUTION from the machine. • Do not remove several Ink Tanks together. Remove and replace each one individually to ensure that they are inserted in the correct slot. Inserting them in the wrong slot will cause colors to print incorrectly. • The holder automatically moves to the center of the machine. • Do not try to manually move or stop the CAUTION holder since this may damage the machine. • Do not touch any metal parts since this may adversely affect operation of the machine and/or affect print quality. • Discard the old Ink Tank immediately according to the local laws and regulations for disposal of consumables. You may want to place it in a bag to keep any residual ink from spilling. • Spilled ink can stain any surface; protect yourself and your work area. 4 To install the new Ink Tank, → Quick Start Guide. 5-6
-
 1
1 -
2
-
3
-
4
-
5
-
6
-
7
-
8
-
9
-
10
-
11
-
12
-
13
-
14
-
15
-
16
-
17
-
18
-
19
-
20
-
21
-
22
-
23
-
24
-
25
-
26
-
27
-
28
-
29
-
30
-
 31
31 -
 32
32 -
 33
33 -
 34
34 -
 35
35 -
 36
36 -
 37
37 -
 38
38 -
 39
39 -
 40
40 -
 41
41 -
42
-
43
-
44
-
45
-
46
-
47
-
48
-
49
-
50
-
51
-
52
-
53
-
54
-
55
-
56
-
57
-
58
 |
 |