Canon PIXMA MX300 MX300 series Quick Start Guide - Page 61
Routine Maintenance, When Printing Becomes Faint or Colors Are Incorrect - cartridges
 |
View all Canon PIXMA MX300 manuals
Add to My Manuals
Save this manual to your list of manuals |
Page 61 highlights
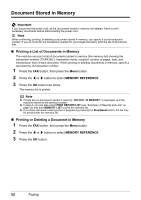
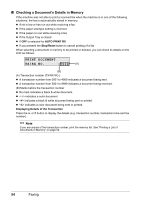
Routine Maintenance When Printing Becomes Faint or Colors Are Incorrect When printing becomes faint or colors are incorrect, the print head nozzles on FINE Cartridges are probably clogged. Print the nozzle check pattern to confirm the condition of the nozzles and then perform Print Head Cleaning. If print results are not satisfactory, performing Print Head Alignment may improve print quality. Note Before performing maintenance z Make sure that a FINE Cartridge has not run out of ink. See "Getting the Ink Status Information" on page 64. z Make sure that a FINE Cartridge is installed properly. See "Replacing FINE Cartridges" on page 67. z Make sure that the orange protective tape is removed from the bottom of a FINE Cartridge. z If the error message is displayed on the LCD, see "An Error Message Is Displayed on the LCD" on page 76. z Increase the Print Quality setting in the printer driver settings. Refer to the PC Printing Guide on-screen manual. Step 1 See "Printing the Nozzle Check Pattern" on page 58. If lines are missing or if white streaks appear Step 2 See "Print Head Cleaning" on page 60. If the problem is not resolved after performing Print Head Cleaning twice After cleaning the Print Head, print and examine the nozzle check pattern. Step 3 See "Print Head Deep Cleaning" on page 61. If the problem is not resolved after performing Print Head Deep Cleaning twice Step 4 See "Replacing a FINE Cartridge" on page 64. Note If the straight line is misaligned or the Print Head position is misaligned, align the Print Head position. See "Aligning the Print Head" on page 62. Routine Maintenance 57
-
 1
1 -
2
-
3
-
4
-
5
-
6
-
7
-
8
-
9
-
10
-
11
-
12
-
13
-
14
-
15
-
16
-
17
-
18
-
19
-
20
-
21
-
22
-
23
-
24
-
25
-
26
-
27
-
28
-
29
-
30
-
31
-
32
-
33
-
34
-
35
-
36
-
37
-
38
-
39
-
40
-
41
-
42
-
43
-
44
-
45
-
46
-
47
-
48
-
49
-
50
-
51
-
52
-
53
-
54
-
55
-
 56
56 -
 57
57 -
 58
58 -
 59
59 -
 60
60 -
 61
61 -
 62
62 -
 63
63 -
 64
64 -
 65
65 -
 66
66 -
67
-
68
-
69
-
70
-
71
-
72
-
73
-
74
-
75
-
76
-
77
-
78
-
79
-
80
-
81
-
82
-
83
-
84
-
85
-
86
-
87
-
88
-
89
-
90
-
91
-
92
-
93
-
94
-
95
-
96
-
97
-
98
-
99
-
100
-
101
-
102
-
103
-
104
-
105
-
106
-
107
-
108
-
109
-
110
-
111
-
112
-
113
-
114
-
115
-
116
-
117
-
118
-
119
-
120
 |
 |