Canon PIXMA i900D i900D Quick Start Guide - Page 45
Aligning the Print Head
 |
View all Canon PIXMA i900D manuals
Add to My Manuals
Save this manual to your list of manuals |
Page 45 highlights
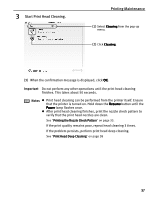
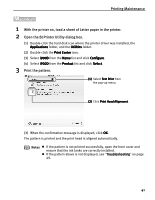
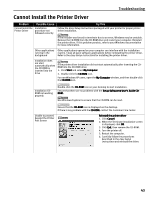
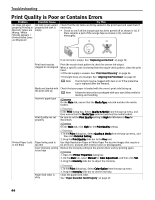
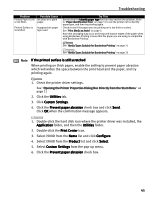
Printing Maintenance Aligning the Print Head This operation must be carried out when using the printer for the first time. Aligning the print head allows you to print without shifts in the color registration. Print head alignment is performed either automatically or manually. This section deals with automatic print head alignment only. For details on how to align the print head manually, refer to the User's Guide. 1 With the printer on, load a sheet of Letter paper in the printer. 2 Open the Printer Properties dialog box. See "Opening the Printer Properties Dialog Box Directly from the Start Menu" on page 11. 3 Align the Print Head automatically. (1) Click the Maintenance tab. (2) Click Print Head Alignment. (3) Check that paper is loaded in the printer and click OK. If a message warning you not to perform other operations appears, click OK. The pattern is printed. (4) When the confirmation message is displayed, click Yes. The print head is aligned automatically. Notes z If the pattern is not printed successfully, open the front cover and ensure that the ink tanks are correctly installed. z If the pattern above is not displayed, see "Troubleshooting" on page 49. 40
-
 1
1 -
2
-
3
-
4
-
5
-
6
-
7
-
8
-
9
-
10
-
11
-
12
-
13
-
14
-
15
-
16
-
17
-
18
-
19
-
20
-
21
-
22
-
23
-
24
-
25
-
26
-
27
-
28
-
29
-
30
-
31
-
32
-
33
-
34
-
35
-
36
-
37
-
38
-
39
-
 40
40 -
 41
41 -
 42
42 -
 43
43 -
 44
44 -
 45
45 -
 46
46 -
 47
47 -
 48
48 -
 49
49 -
 50
50 -
51
-
52
-
53
-
54
-
55
-
56
-
57
-
58
-
59
-
60
-
61
-
62
-
63
-
64
-
65
-
66
-
67
-
68
 |
 |
