Canon PowerShot A510 PowerShot A520/A510 Camera User Guide - Page 24
Date/Time, - set date time
 |
View all Canon PowerShot A510 manuals
Add to My Manuals
Save this manual to your list of manuals |
Page 24 highlights
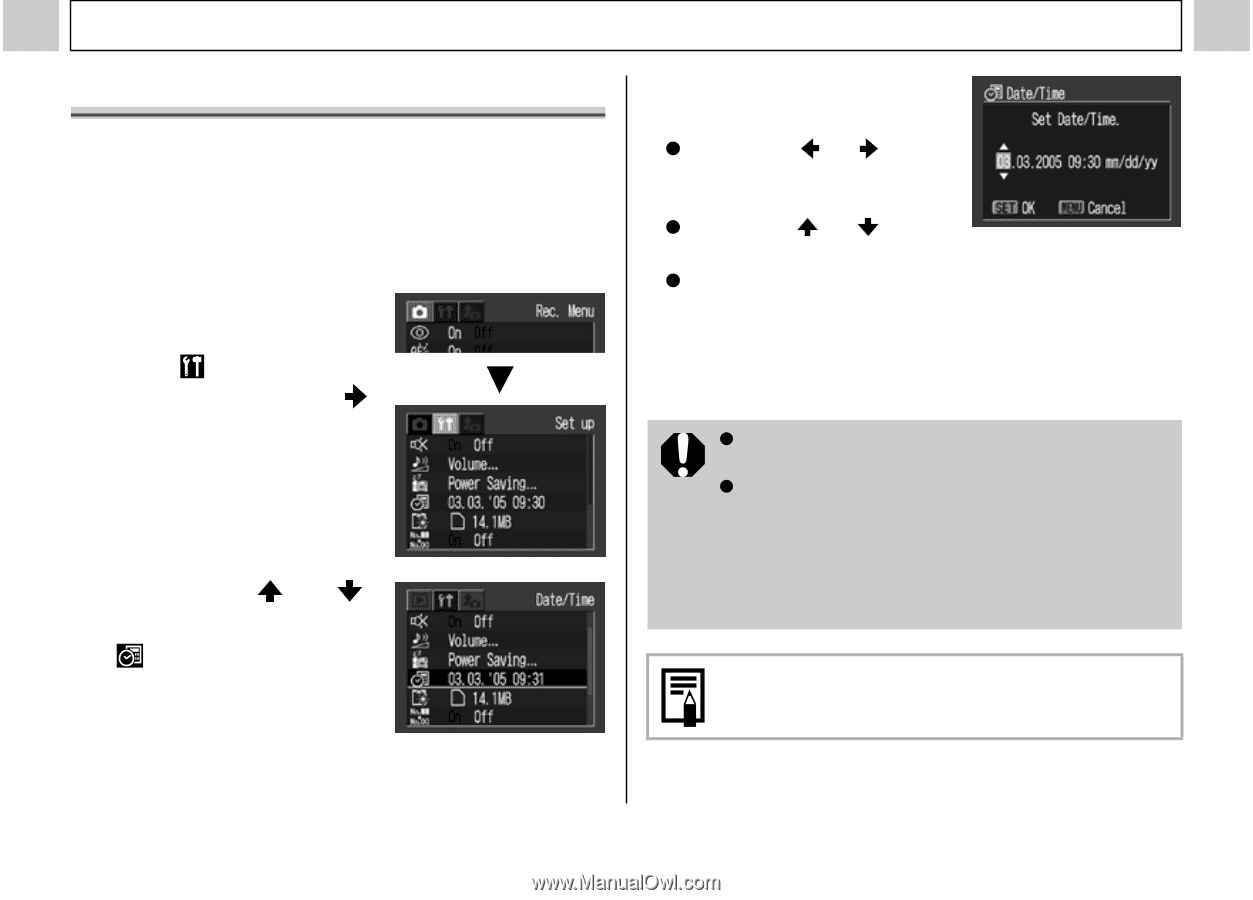
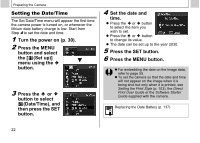
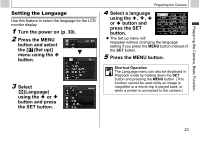
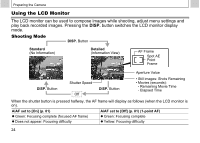
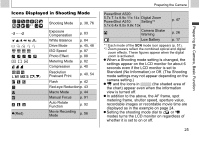
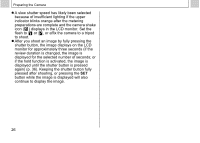
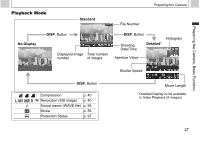
Preparing the Camera Setting the Date/Time The Set Date/Time menu will appear the first time the camera power is turned on, or whenever the lithium date battery charge is low. Start from Step 4 to set the date and time. 1 Turn the power on (p. 30). 2 Press the MENU button and select the [ (Set up)] menu using the button. 3 Press the or button to select (Date/Time), and then press the SET button. 4 Set the date and time. z Press the or button to select the item you wish to set. z Press the or button to change its value. z The date can be set up to the year 2030. 5 Press the SET button. 6 Press the MENU button. z For embedding the date on the image data, refer to page 55. z To set the camera so that the date and time will not appear on the image when it is being shot but only when it is printed, see Setting the Print Style (p. 103), the Direct Print User Guide or the Software Starter Guide supplied with the camera. Replacing the Date Battery (p. 137) 22
-
 1
1 -
2
-
3
-
4
-
5
-
6
-
7
-
8
-
9
-
10
-
11
-
12
-
13
-
14
-
15
-
16
-
17
-
18
-
 19
19 -
 20
20 -
 21
21 -
 22
22 -
 23
23 -
 24
24 -
 25
25 -
 26
26 -
 27
27 -
 28
28 -
 29
29 -
30
-
31
-
32
-
33
-
34
-
35
-
36
-
37
-
38
-
39
-
40
-
41
-
42
-
43
-
44
-
45
-
46
-
47
-
48
-
49
-
50
-
51
-
52
-
53
-
54
-
55
-
56
-
57
-
58
-
59
-
60
-
61
-
62
-
63
-
64
-
65
-
66
-
67
-
68
-
69
-
70
-
71
-
72
-
73
-
74
-
75
-
76
-
77
-
78
-
79
-
80
-
81
-
82
-
83
-
84
-
85
-
86
-
87
-
88
-
89
-
90
-
91
-
92
-
93
-
94
-
95
-
96
-
97
-
98
-
99
-
100
-
101
-
102
-
103
-
104
-
105
-
106
-
107
-
108
-
109
-
110
-
111
-
112
-
113
-
114
-
115
-
116
-
117
-
118
-
119
-
120
-
121
-
122
-
123
-
124
-
125
-
126
-
127
-
128
-
129
-
130
-
131
-
132
-
133
-
134
-
135
-
136
-
137
-
138
-
139
-
140
-
141
-
142
-
143
-
144
-
145
-
146
-
147
-
148
-
149
-
150
-
151
-
152
-
153
-
154
-
155
-
156
-
157
-
158
-
159
-
160
-
161
-
162
-
163
 |
 |