Canon S300 S300 Quick Start Guide - Page 45
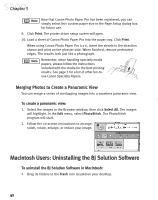
Merging Photos to Create a Panoramic View
 |
UPC - 013803006315
View all Canon S300 manuals
Add to My Manuals
Save this manual to your list of manuals |
Page 45 highlights
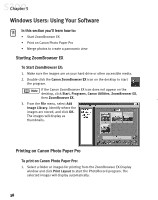
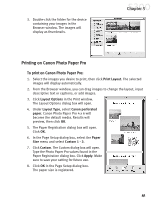
Chapter 5 2. From the PhotoRecord window, you can drag images to change the layout, input descriptive text or captions, or add images. 3. Click Album Settings. The Album Settings dialog box will appear. 4. Make sure the Canon S300 is the selected printer. 5. Under Album Type, select Canon perforated paper printing. Canon Photo Paper Pro 4 x 6 will become the default media. The results will preview, click OK. 6. Load a sheet of Canon Photo Paper Pro into the paper tray, then click Instant Print. When using Canon Photo Paper Pro 4 x 6, insert the sheets in the direction shown and print on the glossier side. When finished, remove perforated edges. The results look just like a photograph. Remember, when handling specialty media papers, always follow the instructions included with the media for the best printing results. See page 3 for a list of other fun-touse Canon Specialty Papers. Merging Photos to Create a Panoramic View You can merge a series of overlapping images into a seamless panoramic view. To create a panoramic view: 1. Select the images in the ZoomBrowser window, then click Select All. The images will highlight. From the Edit menu, select PhotoStitch. The PhotoStitch program will start. 39
-
 1
1 -
2
-
3
-
4
-
5
-
6
-
7
-
8
-
9
-
10
-
11
-
12
-
13
-
14
-
15
-
16
-
17
-
18
-
19
-
20
-
21
-
22
-
23
-
24
-
25
-
26
-
27
-
28
-
29
-
30
-
31
-
32
-
33
-
34
-
35
-
36
-
37
-
38
-
39
-
 40
40 -
 41
41 -
 42
42 -
 43
43 -
 44
44 -
 45
45 -
 46
46 -
 47
47 -
 48
48 -
 49
49 -
 50
50 -
51
-
52
-
53
-
54
-
55
-
56
-
57
-
58
-
59
-
60
-
61
-
62
-
63
-
64
 |
 |
