Canon SELPHY ES2 SELPHY ES2 / ES20 Printer User Guide
Canon SELPHY ES2 Manual
 |
View all Canon SELPHY ES2 manuals
Add to My Manuals
Save this manual to your list of manuals |
Canon SELPHY ES2 manual content summary:
- Canon SELPHY ES2 | SELPHY ES2 / ES20 Printer User Guide - Page 1
Printer User Guide ENGLISH CDP-E059-010 © 2007 CANON INC. - Canon SELPHY ES2 | SELPHY ES2 / ES20 Printer User Guide - Page 2
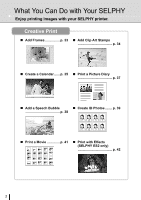
images with your SELPHY printer. Creative Print „ Add Frames p. 33 „ Add Clip Art Stamps p. 34 „ Create a Calendar ...... p. 35 „ Print a Picture Diary p. 37 „ Add a Speech Bubble „ Create ID Photos........ p. 39 p. 38 „ Print a Movie p. 41 „ Print with Effects (SELPHY ES2 only p. 42 - Canon SELPHY ES2 | SELPHY ES2 / ES20 Printer User Guide - Page 3
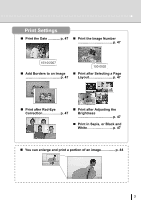
Print Settings „ Print the Date p. 47 „ Print the Image Number p. 47 „ Add Borders to an Image „ Print after Selecting a Page p. 47 Layout p. 47 „ Print after Red-Eye Correction p. 47 „ Print after Adjusting the Brightness p. 47 „ Print in Sepia, or Black and White p. 47 „ You can - Canon SELPHY ES2 | SELPHY ES2 / ES20 Printer User Guide - Page 4
EZ Navigator Select how you wish to use your SELPHY printer. Digital Camera Images USB Cable 52 Camera Equipped Mobile Phone Images Memory Card 24 Infrared (SELPHY ES2 only)/ Bluetooth 55 Images on Your PC USB Cable 59 Print on Location 4 Battery 72 - Canon SELPHY ES2 | SELPHY ES2 / ES20 Printer User Guide - Page 5
You Can Do with Your SELPHY 2 About This Guide 6 Getting Started 7 Printing from Memory Cards 24 Printing from Camera 52 Printing from a Mobile Phone (Wireless Printing)..........55 Printing from a PC 59 Using the Battery Pack (SELPHY ES2 only 72 Appendix 77 Troubleshooting 92 Index 101 5 - Canon SELPHY ES2 | SELPHY ES2 / ES20 Printer User Guide - Page 6
use Canon digital cameras. z This guide primarily uses illustrations of the SELPHY ES2 and its LCD monitor. Unless otherwise noted, the instructions are the same for the SELPHY ES20. Similarly, the screen shots from the LCD monitor show a "P" for the Postcard-Size ink and paper integrated cartridge - Canon SELPHY ES2 | SELPHY ES2 / ES20 Printer User Guide - Page 7
Getting Started Getting Started 7 - Canon SELPHY ES2 | SELPHY ES2 / ES20 Printer User Guide - Page 8
contact the store where you purchased this product. Main Printer Unit 10 Print Trial Cartridge (Postcard size) Cleaner Unit (Inserted prior to shipment) Compact Photo Printer Solution Disk • SELPHY Beginner's Guide • Warranty Card Compact Power Adapter (CA-ES100) Power Cord 8 Getting Started - Canon SELPHY ES2 | SELPHY ES2 / ES20 Printer User Guide - Page 9
(Sold Separately) Ink and paper integrated cartridge. The cartridge differs depending on the paper size and ink type. Please refer to the Cartridge Type table below. Cartridge You can print outdoors, or at locations without a power outlet (p. 72) (SELPHY ES2 only). Battery Pack NB-ES1L You - Canon SELPHY ES2 | SELPHY ES2 / ES20 Printer User Guide - Page 10
infrared data from a mobile phone (SELPHY ES2 only). Open to insert a memory card or card adapter with a memory card inserted. Paper is deposited here after printing. The cartridge is inserted into this compartment. Slide down to eject a cartridge. Open to replace a cartridge. Slide up to open the - Canon SELPHY ES2 | SELPHY ES2 / ES20 Printer User Guide - Page 11
Handle Used for carrying the printer (p. 83). 2 Battery Cover (SELPHY ES2 Remove to install a battery pack. only) 3 Battery Cover Lever (SELPHY ES2 only) Slide up to remove the battery cover. 4 DC IN (Power Input) Terminal Connects to the compact power adapter. 5 Air Vents Dissipates heat - Canon SELPHY ES2 | SELPHY ES2 / ES20 Printer User Guide - Page 12
and printing a portion of the image (trimming). Indicates the printer status. Lit Green: Power on Blinking Green: Printing or communicating Lit Orange: Charging the battery pack (SELPHY ES2 only) Blinking Orange: Battery pack depleted or temperature is not within the operating temperature range for - Canon SELPHY ES2 | SELPHY ES2 / ES20 Printer User Guide - Page 13
Components Guide 8 LCD Monitor 9 Button 10 , , , (Up, Down, Left, Right) Buttons 11 Easy-Scroll Wheel (SELPHY ES2 only) 12 Button Display is the screen that displays the images on a memory card after turning the power on. z You can switch between Multi View or Single View by pressing or in - Canon SELPHY ES2 | SELPHY ES2 / ES20 Printer User Guide - Page 14
Components Guide Information Views You can switch the image information views by pressing . Total Number of Images the total number of images on a memory card. 7 Battery Status (SELPHY ES2 only) Displays the battery status (p. 75). 8 Recording Pixels Displays the recording pixels (otherwise, - Canon SELPHY ES2 | SELPHY ES2 / ES20 Printer User Guide - Page 15
standard one and is not shown ). : About 1/4 full or more. : About 1/8 full or more. : The cartridge is empty. No Display: The status is unknown. Displays operation guides. Follow the instructions to use the printer. The Jump Function Pressing in Single View in the Main Display, or in the Creative - Canon SELPHY ES2 | SELPHY ES2 / ES20 Printer User Guide - Page 16
Components Guide Easy-Scroll Wheel (SELPHY ES2 only) The SELPHY ES2 allows you to select images or menu items, increase or decrease the number of prints, and enlarge or reduce the trimming frame, just by turning - Canon SELPHY ES2 | SELPHY ES2 / ES20 Printer User Guide - Page 17
, or pull out the ink sheet or papers. There may not be enough ink left for the allotted sheets, or paper jams or poor printing may result. • Do not handle the cartridge with wet or sweaty hands. • Please use only cartridges specified for use with the SELPHY ES series. (Cartridges for the CP series - Canon SELPHY ES2 | SELPHY ES2 / ES20 Printer User Guide - Page 18
unit that is inside and remove it. 4 Make sure that the cartridge is oriented as shown on the direction indicator on the inside of the printer, and insert the cartridge until it clicks into place. Direction indicator Protective paper 5 Press the area marked PUSH to close the cover. 18 Getting - Canon SELPHY ES2 | SELPHY ES2 / ES20 Printer User Guide - Page 19
Replacing the Cartridge 1 • When inserting the cartridge into the printer, if the ink sheet is so slack it catches, insert the cleaner unit and turn it slowly to take up the slack. • It will not be possible to use all the paper for printing if you overwind the ink sheet. 4 • The colored paper on the - Canon SELPHY ES2 | SELPHY ES2 / ES20 Printer User Guide - Page 20
17). 2 • You can check the type of cartridge and the amount of remaining paper (ink) loaded in the printer, by the icons displayed in the print confirmation, printing or standby screens (p. 15). • After power is turned on, or immediately after the cartridge cover is opened or closed, the status icon - Canon SELPHY ES2 | SELPHY ES2 / ES20 Printer User Guide - Page 21
Storing Cartridges Preparing/Replacing the Cartridge • When storing cartridges, return the cartridge to its original package. Getting Started 21 - Canon SELPHY ES2 | SELPHY ES2 / ES20 Printer User Guide - Page 22
in.) 10 cm (4 in.) 1 Place the printer on a flat surface. 2 Connect the supplied power cord to the supplied compact power adapter. 3 Insert the plug into a power outlet. 4 Connect the compact power adapter to the printer. • The SELPHY ES2 can also be used with the separately sold battery pack NB - Canon SELPHY ES2 | SELPHY ES2 / ES20 Printer User Guide - Page 23
printing. z Do not eject the cartridge or open the cartridge cover right after turning the power on or while printing. It may result in equipment damage. z During the printing operation, paper is temporarily output from the printer. Do not touch the paper until printing ends. This could impede - Canon SELPHY ES2 | SELPHY ES2 / ES20 Printer User Guide - Page 24
Printing from Memory Cards Print images from a memory card that is inserted into the printer. • Make sure that a camera or computer is not connected to the printer. • This SELPHY printer supports image data conforming to the Design rule for Camera File system (Exif compliant) and DPOF (Ver.1.00) - Canon SELPHY ES2 | SELPHY ES2 / ES20 Printer User Guide - Page 25
be sure to first insert the memory card into the adapter before inserting the adapter into the appropriate card slot. If you insert the memory card into a card slot without first inserting into an adapter, you may not be able to remove the memory card from the printer. Printing from Memory Cards 25 - Canon SELPHY ES2 | SELPHY ES2 / ES20 Printer User Guide - Page 26
Inserting a Memory Card Insert a single memory card into the printer. • Please refer to the user guide included with your memory card for handling instructions. 1 Press until the power lamp lights green to turn on the power. • The startup screen appears on the LCD monitor. 2 Insert a single memory - Canon SELPHY ES2 | SELPHY ES2 / ES20 Printer User Guide - Page 27
Print Selected Photos (Basic Printing) You can select images, specify the number of prints for each, and then print them all out. 1 Turn the printer on, and insert the memory card into the appropriate memory card slot (p. 26). 2 Press or to select images. 3 Press or of prints. to specify the - Canon SELPHY ES2 | SELPHY ES2 / ES20 Printer User Guide - Page 28
Print all the images on the memory card. 1 Turn the printer on, and insert the memory card into the appropriate memory card slot (p. 26). 2 Press Photos] with and select [Print All or . 3 • Press or to specify the number of prints. 3 Press and check the settings. Print image Number of images - Canon SELPHY ES2 | SELPHY ES2 / ES20 Printer User Guide - Page 29
to the DPOF (Digital Print Order Format) setting specified on the camera. For details on the DPOF settings, refer to the user guide provided with your camera. 1 Turn the printer on, and insert the memory card into the appropriate memory card slot (p. 26). 2 Press Print] with and select [DPOF or - Canon SELPHY ES2 | SELPHY ES2 / ES20 Printer User Guide - Page 30
played back and an image can be printed by pausing auto play while that image is displayed. Each image displays for 3 seconds. 1 Turn the printer on, and insert the memory card in the appropriate memory card slot (p. 26). 2 Press Play] with and select [Auto or . 3 • Press during auto play - Canon SELPHY ES2 | SELPHY ES2 / ES20 Printer User Guide - Page 31
for easy printing of images in a few simple steps, following the instructions on the screen. With this function, Frames, Clip Art, Calendar, Multi Layout, Speech Bubble, ID Photo, Movie Print and Image Effects (SELPHY ES2 only) options are available. Frames Images with added frames are printed - Canon SELPHY ES2 | SELPHY ES2 / ES20 Printer User Guide - Page 32
] is not displayed. • Image Effects displays only on the SELPHY ES2. 3 • Settings such as the page layout and speech bubbles are retained after turning the power off. 4 • The function settings are retained on the printer even if the power is turned off. • Multiple functions cannot be applied to an - Canon SELPHY ES2 | SELPHY ES2 / ES20 Printer User Guide - Page 33
Creative Print How to Set Menu Items Frames 1 Select [Frames] in [Creative Print]. • For selecting [Frames], refer to How to Use the Menu (p. 32). 2 Press or to select the image and press . 1 • [Frames] is available only for Postcard size. When using L size or card size, [Frames] is not displayed - Canon SELPHY ES2 | SELPHY ES2 / ES20 Printer User Guide - Page 34
, , or to select the desired clip art stamp and press . 4 • Press to add clip art stamps and place it. • A single image can contain up to 10 clip art stamps. • Press or to rotate the clip art stamp. • If you press while selecting one or more clip art stamps, the confirmation screen - Canon SELPHY ES2 | SELPHY ES2 / ES20 Printer User Guide - Page 35
5 Check the settings on the screen. 6 Press . • Printing starts. Creative Print 5 • Use or for specifying the number of prints. Calendar 1 Select [Calendar] in [Creative Print]. • For selecting [Calendar], refer to How to Use the Menu (p. 32). 2 Press , , or to select the desired layout and press - Canon SELPHY ES2 | SELPHY ES2 / ES20 Printer User Guide - Page 36
• National holidays cannot be set. • The names of the days of the week on the calendar are printed in the language set in [Language] in [Printer Setup]. 5 • Press to enlarge and print a portion of an image (trimming) (p. 44). • If you layout and trim the image, the trimming frame has an arrow - Canon SELPHY ES2 | SELPHY ES2 / ES20 Printer User Guide - Page 37
Multi Layout 1 Select [Multi Layout] in [Creative Print]. • For selecting [Multi Layout], refer to How to Use the Menu (p. 32). 2 Press , , or to select the desired layout and press . 3 Press , , or to select the desired background color and press . Creative Print 4 • A preview of the layout is - Canon SELPHY ES2 | SELPHY ES2 / ES20 Printer User Guide - Page 38
Creative Print 5 Check the settings on the screen. 6 Press . • Printing starts. 5 • Use or for specifying the number of prints. Speech Bubble 1 Select [Speech Bubble] in [Creative Print]. • For selecting [Speech Bubble], refer to How to Use the Menu (p. 32). 2 Press or press . to select an - Canon SELPHY ES2 | SELPHY ES2 / ES20 Printer User Guide - Page 39
number of prints. 5 Press , , or to place the speech bubble where you wish and press . 6 Check the settings on the screen. 7 Press . • Printing starts. ID Photo 1 Select [ID Photo] in [Creative Print]. • For selecting [ID Photo], refer to How to Use the Menu (p. 32). Printing from Memory Cards 39 - Canon SELPHY ES2 | SELPHY ES2 / ES20 Printer User Guide - Page 40
the image to the desired size and press . • The print confirmation screen is displayed. 2 • You can print an ID photo from an image that equals the recording pixels of Canon brand digital cameras' L (Large) mode such as the PowerShot series. • If you have selected an image that cannot be printed - Canon SELPHY ES2 | SELPHY ES2 / ES20 Printer User Guide - Page 41
How to Use the Menu (p. 32). 2 Press or to select the image and press . • The print confirmation screen is displayed. 1 • Only movies shot with Canon digital cameras, such as the PowerShot series, can be printed. • You cannot playback movies. 2 • The first frame of a movie is displayed in the movie - Canon SELPHY ES2 | SELPHY ES2 / ES20 Printer User Guide - Page 42
Creative Print Image Effects (SELPHY ES2 only) Faded Edges Soft Edges Soft Focus Star Lights Creates the effect of the center of the image being clear while the surrounding area is - Canon SELPHY ES2 | SELPHY ES2 / ES20 Printer User Guide - Page 43
Creative Print 3 Press or press . to select the image and • The print confirmation screen is displayed. 4 • Use or for specifying the number of prints. 4 Check the settings on the screen. 5 Press . • Printing starts. Printing from Memory Cards 43 - Canon SELPHY ES2 | SELPHY ES2 / ES20 Printer User Guide - Page 44
in Creative Printing (p. 35), [Multi Layout] mode (p. 37), and [ID Photo] mode (p. 39). Basic Operation for Trimming 1 Press or wish to trim. to select the image you . • The trimming setting screen is displayed on the printer's LCD monitor. 1 • You cannot trim an image smaller than 640 x 480, - Canon SELPHY ES2 | SELPHY ES2 / ES20 Printer User Guide - Page 45
Enlarging and Printing a Portion of an Image (Trimming) 4 Press , , or to set the trimming area. 6 • Press to print images set for trimming and other selected images at the same time (only for Basic Printing (p. 27)). 7 • The trim setting is canceled after printing has finished. 5 Press or to set - Canon SELPHY ES2 | SELPHY ES2 / ES20 Printer User Guide - Page 46
Settings You can set print-related items, such as date on or off, border or borderless, print layout. How to Use the Menu 1 Turn the printer on and press . 2 Press or to select [Print Settings] and press . • The print setting menu is displayed. 3 Press or to select an item and press - Canon SELPHY ES2 | SELPHY ES2 / ES20 Printer User Guide - Page 47
Sets the number of images to print on a single Refer to p. 49 sheet of paper, the number of images to print, or to make an index print. Correct RedEye*1 *2 Images cannot be displayed when using the black and white cartridge (Easy Photo Pack E-P25BW). *3 The default date format varies by region. - Canon SELPHY ES2 | SELPHY ES2 / ES20 Printer User Guide - Page 48
- {{{{ - - { Borders { { {* { Page Layout { { {* - -------- * [Print Type] set to [Standard] in [Print Settings] (when using a Canon digital camera) : Frames : Clip Art : Calendar : Multi Layout : Speech Bubble : ID Photo : Movie Print : Image Effects 48 Printing from Memory Cards - Canon SELPHY ES2 | SELPHY ES2 / ES20 Printer User Guide - Page 49
side with a marker pen. • The page layout you can select differs according to the paper you use. • You can set bordered or borderless when the setting is 1-up, 2-up [Index] and the print mode is set to [Print All Photos] (p. 28), all of the images in memory card can be printed out as a - Canon SELPHY ES2 | SELPHY ES2 / ES20 Printer User Guide - Page 50
Print Settings Adjust Image Off ( ) Brightness Prints the image without adjusting image. Corrects the image brightness. Contrast Corrects the difference between light and dark (gradation) areas of the image. Sharpness Corrects the outline of the image. : Makes the image darker. : Makes the - Canon SELPHY ES2 | SELPHY ES2 / ES20 Printer User Guide - Page 51
My Colors Print Settings Off ( ) The image is printed out without the My Colors function applied. Vivid Neutral Contrast and color depth are enhanced to produce strong hues. Contrast and color depth are suppressed to produce subdued hues. Sepia Images are printed out in sepia tone. B/W - Canon SELPHY ES2 | SELPHY ES2 / ES20 Printer User Guide - Page 52
supporting (PictBridge) or (Direct Print) by connecting it to the printer printer without using a computer. • Make sure that a memory card is not inserted in the printer, or that no computer is connected to the printer cable (USB cable) supplied with the camera to connect to the printer. • Ensure the - Canon SELPHY ES2 | SELPHY ES2 / ES20 Printer User Guide - Page 53
] in the camera's menu to [PTP], or [Print/PTP] or [Print/PC]. See the user guide supplied with the camera for details. 1 Open the terminal cover. 2 Connect a camera to the printer's USB terminal for camera connection with the interface cable supplied with the camera. Printing from Camera 53 - Canon SELPHY ES2 | SELPHY ES2 / ES20 Printer User Guide - Page 54
the printer's power off. • If the (Direct Print) icon is displayed on the LCD monitor of the camera, the black and white cartridge (Easy Photo Pack E-P25BW is available with Canon camera (This may not apply to some models, however). For more details, see the Camera User's Guide supplied with the - Canon SELPHY ES2 | SELPHY ES2 / ES20 Printer User Guide - Page 55
Transmit and print out images shot with a camera-equipped mobile phone supporting infrared data communication (SELPHY ES2 only) or Bluetooth. • Do not insert a memory card or connect a camera or computer to the printer during wireless printing. • You cannot print via wireless connection between the - Canon SELPHY ES2 | SELPHY ES2 / ES20 Printer User Guide - Page 56
Infrared (IrDA) Wireless Printing (SELPHY ES2 only) Print images transmitted from a mobile phone supporting infrared data communication (IrDA). z The mobile phone must have the following features. • Infrared data communication (infrared data communication port supporting IrDA) • Built-in camera - Canon SELPHY ES2 | SELPHY ES2 / ES20 Printer User Guide - Page 57
). For details on compatible profiles, refer to the user manual of the mobile phone. • A built-in camera capable printer, and that no camera is connected to the printer via USB cable. 2 Install Bluetooth Unit BU-20, sold separately. 3 Press green. to turn the printer's power on until the power - Canon SELPHY ES2 | SELPHY ES2 / ES20 Printer User Guide - Page 58
image from your mobile phone to the printer. • Printing starts after data transmission is completed. Up to approx. 10 m (33 ft.) 5 • Bluetooth Unit or make Bluetooth connection, refer to the Bluetooth manual. • Maximum communication distance is approx.10 m (approx. 33 ft.). However, the following - Canon SELPHY ES2 | SELPHY ES2 / ES20 Printer User Guide - Page 59
connect the printer directly to your computer. If you connect the USB cable to a USB hub, the printer may not function properly. • The printer may not Do not connect the computer to the printer before installing the printer driver. Follow the instructions of this guide. • You must login to the - Canon SELPHY ES2 | SELPHY ES2 / ES20 Printer User Guide - Page 60
1.3 GHz or higher processor Windows XP/Windows 2000: Pentium 500 MHz or higher processor Windows Vista: 512 MB or more Windows XP/Windows 2000: 256 MB or more USB Canon Utility • ZoomBrowser EX: 200 MB or more Ulead Photo Express LE: 300 MB or more Canon SELPHY Printer Driver: 4 MB or more (the - Canon SELPHY ES2 | SELPHY ES2 / ES20 Printer User Guide - Page 61
256 MB or more USB Canon Utility • ImageBrowser: 300 MB or more Canon SELPHY Printer Driver: 4 MB or more (the amount of free space required for installation) 1,024 x 768 pixels or more 32,000 colors or better • A CD-ROM drive is required to install the software. • Even when system requirements are - Canon SELPHY ES2 | SELPHY ES2 / ES20 Printer User Guide - Page 62
• The instructions in this section are intended for Windows XP and Mac OS X (v10.4). If you are using another version of OS, actual screen contents and procedures may differ slightly from those indicated here. Windows Installing the Printer Driver 1 Place the supplied Compact Photo Printer Solution - Canon SELPHY ES2 | SELPHY ES2 / ES20 Printer User Guide - Page 63
the software on your computer. • Press when the following screen appears. • Restart your computer when a dialog box appears instructing you to do so. 5 • If you wish to uninstall the printer driver, do as follows on your computer. Click the [Start] button and select [All Programs] - [Canon SELPHY - Canon SELPHY ES2 | SELPHY ES2 / ES20 Printer User Guide - Page 64
Printer Driver and Software Installing the Software 6 Set the supplied Compact Photo Printer Solution Disk in the computer. • The installer panel is displayed. 7 Click the Application Software the software, do as follows on your computer. Click the [Start] button and select [All Programs] - [Canon - Canon SELPHY ES2 | SELPHY ES2 / ES20 Printer User Guide - Page 65
Installing the Printer Driver and Software Macintosh Installing the Printer Driver 1 Place the supplied Compact Photo Printer Solution Disk in the computer and double-click the icon in the CD-ROM window. 2 Select the printer you are using. 1 • Close any programs that are running. 3 Click [Agree] - Canon SELPHY ES2 | SELPHY ES2 / ES20 Printer User Guide - Page 66
Installing the Printer Driver and Software 5 Following the instructions on the screen, then restart your computer. 6 Connect the printer to the computer and turn the printer's power on. 6 • When connecting the printer to the computer, a USB cable is required. The USB cable should be less than 3 - Canon SELPHY ES2 | SELPHY ES2 / ES20 Printer User Guide - Page 67
] button. • Installation of printer driver is completed. Close the window. 9 • If you wish to uninstall the printer driver, double-click the icon in Solution Disk, select the installer panel, and follow the onscreen instructions. Next, delete the printer from the Printer list. Printing from a PC - Canon SELPHY ES2 | SELPHY ES2 / ES20 Printer User Guide - Page 68
Printer Driver and Software Installing Software 10 Place the supplied Compact Photo Printer Solution Disk in the computer and double-click the icon in the CD-ROM window instructions to proceed until a dialog box informing you that the installation is complete appears. 13 Click [OK]. • Software - Canon SELPHY ES2 | SELPHY ES2 / ES20 Printer User Guide - Page 69
to the Supplied Programs • For printing operations, refer to the [Help] menu of the software. • You can download a detailed guide from the following website (available in English only). http://web.canon.jp/Imaging/information-e.html Windows Ulead Photo Express LE (Windows Vista, Windows XP only - Canon SELPHY ES2 | SELPHY ES2 / ES20 Printer User Guide - Page 70
of inserting frames and text, and then printing. If you have questions about Ulead Photo Express LE, please access the URL below: http://www.ulead.com/events/canon/selphy/ 1 Select [SELPHY] and click [SELPHY Print]. 2 Select the paper from the list on the left, select the desired frame to use and - Canon SELPHY ES2 | SELPHY ES2 / ES20 Printer User Guide - Page 71
Introduction to the Supplied Programs 4 Select [Text], click [Add/Edit]. 5 Type the desired text to print, click the text, then click [Print]. , adjust the position of 6 Determine the printer name, paper size, cartridge, layout, and copies, then click . 7 Printing completes. 2 • Frames can be - Canon SELPHY ES2 | SELPHY ES2 / ES20 Printer User Guide - Page 72
Using the Battery Pack (SELPHY ES2 only) You can print outdoors or at locations without a power outlet by installing Battery Pack NB-ES1L (sold separately) into the SELPHY ES2. SELPHY ES20, however, does not accept a battery pack. Use of genuine Canon accessories is recommended. This product is - Canon SELPHY ES2 | SELPHY ES2 / ES20 Printer User Guide - Page 73
, slide the battery cover lever upwards and remove the cover. 3 • Push the battery pack until it clicks into place. • To remove the battery pack, slide the battery cover lever upwards and remove the battery. 3 Install the battery pack in the printer. Using the Battery Pack (SELPHY ES2 only) 73 - Canon SELPHY ES2 | SELPHY ES2 / ES20 Printer User Guide - Page 74
. To power outlet 15 cm (6 in.) 15 cm (6 in.) 10 cm (4 in.) • For more connection details, refer to Placing/ Connecting the Printer (p. 22). • Charging starts. 3 Disconnect the compact power adapter cord from the printer once charging is complete. 74 Using the Battery Pack (SELPHY ES2 only) - Canon SELPHY ES2 | SELPHY ES2 / ES20 Printer User Guide - Page 75
as soon as possible. Battery power is low. We recommend recharging the battery pack. Printing is not possible. Change it for a fully charged battery pack or recharge the battery pack immediately. You can also use the printer's compact power adapter. Using the Battery Pack (SELPHY ES2 only) 75 - Canon SELPHY ES2 | SELPHY ES2 / ES20 Printer User Guide - Page 76
the battery pack with a fully charged one, or use the printer's compact power adapter. • Although the battery pack's maximum operating range is 5 to 40 °C (41 to 104 °F), the optimal range is 10 to 30 store after fully discharging it in the printer. 76 Using the Battery Pack (SELPHY ES2 only) - Canon SELPHY ES2 | SELPHY ES2 / ES20 Printer User Guide - Page 77
Appendix Appendix 77 - Canon SELPHY ES2 | SELPHY ES2 / ES20 Printer User Guide - Page 78
Settings You can make various printer settings, such as language or power saving settings. How to Use the Menu 1 Turn the printer on and press . 2 Press or to select [Printer Setup] and press . • The printer setup screen is displayed. 3 Press or to select the item and change the setting value - Canon SELPHY ES2 | SELPHY ES2 / ES20 Printer User Guide - Page 79
image can be automatically rotated on the LCD monitor. Auto Power Down The printer automatically turns off if no operation is performed for five minutes Selects a name from Canon ES2-1 ( ) to ES2-9 (ES20-1 to ES20-9). This is the name used when the target device (this printer) is selected from the - Canon SELPHY ES2 | SELPHY ES2 / ES20 Printer User Guide - Page 80
displayed. 3 Press or to select the items you wish to set and change setting values. 4 Press . • The setting is saved and the screen returns to [Printer Setup]. 1 • For how to use the menu, refer to page 78. • For how to print using a Bluetooth unit, refer to Printing via Bluetooth (p. 57). 80 - Canon SELPHY ES2 | SELPHY ES2 / ES20 Printer User Guide - Page 81
wish to set and press . • The selected language is set and the display returns to [Printer Setup]. 1 • For how to use the menu, refer to page 78. • When card is inserted, or when no camera or computer is connected to the printer, press and hold down and then press to shortcut to the language set - Canon SELPHY ES2 | SELPHY ES2 / ES20 Printer User Guide - Page 82
Cleaning the Inside of the Printer Remove dust on the head of the cartridge with the supplied cleaner unit. 1 Remove the cartridge (p. 20). 2 Insert the cleaner unit in the cartridge compartment and push it in completely and slide it in and out 2 or 3 times. Arrow side facing up • Do not touch - Canon SELPHY ES2 | SELPHY ES2 / ES20 Printer User Guide - Page 83
Storing the Printer or the Printed Paper Storing the Printer Unplug the power cord from the power outlet (If using the battery pack, remove it). Remove the cartridge from the printer and store it in its original package. Storing Prints • Avoid storing prints in the following places to prevent image - Canon SELPHY ES2 | SELPHY ES2 / ES20 Printer User Guide - Page 84
and compact power adapter. The safety precautions noted on the following pages are intended to instruct you in the safe and correct operation of the printer to prevent injuries or damage to yourself or other persons. WARNING Do not play the supplied CD-ROM(s) in any CD player that does not support - Canon SELPHY ES2 | SELPHY ES2 / ES20 Printer User Guide - Page 85
. Do not use the compact power adapter for any other equipment except this printer, use it beyond its rated capacity or voltage, or leave the plug partially inserted into a power outlet. Do not open the cartridge cover during printing. • If you do so, printing will stop. • Paper moves back and forth - Canon SELPHY ES2 | SELPHY ES2 / ES20 Printer User Guide - Page 86
Safety Precautions Do not place anything, such as tablecloths, carpets, bedding or cushions, on top of the battery charger while it is charging. There is a risk of heat generation or deformation if it is left connected for a long period of time. Before you discard a battery, cover the terminals with - Canon SELPHY ES2 | SELPHY ES2 / ES20 Printer User Guide - Page 87
, refer to the supplied user's manual of each product. Warning Against Copyright Infringement Please respect all copyrights. Use of images produced by SELPHY ES2 or ES20 for purposes other than personal entertainment may be prohibited by law. Warranty Limitations This printer's warranty is only - Canon SELPHY ES2 | SELPHY ES2 / ES20 Printer User Guide - Page 88
, and then insert the shaft on the right side of the cover into the printer ( ). If the print receptacle cover is not attached during printing, paper that is finished printing may become jammed inside the printer. Do not insert foreign objects into the print receptacle. z To prevent malfunctions and - Canon SELPHY ES2 | SELPHY ES2 / ES20 Printer User Guide - Page 89
Canon testing procedures. We reserve the right to change specifications without notice. Compact Photo Printer SELPHY ES2/ES20 Printing Method Print Resolution Gradation Ink Paper per color (300 x 300 dpi) Dedicated ink and paper integrated cartridge Color (Y, M, C and overcoating) Black & - Canon SELPHY ES2 | SELPHY ES2 / ES20 Printer User Guide - Page 90
Weight (printer only) ES2: Approx. 1955g (69.0 oz.) / ES20: Approx. 1865g (65.8 oz.) *1 When connected to a Canon digital camera equipped with DIGIC lll. *2 IrSimple is not supported. *3 Bluetooth Unit BU-20 sold separately is required. *4 Specialized adapter is required. Compact Power Adapter CA - Canon SELPHY ES2 | SELPHY ES2 / ES20 Printer User Guide - Page 91
Specification Battery Pack NB-ES1L (sold separately) (SELPHY ES2 only) Type Nominal Voltage Nominal Capacity Charge Cycles Number of prints* Operating Temperatures Dimensions Weight Lithium ion battery DC 22.2 V 2000 mAh Approx. 300 times Postcard size paper: Approx. 50 sheets L size paper: Approx - Canon SELPHY ES2 | SELPHY ES2 / ES20 Printer User Guide - Page 92
Troubleshooting This section has solutions for when the printer does not function as expected or an error symbol is displayed. 92 Troubleshooting - Canon SELPHY ES2 | SELPHY ES2 / ES20 Printer User Guide - Page 93
do not remedy your problem, contact the retail outlet or a Canon customer support center. Printer and Power Source Power will not turn on • Has the plug come out of the power outlet? (p. 22) • Is the connector of the compact power adapter securely connected to the printer's DC IN terminal? (p. 22 - Canon SELPHY ES2 | SELPHY ES2 / ES20 Printer User Guide - Page 94
There is a Problem Cannot Print (continued from previous page) • Does the camera battery have sufficient charge? Replace the battery with a fully charged (or new) battery, or use the compact power adapter for the camera. Printing from Computers • Did you install the printer driver according to the - Canon SELPHY ES2 | SELPHY ES2 / ES20 Printer User Guide - Page 95
the ejected paper fallen over? Paper jams occur if ejected paper falls over (lean forward). Remove the jammed paper. Cannot Print the Specified No. of Prints. • Is the printer's power being turned on and off repeatedly? The printer initialization consumes ink. There may not be enough ink left for - Canon SELPHY ES2 | SELPHY ES2 / ES20 Printer User Guide - Page 96
pack. You can also use the printer's compact power adapter. • Temperature is not within the operating temperature range for charging (SELPHY ES2 only). Charge within 5 - 40 °C (41 - 104 °F). Lights red • Check the error message on the LCD monitor. LCD Monitor No paper/ink • Check that the cartridge - Canon SELPHY ES2 | SELPHY ES2 / ES20 Printer User Guide - Page 97
ink sheet, and then reload the cartridge. If the cartridge is stuck in the printer, contact a Canon Customer Support center for assistance. Recharge the printer battery • Change it with a fully charged battery pack or recharge the battery pack. You can also use the printer's compact power adapter - Canon SELPHY ES2 | SELPHY ES2 / ES20 Printer User Guide - Page 98
display, contact a Canon Customer Support center for assistance. Disconnected • Make sure that the printer and the sender are in appropriate distance. • Check the sender's power supply. Print output tray is full • Remove accumulated paper from the print receptacle. Cartridge incorrectly inserted or - Canon SELPHY ES2 | SELPHY ES2 / ES20 Printer User Guide - Page 99
into the adapter before inserting it into the printer. If an empty adapter had been inserted, remove the adapter and turn the printer's power off and on again. • Some memory cards require a specific adapter. You -to-height ratio narrower than 16:9. Select another image to trim. Troubleshooting 99 - Canon SELPHY ES2 | SELPHY ES2 / ES20 Printer User Guide - Page 100
transfer an image from a mobile phone using IrSimple. If your mobile phone supports another transfer method, switch to that method and transfer the image. Device Not Supported (HUB) • You attempted to connect an unsupported USB connector, e.g. a USB hub. Disconnect the USB hub. 100 Troubleshooting - Canon SELPHY ES2 | SELPHY ES2 / ES20 Printer User Guide - Page 101
, 35 Card Slot 10, 26 Card Slot Cover 10 Carrying Handle 11, 83 Cartridge 9, 17 Cartridge Compartment 10 Cartridge Cover 10 Cartridge Cover Lever 10 Cartridge Lever 10 Cleaner Unit 8, 82 Cleaning 82 Clip Art 31, 34 Compact Photo Printer Solution Disk 8, 62 Compact Power Adapter (CA-ES100 - Canon SELPHY ES2 | SELPHY ES2 / ES20 Printer User Guide - Page 102
47, 49 Paper-handling Slot 10 Passkey 79 PictBridge 52 Positive Film 51 Power Cord 8, 22 Power Lamp 12 Print All Photos 28 PRINT Button 13 Print Receptacle (Output Tray 10 Print Receptacle Button 10 Print Receptacle Cover 10 Print Settings 46 Printer Driver 62, 65 Printer Setup 78 - Canon SELPHY ES2 | SELPHY ES2 / ES20 Printer User Guide - Page 103
the specifications of the hardware and software described herein at any time without prior notice. • Canon makes no warranties for damages resulting from corrupted or lost data due to a mistaken operation or malfunction of the camera, the printer, the software, the memory cards, personal computers
-
 1
1 -
 2
2 -
 3
3 -
 4
4 -
 5
5 -
 6
6 -
 7
7 -
8
-
9
-
10
-
11
-
12
-
13
-
14
-
15
-
16
-
17
-
18
-
19
-
20
-
21
-
22
-
23
-
24
-
25
-
26
-
27
-
28
-
29
-
30
-
31
-
32
-
33
-
34
-
35
-
36
-
37
-
38
-
39
-
40
-
41
-
42
-
43
-
44
-
45
-
46
-
47
-
48
-
49
-
50
-
51
-
52
-
53
-
54
-
55
-
56
-
57
-
58
-
59
-
60
-
61
-
62
-
63
-
64
-
65
-
66
-
67
-
68
-
69
-
70
-
71
-
72
-
73
-
74
-
75
-
76
-
77
-
78
-
79
-
80
-
81
-
82
-
83
-
84
-
85
-
86
-
87
-
88
-
89
-
90
-
91
-
92
-
93
-
94
-
95
-
96
-
97
-
98
-
99
-
100
-
101
-
102
-
103
 |
 |
Printer User Guide
CDP-E059-010
© 2007 CANON INC.
ENGLISH