Canon SELPHY ES2 SELPHY ES2 / ES20 Printer User Guide - Page 13
Main Display, Enlarged View, Switching the View to 9 Images at a Time, in Single View. Press
 |
View all Canon SELPHY ES2 manuals
Add to My Manuals
Save this manual to your list of manuals |
Page 13 highlights
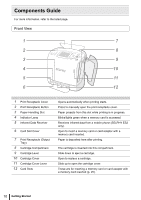
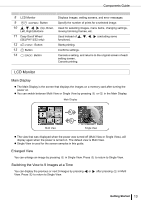
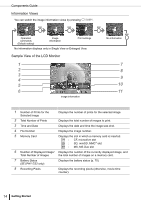
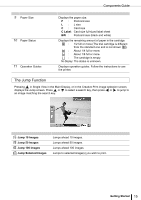
Components Guide 8 LCD Monitor 9 Button 10 , , , (Up, Down, Left, Right) Buttons 11 Easy-Scroll Wheel (SELPHY ES2 only) 12 Button 13 Button 14 Button Displays images, setting screens, and error messages. Specify the number of prints for a selected image. Used for selecting images, menu items, changing settings, moving trimming frames, etc. Used instead of , , , (excluding some functions). Starts printing. Confirms settings. Cancels a setting, and returns to the original screen of each setting screen. Cancels printing. LCD Monitor Main Display z The Main Display is the screen that displays the images on a memory card after turning the power on. z You can switch between Multi View or Single View by pressing or in the Main Display. Main Display Multi View Single View z The view that was displayed when the power was turned off (Multi View or Single View), will display again when the power is turned on. The default view is Multi View. z Single View is used for the screen samples in this guide. Enlarged View You can enlarge an image by pressing in Single View. Press to return to Single View. Switching the View to 9 Images at a Time You can display the previous or next 9 images by pressing or after pressing in Multi View. Press to return to Single View. Getting Started 13
-
 1
1 -
2
-
3
-
4
-
5
-
6
-
7
-
 8
8 -
 9
9 -
 10
10 -
 11
11 -
 12
12 -
 13
13 -
 14
14 -
 15
15 -
 16
16 -
 17
17 -
 18
18 -
19
-
20
-
21
-
22
-
23
-
24
-
25
-
26
-
27
-
28
-
29
-
30
-
31
-
32
-
33
-
34
-
35
-
36
-
37
-
38
-
39
-
40
-
41
-
42
-
43
-
44
-
45
-
46
-
47
-
48
-
49
-
50
-
51
-
52
-
53
-
54
-
55
-
56
-
57
-
58
-
59
-
60
-
61
-
62
-
63
-
64
-
65
-
66
-
67
-
68
-
69
-
70
-
71
-
72
-
73
-
74
-
75
-
76
-
77
-
78
-
79
-
80
-
81
-
82
-
83
-
84
-
85
-
86
-
87
-
88
-
89
-
90
-
91
-
92
-
93
-
94
-
95
-
96
-
97
-
98
-
99
-
100
-
101
-
102
-
103
 |
 |