Canon SELPHY ES2 SELPHY ES2 / ES20 Printer User Guide - Page 47
Print Setting Menu - photo pack
 |
View all Canon SELPHY ES2 manuals
Add to My Manuals
Save this manual to your list of manuals |
Page 47 highlights
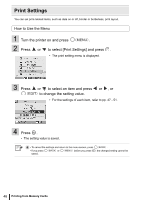
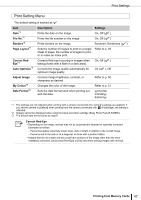
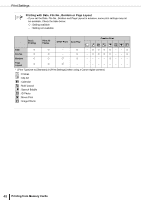
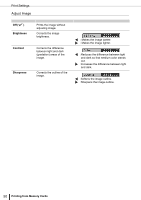
Print Settings Print Setting Menu The default setting is marked as . Item Date*1 File No.*1 Borders*1 Page Layout*1 Description Settings Prints the date on the image. On, Off ( ) Prints the file number on the image. On, Off ( ) Prints borders on the image. Bordered, Borderless ( ) Sets the number of images to print on a single Refer to p. 49 sheet of paper, the number of images to print, or to make an index print. Correct RedEye*1 Auto Optimize*1 Corrects Red-eye (occuring in images when taking photos with a flash in a dark area). Corrects the image quality automatically for optimum image quality. On, Off ( ) On ( ), Off Adjust Image My Colors*2 Date Format*3 Corrects image brightness, contrast, or sharpness as desired. Changes the color of the image. Sets the date format used when printing out with the date. Refer to p. 50 Refer to p. 51 yy/mm/dd, mm/dd/yy, dd/mm/yy *1 The settings are not reflected when printing with a camera connected (the camera's settings are applied). If you set the camera to [Default] when printing from the camera connected with (PictBridge), the setting is reflected. *2 Images cannot be displayed when using the black and white cartridge (Easy Photo Pack E-P25BW). *3 The default date format varies by region. Correct Red-Eye • Depending on the image, red-eye may not be automatically detected or optimally corrected. Examples as follows. - Faces that appear extremely small, large, dark or bright in relation to the overall image. - Faces turned to the side or at a diagonal, or faces with a portion hidden. • Images that do not contain red-eye could have portions of the image other than the eyes mistakenly corrected. Set [Correct Red-Eye] to [On] only when printing images with red-eye. Printing from Memory Cards 47
-
 1
1 -
2
-
3
-
4
-
5
-
6
-
7
-
8
-
9
-
10
-
11
-
12
-
13
-
14
-
15
-
16
-
17
-
18
-
19
-
20
-
21
-
22
-
23
-
24
-
25
-
26
-
27
-
28
-
29
-
30
-
31
-
32
-
33
-
34
-
35
-
36
-
37
-
38
-
39
-
40
-
41
-
 42
42 -
 43
43 -
 44
44 -
 45
45 -
 46
46 -
 47
47 -
 48
48 -
 49
49 -
 50
50 -
 51
51 -
 52
52 -
53
-
54
-
55
-
56
-
57
-
58
-
59
-
60
-
61
-
62
-
63
-
64
-
65
-
66
-
67
-
68
-
69
-
70
-
71
-
72
-
73
-
74
-
75
-
76
-
77
-
78
-
79
-
80
-
81
-
82
-
83
-
84
-
85
-
86
-
87
-
88
-
89
-
90
-
91
-
92
-
93
-
94
-
95
-
96
-
97
-
98
-
99
-
100
-
101
-
102
-
103
 |
 |