Canon VB-S900F User Manual - Page 139
Displaying Event Status, Adjusting Image Quality, Enabling Video Reception
 |
View all Canon VB-S900F manuals
Add to My Manuals
Save this manual to your list of manuals |
Page 139 highlights
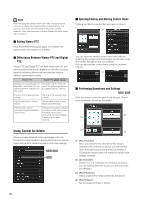
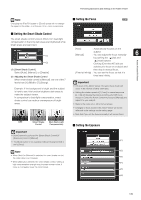
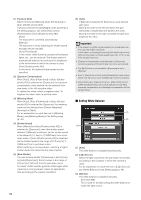
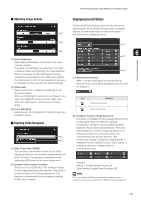
Performing Operations and Settings in the Admin Viewer „ Adjusting Image Quality Displaying Event Status Clicking the [Event Display] button will show the event display panel, which shows the input status of external devices, as well as the status of video and volume (1) detection by the intelligent function. (2) (1) (3) 6 (2) Admin Viewer/VB Viewer (1) [Noise Reduction] Select [Mild], [Standard], or [Strong] for the noise reduction setting. Principally, this setting is more effective in low-light conditions. When set to [Strong], the noise reduction effect is increased, but the afterimage of moving subjects becomes easier to see. When set to [Mild], the noise reduction effect is decreased and resolution is increased, but the video file size becomes larger. (3) (1) [External Device Input] When a contact input signal is received from an external device, input will be activated and an icon will (2) [Sharpness] Select a level from [1] (Mild) to [7] (Strong) for the sharpness setting. When set to [Strong] the video becomes sharper, and when set to [Mild] the video becomes softer. Also, when set to [Strong] the video file size becomes larger. be displayed. Icon Meaning Input inactive state (3) [Color Saturation] Select a level from [1] (Light) to [7] (Dark) for the color saturation setting. „ Enabling Video Reception (1) (2) (1) [Max. Frame Rate (JPEG)] You can select the maximum frame rate for JPEG displayed video from one of twelve levels between [30 fps] to [0.2 fps]. The setting is not available when displaying H.264 video in the video display area. (2) [Enable H.264 reception] checkbox Select to receive H.264 video. The Software Product License Agreement dialog box appears. Click [Yes] to accept the terms of the license agreement. The decoder is downloaded from the camera, enabling H.264 video reception. Input active state (2) [Intelligent Function (Image Detection)] The status of intelligent function (image detection) will be displayed. When the detection settings configured in intelligent functions (Moving Object Detection, Abandoned Object Detection, Removed Object Detection, Camera Tampering Detection or Passing Detection) enter Detected mode, the corresponding icon will turn green (p. 103). If names are entered in [Detection Setting Name] in Intelligent Function Setting Tools (p. 103), [Setting 1] to [Setting 15] will be displayed with the corresponding name. Example: Setting 1: Image Detection status ON Other settings: Image Detection status OFF Note The icon signifying Detection mode will be displayed for a maximum of five minutes (except for Moving Object Detection). 139
-
 1
1 -
2
-
3
-
4
-
5
-
6
-
7
-
8
-
9
-
10
-
11
-
12
-
13
-
14
-
15
-
16
-
17
-
18
-
19
-
20
-
21
-
22
-
23
-
24
-
25
-
26
-
27
-
28
-
29
-
30
-
31
-
32
-
33
-
34
-
35
-
36
-
37
-
38
-
39
-
40
-
41
-
42
-
43
-
44
-
45
-
46
-
47
-
48
-
49
-
50
-
51
-
52
-
53
-
54
-
55
-
56
-
57
-
58
-
59
-
60
-
61
-
62
-
63
-
64
-
65
-
66
-
67
-
68
-
69
-
70
-
71
-
72
-
73
-
74
-
75
-
76
-
77
-
78
-
79
-
80
-
81
-
82
-
83
-
84
-
85
-
86
-
87
-
88
-
89
-
90
-
91
-
92
-
93
-
94
-
95
-
96
-
97
-
98
-
99
-
100
-
101
-
102
-
103
-
104
-
105
-
106
-
107
-
108
-
109
-
110
-
111
-
112
-
113
-
114
-
115
-
116
-
117
-
118
-
119
-
120
-
121
-
122
-
123
-
124
-
125
-
126
-
127
-
128
-
129
-
130
-
131
-
132
-
133
-
 134
134 -
 135
135 -
 136
136 -
 137
137 -
 138
138 -
 139
139 -
 140
140 -
 141
141 -
 142
142 -
 143
143 -
 144
144 -
145
-
146
-
147
-
148
-
149
-
150
-
151
-
152
-
153
-
154
-
155
-
156
-
157
-
158
-
159
-
160
-
161
-
162
-
163
-
164
-
165
-
166
-
167
-
168
-
169
-
170
-
171
-
172
-
173
-
174
-
175
-
176
 |
 |
