Canon imageRUNNER ADVANCE C2230 imageRUNNER ADVANCE C2200 Srs Setup Guide - Page 52
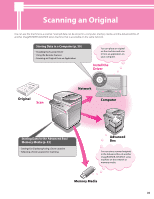
Storing Data in the Advanced Box/Memory Media, Preparations for Scanning
 |
View all Canon imageRUNNER ADVANCE C2230 manuals
Add to My Manuals
Save this manual to your list of manuals |
Page 52 highlights
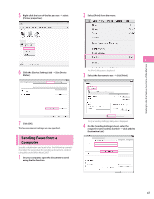
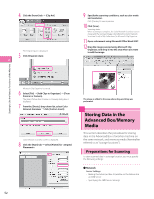
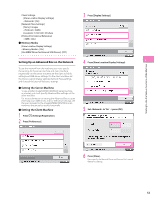
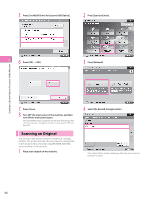
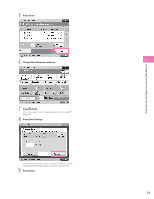
4 Click the [Insert] tab → [Clip Art]. The [Clip Art] pane is displayed. 5 Click [Organize clips]. 2 9 Specify the scanning conditions, such as color mode and resolution. Click [Preview] to view a preview. 10 Click [Scan]. Scanning starts. When scanning is complete, the Color Network ScanGear screen closes and the scanned image is transferred to [Color Network ScanGear Vx.xx] in [My Collections] in Microsoft Clip Organizer. 11 Open a document using Microsoft Office Word 2007. 12 Drag the image scanned using Microsoft Clip Organizer, and drop it into the area where you want to add the image. Starting to Use the Various Functions of the Machine Microsoft Clip Organizer is started. 6 Select [File] → [Add Clips to Organizer] → [From Scanner or Camera]. The [Insert Picture from Scanner or Camera] dialog box is displayed. 7 From the [Device] drop-down list, select Color Network ScanGear → click [Custom Insert]. Color Network ScanGear screen is displayed. 8 Click the [Main] tab → select [Platen] for . 52 The image is added to the area where drag-and-drop was performed. Storing Data in the Advanced Box/Memory Media This section describes the procedure for storing data in the Advanced Box of another machine on the same network, and memory media (hereinafter referred to as "storage locations"). Preparations for Scanning To store scanned data in a storage location, you must specify the following settings: ⨋⨋Network Server Settings • Making the Advanced Box Accessible on the Network as an SMB Server • Specifying the SMB Server Settings
-
 1
1 -
2
-
3
-
4
-
5
-
6
-
7
-
8
-
9
-
10
-
11
-
12
-
13
-
14
-
15
-
16
-
17
-
18
-
19
-
20
-
21
-
22
-
23
-
24
-
25
-
26
-
27
-
28
-
29
-
30
-
31
-
32
-
33
-
34
-
35
-
36
-
37
-
38
-
39
-
40
-
41
-
42
-
43
-
44
-
45
-
46
-
 47
47 -
 48
48 -
 49
49 -
 50
50 -
 51
51 -
 52
52 -
 53
53 -
 54
54 -
 55
55 -
 56
56 -
 57
57 -
58
-
59
-
60
-
61
-
62
-
63
-
64
-
65
-
66
-
67
-
68
-
69
-
70
-
71
-
72
-
73
-
74
-
75
-
76
-
77
-
78
-
79
-
80
 |
 |
