Casio EX-Z750 Owners Manual - Page 100
To use Business Shot, Press the shutter
 |
UPC - 079767684266
View all Casio EX-Z750 manuals
Add to My Manuals
Save this manual to your list of manuals |
Page 100 highlights
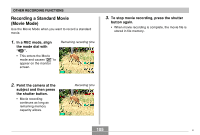
OTHER RECORDING FUNCTIONS To use Business Shot 1. In a REC mode, align the mode dial with " ", and then press [SET]. 2. Use [̇] and [̈] to select the Business Shot image you want, and then press [SET]. 3. Press the shutter button to record the image. • This displays a screen that shows all of the objects in the image that qualify as candidates for keystone correction. An error message will appear (page 243) if the camera is unable to find any suitable keystone correction candidate in the image. After a short while, the original image will be stored in memory, as-is. 4. Use [̇] and [̈] to select the candidate you want to correct. 5. Use [̆] and [̄] to select "Correct", and then press [SET]. • Selecting "Cancel" in place of "Correct" stores the original image as-is, without correcting it. IMPORTANT! • The maximum Business Shot image size is 1600 × 1200 pixels, even if the camera is configured for a larger image size. An image size setting smaller than 1600 × 1200 pixels records images at the specified size. 100
-
 1
1 -
2
-
3
-
4
-
5
-
6
-
7
-
8
-
9
-
10
-
11
-
12
-
13
-
14
-
15
-
16
-
17
-
18
-
19
-
20
-
21
-
22
-
23
-
24
-
25
-
26
-
27
-
28
-
29
-
30
-
31
-
32
-
33
-
34
-
35
-
36
-
37
-
38
-
39
-
40
-
41
-
42
-
43
-
44
-
45
-
46
-
47
-
48
-
49
-
50
-
51
-
52
-
53
-
54
-
55
-
56
-
57
-
58
-
59
-
60
-
61
-
62
-
63
-
64
-
65
-
66
-
67
-
68
-
69
-
70
-
71
-
72
-
73
-
74
-
75
-
76
-
77
-
78
-
79
-
80
-
81
-
82
-
83
-
84
-
85
-
86
-
87
-
88
-
89
-
90
-
91
-
92
-
93
-
94
-
 95
95 -
 96
96 -
 97
97 -
 98
98 -
 99
99 -
 100
100 -
 101
101 -
 102
102 -
 103
103 -
 104
104 -
 105
105 -
106
-
107
-
108
-
109
-
110
-
111
-
112
-
113
-
114
-
115
-
116
-
117
-
118
-
119
-
120
-
121
-
122
-
123
-
124
-
125
-
126
-
127
-
128
-
129
-
130
-
131
-
132
-
133
-
134
-
135
-
136
-
137
-
138
-
139
-
140
-
141
-
142
-
143
-
144
-
145
-
146
-
147
-
148
-
149
-
150
-
151
-
152
-
153
-
154
-
155
-
156
-
157
-
158
-
159
-
160
-
161
-
162
-
163
-
164
-
165
-
166
-
167
-
168
-
169
-
170
-
171
-
172
-
173
-
174
-
175
-
176
-
177
-
178
-
179
-
180
-
181
-
182
-
183
-
184
-
185
-
186
-
187
-
188
-
189
-
190
-
191
-
192
-
193
-
194
-
195
-
196
-
197
-
198
-
199
-
200
-
201
-
202
-
203
-
204
-
205
-
206
-
207
-
208
-
209
-
210
-
211
-
212
-
213
-
214
-
215
-
216
-
217
-
218
-
219
-
220
-
221
-
222
-
223
-
224
-
225
-
226
-
227
-
228
-
229
-
230
-
231
-
232
-
233
-
234
-
235
-
236
-
237
-
238
-
239
-
240
-
241
-
242
-
243
-
244
-
245
-
246
-
247
-
248
-
249
-
250
 |
 |
