Casio EX-Z750 Owners Manual - Page 156
Selecting the Video Output System - usb cable
 |
UPC - 079767684266
View all Casio EX-Z750 manuals
Add to My Manuals
Save this manual to your list of manuals |
Page 156 highlights
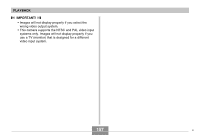
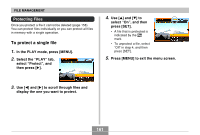
PLAYBACK IMPORTANT! • All icons and indicators that appear on the monitor screen also appear on the TV screen. • Note that the audio output is monaural. • The camera's monitor screen will go blank during video output. • Pressing the USB cradle's [PHOTO] button will activate the Photo Stand feature (page 149) and display images on the TV screen. • Depending on the size of the TV screen, recorded images may not fill the entire screen. • For video output, the audio volume level is initially set to maximum. Perform volume level adjustment using TV controls. • After using an optionally available AV cable (EMC2A) to connect the camera's USB cradle connector directly to the AUDIO IN terminal of a TV, you can view recorded images on the TV and even use the TV screen to compose images before recording them. Selecting the Video Output System You can select either NTSC or PAL for the video output system to match the system of the TV you are using. 1. In a REC mode or the PLAY mode, press [MENU]. 2. Select the "Set Up" tab, select "Video Out", and then press [̈]. 3. Use [̆] and [̄] to select the setting you want, and then press [SET]. If you are using a TV designed for use in this area: U.S., Japan, and other areas that use the NTSC system Europe and other areas that use the PAL system Select this setting: NTSC PAL 156 B
-
 1
1 -
2
-
3
-
4
-
5
-
6
-
7
-
8
-
9
-
10
-
11
-
12
-
13
-
14
-
15
-
16
-
17
-
18
-
19
-
20
-
21
-
22
-
23
-
24
-
25
-
26
-
27
-
28
-
29
-
30
-
31
-
32
-
33
-
34
-
35
-
36
-
37
-
38
-
39
-
40
-
41
-
42
-
43
-
44
-
45
-
46
-
47
-
48
-
49
-
50
-
51
-
52
-
53
-
54
-
55
-
56
-
57
-
58
-
59
-
60
-
61
-
62
-
63
-
64
-
65
-
66
-
67
-
68
-
69
-
70
-
71
-
72
-
73
-
74
-
75
-
76
-
77
-
78
-
79
-
80
-
81
-
82
-
83
-
84
-
85
-
86
-
87
-
88
-
89
-
90
-
91
-
92
-
93
-
94
-
95
-
96
-
97
-
98
-
99
-
100
-
101
-
102
-
103
-
104
-
105
-
106
-
107
-
108
-
109
-
110
-
111
-
112
-
113
-
114
-
115
-
116
-
117
-
118
-
119
-
120
-
121
-
122
-
123
-
124
-
125
-
126
-
127
-
128
-
129
-
130
-
131
-
132
-
133
-
134
-
135
-
136
-
137
-
138
-
139
-
140
-
141
-
142
-
143
-
144
-
145
-
146
-
147
-
148
-
149
-
150
-
 151
151 -
 152
152 -
 153
153 -
 154
154 -
 155
155 -
 156
156 -
 157
157 -
 158
158 -
 159
159 -
 160
160 -
 161
161 -
162
-
163
-
164
-
165
-
166
-
167
-
168
-
169
-
170
-
171
-
172
-
173
-
174
-
175
-
176
-
177
-
178
-
179
-
180
-
181
-
182
-
183
-
184
-
185
-
186
-
187
-
188
-
189
-
190
-
191
-
192
-
193
-
194
-
195
-
196
-
197
-
198
-
199
-
200
-
201
-
202
-
203
-
204
-
205
-
206
-
207
-
208
-
209
-
210
-
211
-
212
-
213
-
214
-
215
-
216
-
217
-
218
-
219
-
220
-
221
-
222
-
223
-
224
-
225
-
226
-
227
-
228
-
229
-
230
-
231
-
232
-
233
-
234
-
235
-
236
-
237
-
238
-
239
-
240
-
241
-
242
-
243
-
244
-
245
-
246
-
247
-
248
-
249
-
250
 |
 |
