Casio EX-Z750 Owners Manual - Page 191
Date Printing, After you are finished printing, press the USB
 |
UPC - 079767684266
View all Casio EX-Z750 manuals
Add to My Manuals
Save this manual to your list of manuals |
Page 191 highlights
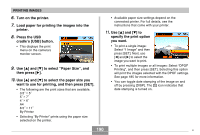
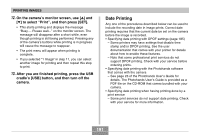
PRINTING IMAGES 12. On the camera's monitor screen, use [̆] and [̄] to select "Print", and then press [SET]. • This starts printing and displays the message "Busy.... Please wait..." on the monitor screen. The message will disappear after a short while, even though printing is still being performed. Pressing any of the camera's buttons while printing is in progress will cause the message to reappear. • The print menu will appear when printing is complete. • If you selected "1 Image" in step 11, you can select another image for printing and then repeat this step to print. 13. After you are finished printing, press the USB cradle's [USB] button, and then turn off the camera. Date Printing Any one of the procedures described below can be used to include the recording date in image prints. Correct date printing requires that the current date be set on the camera before the image is recorded. • Specifying date printing with DPOF settings (page 185) - Some printers may have settings that disable time stamp and/or DPOF printing. See the user documentation that comes with your printer for details about how to enable these features. - Note that some professional print services do not support DPOF printing. Check with your service before ordering prints. • Specifying date printing with the Photohands software that comes with the camera - See page 23 of the Photohands User's Guide for details. The Photohands User's Guide is provided as a PDF file on the CD-ROM that comes bundled with your camera. • Specifying date printing when having printing done by a print service - Some print services do not support date printing. Check with your service for more information. 191
-
 1
1 -
2
-
3
-
4
-
5
-
6
-
7
-
8
-
9
-
10
-
11
-
12
-
13
-
14
-
15
-
16
-
17
-
18
-
19
-
20
-
21
-
22
-
23
-
24
-
25
-
26
-
27
-
28
-
29
-
30
-
31
-
32
-
33
-
34
-
35
-
36
-
37
-
38
-
39
-
40
-
41
-
42
-
43
-
44
-
45
-
46
-
47
-
48
-
49
-
50
-
51
-
52
-
53
-
54
-
55
-
56
-
57
-
58
-
59
-
60
-
61
-
62
-
63
-
64
-
65
-
66
-
67
-
68
-
69
-
70
-
71
-
72
-
73
-
74
-
75
-
76
-
77
-
78
-
79
-
80
-
81
-
82
-
83
-
84
-
85
-
86
-
87
-
88
-
89
-
90
-
91
-
92
-
93
-
94
-
95
-
96
-
97
-
98
-
99
-
100
-
101
-
102
-
103
-
104
-
105
-
106
-
107
-
108
-
109
-
110
-
111
-
112
-
113
-
114
-
115
-
116
-
117
-
118
-
119
-
120
-
121
-
122
-
123
-
124
-
125
-
126
-
127
-
128
-
129
-
130
-
131
-
132
-
133
-
134
-
135
-
136
-
137
-
138
-
139
-
140
-
141
-
142
-
143
-
144
-
145
-
146
-
147
-
148
-
149
-
150
-
151
-
152
-
153
-
154
-
155
-
156
-
157
-
158
-
159
-
160
-
161
-
162
-
163
-
164
-
165
-
166
-
167
-
168
-
169
-
170
-
171
-
172
-
173
-
174
-
175
-
176
-
177
-
178
-
179
-
180
-
181
-
182
-
183
-
184
-
185
-
 186
186 -
 187
187 -
 188
188 -
 189
189 -
 190
190 -
 191
191 -
 192
192 -
 193
193 -
 194
194 -
 195
195 -
 196
196 -
197
-
198
-
199
-
200
-
201
-
202
-
203
-
204
-
205
-
206
-
207
-
208
-
209
-
210
-
211
-
212
-
213
-
214
-
215
-
216
-
217
-
218
-
219
-
220
-
221
-
222
-
223
-
224
-
225
-
226
-
227
-
228
-
229
-
230
-
231
-
232
-
233
-
234
-
235
-
236
-
237
-
238
-
239
-
240
-
241
-
242
-
243
-
244
-
245
-
246
-
247
-
248
-
249
-
250
 |
 |
