Casio EX-Z750 Owners Manual - Page 104
Specifying Movie Image Quality
 |
UPC - 079767684266
View all Casio EX-Z750 manuals
Add to My Manuals
Save this manual to your list of manuals |
Page 104 highlights
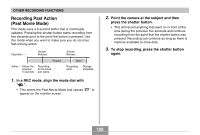
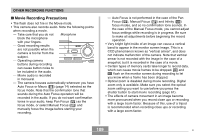
OTHER RECORDING FUNCTIONS Specifying Movie Image Quality The image quality setting determines how much the camera compresses movie images before storing them. Image quality is expressed as image size in pixels. A "pixel" is one of the many tiny dots that make up an image. More pixels (a larger image size) provide finer detail and higher image quality when a movie is played back. Before recording a movie, select the image quality setting that suits your needs. 1. In a REC mode, press [MENU]. 2. Use [̇] and [̈] to select the "Quality" tab. 3. Use [̆] and [̄] to select " Quality" , and then press [̈]. 4. Use [̆] and [̄] to select the setting you want, and then press [SET]. Setting Higher Quality Lower Quality HQ (640 × 480 pixels) Normal (640 × 480 pixels) LP (320 × 240 pixels) Approximate Data Rate 4.0 megabits per second 2.1 megabits per second 745 kilobits per second Frame Rate 30 frames/ second 30 frames/ second 15 frames/ second 104
-
 1
1 -
2
-
3
-
4
-
5
-
6
-
7
-
8
-
9
-
10
-
11
-
12
-
13
-
14
-
15
-
16
-
17
-
18
-
19
-
20
-
21
-
22
-
23
-
24
-
25
-
26
-
27
-
28
-
29
-
30
-
31
-
32
-
33
-
34
-
35
-
36
-
37
-
38
-
39
-
40
-
41
-
42
-
43
-
44
-
45
-
46
-
47
-
48
-
49
-
50
-
51
-
52
-
53
-
54
-
55
-
56
-
57
-
58
-
59
-
60
-
61
-
62
-
63
-
64
-
65
-
66
-
67
-
68
-
69
-
70
-
71
-
72
-
73
-
74
-
75
-
76
-
77
-
78
-
79
-
80
-
81
-
82
-
83
-
84
-
85
-
86
-
87
-
88
-
89
-
90
-
91
-
92
-
93
-
94
-
95
-
96
-
97
-
98
-
 99
99 -
 100
100 -
 101
101 -
 102
102 -
 103
103 -
 104
104 -
 105
105 -
 106
106 -
 107
107 -
 108
108 -
 109
109 -
110
-
111
-
112
-
113
-
114
-
115
-
116
-
117
-
118
-
119
-
120
-
121
-
122
-
123
-
124
-
125
-
126
-
127
-
128
-
129
-
130
-
131
-
132
-
133
-
134
-
135
-
136
-
137
-
138
-
139
-
140
-
141
-
142
-
143
-
144
-
145
-
146
-
147
-
148
-
149
-
150
-
151
-
152
-
153
-
154
-
155
-
156
-
157
-
158
-
159
-
160
-
161
-
162
-
163
-
164
-
165
-
166
-
167
-
168
-
169
-
170
-
171
-
172
-
173
-
174
-
175
-
176
-
177
-
178
-
179
-
180
-
181
-
182
-
183
-
184
-
185
-
186
-
187
-
188
-
189
-
190
-
191
-
192
-
193
-
194
-
195
-
196
-
197
-
198
-
199
-
200
-
201
-
202
-
203
-
204
-
205
-
206
-
207
-
208
-
209
-
210
-
211
-
212
-
213
-
214
-
215
-
216
-
217
-
218
-
219
-
220
-
221
-
222
-
223
-
224
-
225
-
226
-
227
-
228
-
229
-
230
-
231
-
232
-
233
-
234
-
235
-
236
-
237
-
238
-
239
-
240
-
241
-
242
-
243
-
244
-
245
-
246
-
247
-
248
-
249
-
250
 |
 |
