Casio EX-Z750 Owners Manual - Page 65
Flash On, About Red-eye Reduction
 |
UPC - 079767684266
View all Casio EX-Z750 manuals
Add to My Manuals
Save this manual to your list of manuals |
Page 65 highlights
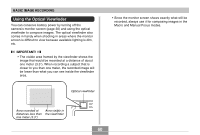
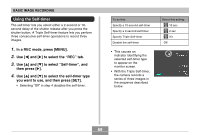
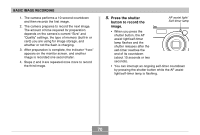
BASIC IMAGE RECORDING IMPORTANT! • The flash unit of this camera fires a number of times when you record an image. The initial flashes are pre-flashes, which the camera uses to obtain information that it uses for exposure settings. The final flash is for recording. Make sure that you keep the camera still until the shutter releases. • Using the flash while "Auto" is selected for the ISO Sensitivity setting increases sensitivity, which can cause large amounts of digital noise to appear in the image. You can reduce digital noise by using a lower ISO Sensitivity setting. Note, however, that this also has the effect of shortening the flash range (the range that is covered by the light from the flash) (page 125). I Flash On Select (Flash On) as the flash mode when backlighting causes your subject to appear dark, even though there is enough light to keep the flash from firing automatically. This will cause the flash to fire and illuminate your subject whenever you press the shutter button (daylight synchro flash). I About Red-eye Reduction Using the flash to record at night or in a dimly lit room can cause red spots inside the eyes of people who are in the image. This happens because the light from the flash reflects off of the retina of the eye. IMPORTANT! Note the following important points when using redeye reduction. • Red-eye reduction does not work unless the people in the image are looking directly at the camera during the pre-flash. Before pressing the shutter button, call out to the subjects so they all look at the camera while the pre-flash operation is performed. • Red-eye reduction may not work very well if the subjects are located far away from the camera. 65
-
 1
1 -
2
-
3
-
4
-
5
-
6
-
7
-
8
-
9
-
10
-
11
-
12
-
13
-
14
-
15
-
16
-
17
-
18
-
19
-
20
-
21
-
22
-
23
-
24
-
25
-
26
-
27
-
28
-
29
-
30
-
31
-
32
-
33
-
34
-
35
-
36
-
37
-
38
-
39
-
40
-
41
-
42
-
43
-
44
-
45
-
46
-
47
-
48
-
49
-
50
-
51
-
52
-
53
-
54
-
55
-
56
-
57
-
58
-
59
-
 60
60 -
 61
61 -
 62
62 -
 63
63 -
 64
64 -
 65
65 -
 66
66 -
 67
67 -
 68
68 -
 69
69 -
 70
70 -
71
-
72
-
73
-
74
-
75
-
76
-
77
-
78
-
79
-
80
-
81
-
82
-
83
-
84
-
85
-
86
-
87
-
88
-
89
-
90
-
91
-
92
-
93
-
94
-
95
-
96
-
97
-
98
-
99
-
100
-
101
-
102
-
103
-
104
-
105
-
106
-
107
-
108
-
109
-
110
-
111
-
112
-
113
-
114
-
115
-
116
-
117
-
118
-
119
-
120
-
121
-
122
-
123
-
124
-
125
-
126
-
127
-
128
-
129
-
130
-
131
-
132
-
133
-
134
-
135
-
136
-
137
-
138
-
139
-
140
-
141
-
142
-
143
-
144
-
145
-
146
-
147
-
148
-
149
-
150
-
151
-
152
-
153
-
154
-
155
-
156
-
157
-
158
-
159
-
160
-
161
-
162
-
163
-
164
-
165
-
166
-
167
-
168
-
169
-
170
-
171
-
172
-
173
-
174
-
175
-
176
-
177
-
178
-
179
-
180
-
181
-
182
-
183
-
184
-
185
-
186
-
187
-
188
-
189
-
190
-
191
-
192
-
193
-
194
-
195
-
196
-
197
-
198
-
199
-
200
-
201
-
202
-
203
-
204
-
205
-
206
-
207
-
208
-
209
-
210
-
211
-
212
-
213
-
214
-
215
-
216
-
217
-
218
-
219
-
220
-
221
-
222
-
223
-
224
-
225
-
226
-
227
-
228
-
229
-
230
-
231
-
232
-
233
-
234
-
235
-
236
-
237
-
238
-
239
-
240
-
241
-
242
-
243
-
244
-
245
-
246
-
247
-
248
-
249
-
250
 |
 |
