Cisco ESW-540-48 Administration Guide - Page 159
Scenario Step 2: Adding the SSL VPN Users, Configuring VPN, Scenario Step 2, Adding the SSL VPN Users
 |
UPC - 882658251351
View all Cisco ESW-540-48 manuals
Add to My Manuals
Save this manual to your list of manuals |
Page 159 highlights
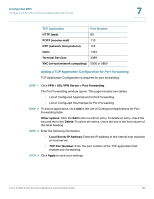
Configuring VPN Configuring SSL VPN for Browser-Based Remote Access 7 STEP 4 In the SSL VPN Portal Pages to Display area, check the box for each SSL VPN Portal page that users can access through this portal. Any page that is not selected will not be visible from the SSL VPN portal navigation menu. However, users can still access the hidden pages unless SSL VPN access policies are created to prevent access to these pages STEP 5 Click Apply to save your settings. STEP 6 To view your new page, click the link in the Portal URL column of the table. This URL also is the URL that you will provide to your users. STEP 7 Repeat as needed to add more portal layouts. NOTE Next step (required) Configure the SSL VPN Users. Proceed to the next section Scenario Step 2: Adding the SSL VPN Users. Scenario Step 2: Adding the SSL VPN Users Authentication of the remote SSL VPN user is done by the security appliance by using either a local database on the security appliance or external authentication servers (i.e. LDAP or RADIUS). The user domain determines the authentication method (local user database, external server) to be used when validating the remote user's connection. In this scenario, you add all users to the default domain and group. However, you can create different domains and groups if you want to have different portal layouts and different SSL VPN policies for different users. For complete details about domains, groups, and users, as well as user policies that you can configure see Chapter 8, "Administration." For information about adding users, see Adding or Editing User Settings, page 173. STEP 1 Click Administration > Users > Users. The List of Users table appears. The User window opens. The default Administrator and Guest users appear in the List of Users table, along with any new users that you add. STEP 2 To add a user, click Add. Cisco SA500 Series Security Appliances Administration Guide 159
-
 1
1 -
2
-
3
-
4
-
5
-
6
-
7
-
8
-
9
-
10
-
11
-
12
-
13
-
14
-
15
-
16
-
17
-
18
-
19
-
20
-
21
-
22
-
23
-
24
-
25
-
26
-
27
-
28
-
29
-
30
-
31
-
32
-
33
-
34
-
35
-
36
-
37
-
38
-
39
-
40
-
41
-
42
-
43
-
44
-
45
-
46
-
47
-
48
-
49
-
50
-
51
-
52
-
53
-
54
-
55
-
56
-
57
-
58
-
59
-
60
-
61
-
62
-
63
-
64
-
65
-
66
-
67
-
68
-
69
-
70
-
71
-
72
-
73
-
74
-
75
-
76
-
77
-
78
-
79
-
80
-
81
-
82
-
83
-
84
-
85
-
86
-
87
-
88
-
89
-
90
-
91
-
92
-
93
-
94
-
95
-
96
-
97
-
98
-
99
-
100
-
101
-
102
-
103
-
104
-
105
-
106
-
107
-
108
-
109
-
110
-
111
-
112
-
113
-
114
-
115
-
116
-
117
-
118
-
119
-
120
-
121
-
122
-
123
-
124
-
125
-
126
-
127
-
128
-
129
-
130
-
131
-
132
-
133
-
134
-
135
-
136
-
137
-
138
-
139
-
140
-
141
-
142
-
143
-
144
-
145
-
146
-
147
-
148
-
149
-
150
-
151
-
152
-
153
-
 154
154 -
 155
155 -
 156
156 -
 157
157 -
 158
158 -
 159
159 -
 160
160 -
 161
161 -
 162
162 -
 163
163 -
 164
164 -
165
-
166
-
167
-
168
-
169
-
170
-
171
-
172
-
173
-
174
-
175
-
176
-
177
-
178
-
179
-
180
-
181
-
182
-
183
-
184
-
185
-
186
-
187
-
188
-
189
-
190
-
191
-
192
-
193
-
194
-
195
-
196
-
197
-
198
-
199
-
200
-
201
-
202
-
203
-
204
-
205
-
206
-
207
-
208
-
209
-
210
-
211
-
212
-
213
-
214
-
215
-
216
-
217
-
218
-
219
-
220
-
221
-
222
-
223
-
224
-
225
-
226
-
227
-
228
-
229
-
230
-
231
-
232
-
233
-
234
-
235
-
236
-
237
-
238
-
239
-
240
 |
 |
