Cisco ESW-540-48 Administration Guide - Page 79
Networking, Configuring the IPv6 LAN, IPv6 > IPv6 LAN Config
 |
UPC - 882658251351
View all Cisco ESW-540-48 manuals
Add to My Manuals
Save this manual to your list of manuals |
Page 79 highlights
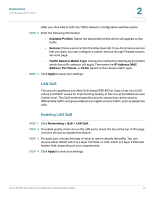
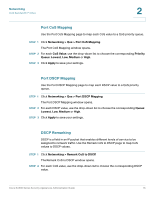
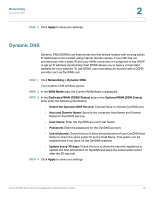
Networking Configuring IPv6 Addressing 2 STEP 3 If you are configuring a static address, enter the following information in the Static IP Address area of the page. • IPv6 Address: Enter the static IP address that was provided by your Service Provider. • IPv6 Prefix Length: The IPv6 network (subnet) is identified by the initial bits of the address called the prefix. All hosts in the network have the identical initial bits for their IPv6 address. Enter the number of common initial bits in the network's addresses. The default prefix length is 64. • Default IPv6 Gateway: Enter the IPv6 address of the gateway for your ISP. This is usually provided by the ISP or your network administrator. • Primary DNS Server and Secondary DNS Server: Enter a valid IP address of a primary DNS Server and optionally a secondary DNS Server. STEP 4 If you need to change the DHCPv6 autoconfiguration mode, choose the mode in the DHCPv6 area of the page: • Stateless Address Auto Configuration: If you choose this option, the security appliance can generate its own addresses using a combination of locally available information and information advertised by routers. • Stateful Address Auto Configuration: If you choose this option, the security appliance connects to the DHCPv6 server at the ISP to obtain a leased address. STEP 5 Click Apply to save your settings. NOTE Next steps: To configure the LAN, click IPv6 > IPv6 LAN Config. For more information, see Configuring the IPv6 LAN, page 80. Cisco SA500 Series Security Appliances Administration Guide 79
-
 1
1 -
2
-
3
-
4
-
5
-
6
-
7
-
8
-
9
-
10
-
11
-
12
-
13
-
14
-
15
-
16
-
17
-
18
-
19
-
20
-
21
-
22
-
23
-
24
-
25
-
26
-
27
-
28
-
29
-
30
-
31
-
32
-
33
-
34
-
35
-
36
-
37
-
38
-
39
-
40
-
41
-
42
-
43
-
44
-
45
-
46
-
47
-
48
-
49
-
50
-
51
-
52
-
53
-
54
-
55
-
56
-
57
-
58
-
59
-
60
-
61
-
62
-
63
-
64
-
65
-
66
-
67
-
68
-
69
-
70
-
71
-
72
-
73
-
 74
74 -
 75
75 -
 76
76 -
 77
77 -
 78
78 -
 79
79 -
 80
80 -
 81
81 -
 82
82 -
 83
83 -
 84
84 -
85
-
86
-
87
-
88
-
89
-
90
-
91
-
92
-
93
-
94
-
95
-
96
-
97
-
98
-
99
-
100
-
101
-
102
-
103
-
104
-
105
-
106
-
107
-
108
-
109
-
110
-
111
-
112
-
113
-
114
-
115
-
116
-
117
-
118
-
119
-
120
-
121
-
122
-
123
-
124
-
125
-
126
-
127
-
128
-
129
-
130
-
131
-
132
-
133
-
134
-
135
-
136
-
137
-
138
-
139
-
140
-
141
-
142
-
143
-
144
-
145
-
146
-
147
-
148
-
149
-
150
-
151
-
152
-
153
-
154
-
155
-
156
-
157
-
158
-
159
-
160
-
161
-
162
-
163
-
164
-
165
-
166
-
167
-
168
-
169
-
170
-
171
-
172
-
173
-
174
-
175
-
176
-
177
-
178
-
179
-
180
-
181
-
182
-
183
-
184
-
185
-
186
-
187
-
188
-
189
-
190
-
191
-
192
-
193
-
194
-
195
-
196
-
197
-
198
-
199
-
200
-
201
-
202
-
203
-
204
-
205
-
206
-
207
-
208
-
209
-
210
-
211
-
212
-
213
-
214
-
215
-
216
-
217
-
218
-
219
-
220
-
221
-
222
-
223
-
224
-
225
-
226
-
227
-
228
-
229
-
230
-
231
-
232
-
233
-
234
-
235
-
236
-
237
-
238
-
239
-
240
 |
 |
