Cisco ESW-540-48 Administration Guide - Page 18
Connecting to the Configuration Utility, Getting Started, Using the Getting Started s, - default password
 |
UPC - 882658251351
View all Cisco ESW-540-48 manuals
Add to My Manuals
Save this manual to your list of manuals |
Page 18 highlights
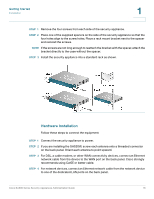
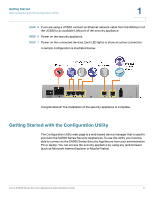
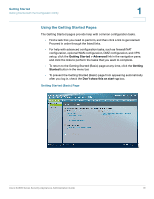
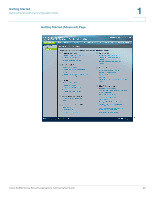
Getting Started Getting Started with the Configuration Utility 1 Connecting to the Configuration Utility STEP 1 Connect your computer to an available LAN port on the back panel of the security appliance. STEP 2 Start a web browser, and enter the following address: 192.168.75.1 This address is the factory default LAN address of the security appliance. If you change this setting in the LAN configuration, you will need to enter the new IP address to connect to the Configuration Utility. STEP 3 When the Security Alert appears, accept or install the certificate: • Internet Explorer: Click Yes to proceed, or click View Certificate for details. On the Certificate page, click Install the Certificate. Follow the instructions in the Wizard to complete the installation. • Firefox: Click the link to add an exception. Click the Add Exception button. Click Get Certificate, and then click Confirm Security Exception. • Safari: Click Continue to proceed, or click Show Certificate. On the Certificate page, click Install the Certificate. Follow the instructions in the Wizard to complete the installation. STEP 4 Enter the default user name and password: • Username: cisco • Password: cisco STEP 5 Click Log In. The Getting Started (Basic) window opens. For more information, see Using the Getting Started Pages, page 19. NOTE You can use the Cisco Configuration Assistant (CCA) t to launch the Configuration Utility if you are using the security appliance with a CCA-supported device, such as the UC500. For more information about CCA, see: www.cisco.com/go/configassist. Cisco SA500 Series Security Appliances Administration Guide 18
-
 1
1 -
2
-
3
-
4
-
5
-
6
-
7
-
8
-
9
-
10
-
11
-
12
-
 13
13 -
 14
14 -
 15
15 -
 16
16 -
 17
17 -
 18
18 -
 19
19 -
 20
20 -
 21
21 -
 22
22 -
 23
23 -
24
-
25
-
26
-
27
-
28
-
29
-
30
-
31
-
32
-
33
-
34
-
35
-
36
-
37
-
38
-
39
-
40
-
41
-
42
-
43
-
44
-
45
-
46
-
47
-
48
-
49
-
50
-
51
-
52
-
53
-
54
-
55
-
56
-
57
-
58
-
59
-
60
-
61
-
62
-
63
-
64
-
65
-
66
-
67
-
68
-
69
-
70
-
71
-
72
-
73
-
74
-
75
-
76
-
77
-
78
-
79
-
80
-
81
-
82
-
83
-
84
-
85
-
86
-
87
-
88
-
89
-
90
-
91
-
92
-
93
-
94
-
95
-
96
-
97
-
98
-
99
-
100
-
101
-
102
-
103
-
104
-
105
-
106
-
107
-
108
-
109
-
110
-
111
-
112
-
113
-
114
-
115
-
116
-
117
-
118
-
119
-
120
-
121
-
122
-
123
-
124
-
125
-
126
-
127
-
128
-
129
-
130
-
131
-
132
-
133
-
134
-
135
-
136
-
137
-
138
-
139
-
140
-
141
-
142
-
143
-
144
-
145
-
146
-
147
-
148
-
149
-
150
-
151
-
152
-
153
-
154
-
155
-
156
-
157
-
158
-
159
-
160
-
161
-
162
-
163
-
164
-
165
-
166
-
167
-
168
-
169
-
170
-
171
-
172
-
173
-
174
-
175
-
176
-
177
-
178
-
179
-
180
-
181
-
182
-
183
-
184
-
185
-
186
-
187
-
188
-
189
-
190
-
191
-
192
-
193
-
194
-
195
-
196
-
197
-
198
-
199
-
200
-
201
-
202
-
203
-
204
-
205
-
206
-
207
-
208
-
209
-
210
-
211
-
212
-
213
-
214
-
215
-
216
-
217
-
218
-
219
-
220
-
221
-
222
-
223
-
224
-
225
-
226
-
227
-
228
-
229
-
230
-
231
-
232
-
233
-
234
-
235
-
236
-
237
-
238
-
239
-
240
 |
 |