Cisco ESW-540-48 Administration Guide - Page 80
Configuring the IPv6 LAN, Networking, IPv6 LAN, Address Pools,
 |
UPC - 882658251351
View all Cisco ESW-540-48 manuals
Add to My Manuals
Save this manual to your list of manuals |
Page 80 highlights
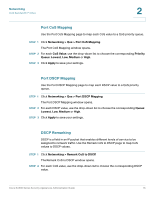
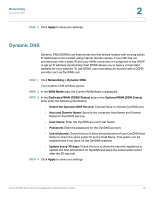
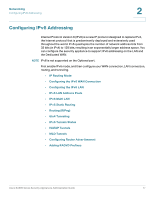
Networking Configuring IPv6 Addressing 2 Configuring the IPv6 LAN In IPv6 mode, the LAN DHCP server is enabled by default (similar to IPv4 mode). The DHCPv6 server will serve IPv6 addresses from configured address pools with the IPv6 Prefix Length assigned to the LAN. For more information, see IPv6 LAN Address Pools, page 82. STEP 1 Click Networking > IPv6 > IPv6 LAN Config. The IPv6 LAN Configuration window opens. STEP 2 In the LAN TCP/IP Settings section, enter the following information: • IPv6 Address: Enter the IPv6 address. The default IPv6 address for the gateway is fec0::1. You can change this 128-bit IPv6 address based on your network requirements. NOTE If you change the IP address and click Apply, then the browser connection is lost. Wait a few seconds to allow your administration computer to obtain a new IP address from newly assigned IP address pool (or release and renew if connected via DHCP). Then enter the new IP address of the security appliance in the Address bar of the browser, and log in again. • IPv6 Prefix Length: Enter the number of characters in the IPv6 prefix. The IPv6 network (subnet) is identified by the prefix, which consists of the initial bits of the address. The default prefix length is 64 bits. All hosts in the network have the identical initial bits for the IPv6 address. The number of common initial bits in the addresses is set by the prefix length field. STEP 3 In the DHCPv6 area, enter the following information: • DHCP Status: If you do not want the security appliance to act as a DHCP server, click Disable DHCPv6 Server (the default setting). If you want the security appliance to act as a DHCP server that dynamically assigns IP addresses to all connected devices, click Enable DHCPv6 Server, and then complete all fields that are highlighted with white backgrounds. Cisco SA500 Series Security Appliances Administration Guide 80
-
 1
1 -
2
-
3
-
4
-
5
-
6
-
7
-
8
-
9
-
10
-
11
-
12
-
13
-
14
-
15
-
16
-
17
-
18
-
19
-
20
-
21
-
22
-
23
-
24
-
25
-
26
-
27
-
28
-
29
-
30
-
31
-
32
-
33
-
34
-
35
-
36
-
37
-
38
-
39
-
40
-
41
-
42
-
43
-
44
-
45
-
46
-
47
-
48
-
49
-
50
-
51
-
52
-
53
-
54
-
55
-
56
-
57
-
58
-
59
-
60
-
61
-
62
-
63
-
64
-
65
-
66
-
67
-
68
-
69
-
70
-
71
-
72
-
73
-
74
-
 75
75 -
 76
76 -
 77
77 -
 78
78 -
 79
79 -
 80
80 -
 81
81 -
 82
82 -
 83
83 -
 84
84 -
 85
85 -
86
-
87
-
88
-
89
-
90
-
91
-
92
-
93
-
94
-
95
-
96
-
97
-
98
-
99
-
100
-
101
-
102
-
103
-
104
-
105
-
106
-
107
-
108
-
109
-
110
-
111
-
112
-
113
-
114
-
115
-
116
-
117
-
118
-
119
-
120
-
121
-
122
-
123
-
124
-
125
-
126
-
127
-
128
-
129
-
130
-
131
-
132
-
133
-
134
-
135
-
136
-
137
-
138
-
139
-
140
-
141
-
142
-
143
-
144
-
145
-
146
-
147
-
148
-
149
-
150
-
151
-
152
-
153
-
154
-
155
-
156
-
157
-
158
-
159
-
160
-
161
-
162
-
163
-
164
-
165
-
166
-
167
-
168
-
169
-
170
-
171
-
172
-
173
-
174
-
175
-
176
-
177
-
178
-
179
-
180
-
181
-
182
-
183
-
184
-
185
-
186
-
187
-
188
-
189
-
190
-
191
-
192
-
193
-
194
-
195
-
196
-
197
-
198
-
199
-
200
-
201
-
202
-
203
-
204
-
205
-
206
-
207
-
208
-
209
-
210
-
211
-
212
-
213
-
214
-
215
-
216
-
217
-
218
-
219
-
220
-
221
-
222
-
223
-
224
-
225
-
226
-
227
-
228
-
229
-
230
-
231
-
232
-
233
-
234
-
235
-
236
-
237
-
238
-
239
-
240
 |
 |
