Cisco ESW-540-48 Administration Guide - Page 60
Configuring the Protocol Bindings for Load Balancing, Configuring Auto-Rollover, Load Balancing
 |
UPC - 882658251351
View all Cisco ESW-540-48 manuals
Add to My Manuals
Save this manual to your list of manuals |
Page 60 highlights
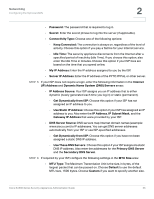
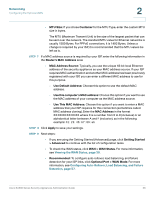
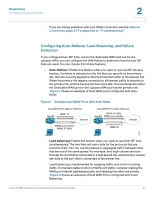
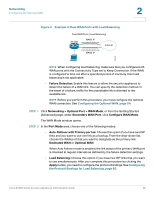
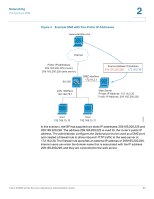
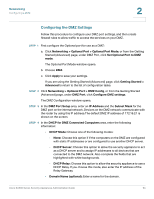
Networking Configuring the Optional WAN 2 NOTE Next steps: • If you are using the Getting Started (Advanced) page, click Getting Started > Advanced to continue with the list of configuration tasks. • Required for load balancing: If you chose the Load Balancing option, click Optional Port > Protocol Bindings to configure your protocol bindings. For more information, see Configuring the Protocol Bindings for Load Balancing, page 60. Configuring the Protocol Bindings for Load Balancing If you chose Load Balancing as the Port Mode for your Optional WAN, you configure protocol bindings to determine how the traffic is balanced between the two ISP links. This feature can be used to segregate traffic between links that are not of the same speed. High volume traffic can be routed through the port connected to a high speed link and low volume traffic can be routed through the port connected to the slow link. For example, you can bind the HTTP protocol to the Dedicated WAN and bind the FTP protocol to the Optional WAN. In this scenario, the security appliance automatically channels FTP data through the Optional WAN. All HTTP traffic is routed through the Dedicated WAN. NOTE Before you can enter the protocol bindings, you must configure the optional port, the WAN connection, and the WAN port mode. For more information, see Configuring Auto-Rollover, Load Balancing, and Failure Detection, page 57. If you want to enter a protocol binding for a custom service, you must first add the custom service to the database. See Creating Custom Services, page 104. STEP 1 Click Networking > Optional Port > Protocol Bindings, or from the Getting Started (Advanced) page, under Secondary WAN Port, click Configure Protocol Bindings (Optional - if WAN Mode set to Load Balancing). The Protocol Bindings window opens. Any existing protocol bindings appear in the List of Available Protocol Bindings table. STEP 2 Click Add. Cisco SA500 Series Security Appliances Administration Guide 60
-
 1
1 -
2
-
3
-
4
-
5
-
6
-
7
-
8
-
9
-
10
-
11
-
12
-
13
-
14
-
15
-
16
-
17
-
18
-
19
-
20
-
21
-
22
-
23
-
24
-
25
-
26
-
27
-
28
-
29
-
30
-
31
-
32
-
33
-
34
-
35
-
36
-
37
-
38
-
39
-
40
-
41
-
42
-
43
-
44
-
45
-
46
-
47
-
48
-
49
-
50
-
51
-
52
-
53
-
54
-
 55
55 -
 56
56 -
 57
57 -
 58
58 -
 59
59 -
 60
60 -
 61
61 -
 62
62 -
 63
63 -
 64
64 -
 65
65 -
66
-
67
-
68
-
69
-
70
-
71
-
72
-
73
-
74
-
75
-
76
-
77
-
78
-
79
-
80
-
81
-
82
-
83
-
84
-
85
-
86
-
87
-
88
-
89
-
90
-
91
-
92
-
93
-
94
-
95
-
96
-
97
-
98
-
99
-
100
-
101
-
102
-
103
-
104
-
105
-
106
-
107
-
108
-
109
-
110
-
111
-
112
-
113
-
114
-
115
-
116
-
117
-
118
-
119
-
120
-
121
-
122
-
123
-
124
-
125
-
126
-
127
-
128
-
129
-
130
-
131
-
132
-
133
-
134
-
135
-
136
-
137
-
138
-
139
-
140
-
141
-
142
-
143
-
144
-
145
-
146
-
147
-
148
-
149
-
150
-
151
-
152
-
153
-
154
-
155
-
156
-
157
-
158
-
159
-
160
-
161
-
162
-
163
-
164
-
165
-
166
-
167
-
168
-
169
-
170
-
171
-
172
-
173
-
174
-
175
-
176
-
177
-
178
-
179
-
180
-
181
-
182
-
183
-
184
-
185
-
186
-
187
-
188
-
189
-
190
-
191
-
192
-
193
-
194
-
195
-
196
-
197
-
198
-
199
-
200
-
201
-
202
-
203
-
204
-
205
-
206
-
207
-
208
-
209
-
210
-
211
-
212
-
213
-
214
-
215
-
216
-
217
-
218
-
219
-
220
-
221
-
222
-
223
-
224
-
225
-
226
-
227
-
228
-
229
-
230
-
231
-
232
-
233
-
234
-
235
-
236
-
237
-
238
-
239
-
240
 |
 |
