Cisco WRT54GS User Manual - Page 21
Setting up the Wireless-G Broadband Router - manual
 |
View all Cisco WRT54GS manuals
Add to My Manuals
Save this manual to your list of manuals |
Page 21 highlights
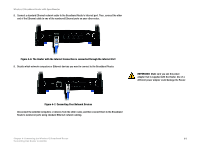
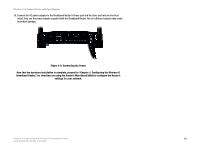
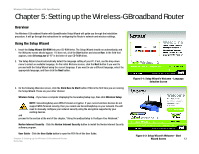
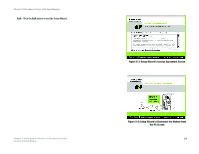
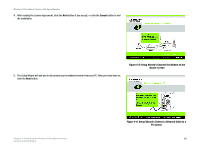
Wireless-G Broadband Router with SpeedBooster Chapter 5: Setting up the Wireless-G Broadband Router Overview The Wireless-G Broadband Router with SpeedBooster Setup Wizard will guide you through the installation procedure. It will go through the instructions for configuring the Router's network and wireless settings. Using the Setup Wizard 1. Insert the Setup Wizard CD-ROM into your CD-ROM drive. The Setup Wizard should run automatically, and the Welcome screen should appear. If it does not, click the Start button and choose Run. In the field that appears, enter D:\setup.exe (if "D" is the letter of your CD-ROM drive). 2. The Setup Wizard should automatically detect the language setting of your PC. If not, use the drop-down menu to select an available language. On the initial Welcome screen, click the Next button if you want to proceed with the Setup Wizard using the current language. If you want to use a different language, select the appropriate language, and then click the Next button. 3. On the following Welcome screen, click the Click Here to Start button if this is the first time you are running the Setup Wizard. These are your other choices: Wireless Setup - If you have a computer displaying the SecureEasySetup logo, then click Wireless Setup NOTE: SecureEasySetup uses WPA-Personal encryption. If your current wireless devices do not support WPA-Personal security, then you cannot use SecureEasySetup on your network. You will need to manually configure your network security using the encryption supported by your existing devices. and proceed to the section at the end of this chapter, "Using SecureEasySetup to Configure Your Notebook." Norton Internet Security - Click the Norton Internet Security button to install the Norton Internet Security software program. User Guide - Click the User Guide button to open the PDF file of this User Guide. Chapter 5: Setting up the Wireless-G Broadband Router Overview Figure 5-1: Setup Wizard's Welcome - Language Selection Screen Figure 5-2: Setup Wizard's Welcome - Start Wizard Screen 13
-
 1
1 -
2
-
3
-
4
-
5
-
6
-
7
-
8
-
9
-
10
-
11
-
12
-
13
-
14
-
15
-
 16
16 -
 17
17 -
 18
18 -
 19
19 -
 20
20 -
 21
21 -
 22
22 -
 23
23 -
 24
24 -
 25
25 -
 26
26 -
27
-
28
-
29
-
30
-
31
-
32
-
33
-
34
-
35
-
36
-
37
-
38
-
39
-
40
-
41
-
42
-
43
-
44
-
45
-
46
-
47
-
48
-
49
-
50
-
51
-
52
-
53
-
54
-
55
-
56
-
57
-
58
-
59
-
60
-
61
-
62
-
63
-
64
-
65
-
66
-
67
-
68
-
69
-
70
-
71
-
72
-
73
-
74
-
75
-
76
-
77
-
78
-
79
-
80
-
81
-
82
-
83
-
84
-
85
-
86
-
87
-
88
-
89
-
90
-
91
-
92
-
93
-
94
-
95
-
96
-
97
-
98
-
99
-
100
-
101
-
102
-
103
-
104
-
105
-
106
-
107
-
108
-
109
-
110
-
111
-
112
-
113
-
114
-
115
-
116
-
117
-
118
-
119
-
120
-
121
-
122
-
123
-
124
-
125
-
126
-
127
-
128
-
129
-
130
-
131
-
132
-
133
-
134
-
135
-
136
-
137
-
138
-
139
-
140
-
141
-
142
-
143
-
144
-
145
-
146
-
147
-
148
-
149
-
150
-
151
-
152
-
153
-
154
-
155
-
156
-
157
-
158
-
159
-
160
-
161
-
162
-
163
-
164
-
165
-
166
-
167
-
168
-
169
-
170
-
171
-
172
-
173
-
174
-
175
-
176
-
177
-
178
-
179
-
180
-
181
-
182
-
183
-
184
-
185
-
186
-
187
-
188
-
189
-
190
-
191
-
192
-
193
-
194
-
195
-
196
-
197
-
198
-
199
-
200
-
201
-
202
-
203
-
204
-
205
-
206
-
207
-
208
-
209
-
210
-
211
-
212
-
213
-
214
-
215
-
216
-
217
-
218
-
219
-
220
-
221
-
222
-
223
-
224
-
225
-
226
-
227
-
228
-
229
-
230
-
231
-
232
-
233
-
234
-
235
-
236
-
237
-
238
-
239
-
240
-
241
-
242
-
243
-
244
-
245
-
246
-
247
-
248
-
249
-
250
-
251
-
252
-
253
-
254
-
255
-
256
-
257
-
258
-
259
-
260
-
261
-
262
-
263
-
264
-
265
-
266
-
267
-
268
-
269
-
270
-
271
-
272
-
273
-
274
-
275
-
276
-
277
-
278
-
279
-
280
-
281
-
282
-
283
-
284
-
285
-
286
-
287
-
288
-
289
-
290
-
291
-
292
-
293
-
294
-
295
-
296
-
297
-
298
-
299
-
300
-
301
-
302
-
303
-
304
-
305
-
306
-
307
-
308
-
309
-
310
-
311
-
312
-
313
-
314
-
315
-
316
-
317
-
318
-
319
-
320
-
321
-
322
-
323
-
324
-
325
-
326
-
327
-
328
-
329
-
330
-
331
-
332
-
333
 |
 |
