Cisco WRT54GS User Manual - Page 39
Using SecureEasySetup to Con Your Notebook, Con Wireless Settings #2 Screen
 |
View all Cisco WRT54GS manuals
Add to My Manuals
Save this manual to your list of manuals |
Page 39 highlights
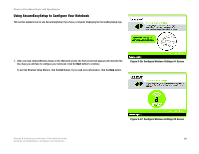
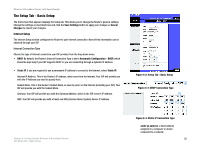
Wireless-G Broadband Router with SpeedBooster Using SecureEasySetup to Configure Your Notebook This section explains how to use SecureEasySetup if you have a computer displaying the SecureEasySetup logo. 1. After you have clicked Wireless Setup on the Welcome screen, the first screen that appears will describe the two steps you will take to configure your notebook. Click the Next button to continue. To exit the Wireless Setup Wizard, click the Exit button. If you need more information, click the Help button. Figure 5-36: Configure Wireless Settings #1 Screen Chapter 5: Setting up the Wireless-G Broadband Router Using SecureEasySetup to Configure Your Notebook Figure 5-37: Configure Wireless Settings #2 Screen 31
-
 1
1 -
2
-
3
-
4
-
5
-
6
-
7
-
8
-
9
-
10
-
11
-
12
-
13
-
14
-
15
-
16
-
17
-
18
-
19
-
20
-
21
-
22
-
23
-
24
-
25
-
26
-
27
-
28
-
29
-
30
-
31
-
32
-
33
-
 34
34 -
 35
35 -
 36
36 -
 37
37 -
 38
38 -
 39
39 -
 40
40 -
 41
41 -
 42
42 -
 43
43 -
 44
44 -
45
-
46
-
47
-
48
-
49
-
50
-
51
-
52
-
53
-
54
-
55
-
56
-
57
-
58
-
59
-
60
-
61
-
62
-
63
-
64
-
65
-
66
-
67
-
68
-
69
-
70
-
71
-
72
-
73
-
74
-
75
-
76
-
77
-
78
-
79
-
80
-
81
-
82
-
83
-
84
-
85
-
86
-
87
-
88
-
89
-
90
-
91
-
92
-
93
-
94
-
95
-
96
-
97
-
98
-
99
-
100
-
101
-
102
-
103
-
104
-
105
-
106
-
107
-
108
-
109
-
110
-
111
-
112
-
113
-
114
-
115
-
116
-
117
-
118
-
119
-
120
-
121
-
122
-
123
-
124
-
125
-
126
-
127
-
128
-
129
-
130
-
131
-
132
-
133
-
134
-
135
-
136
-
137
-
138
-
139
-
140
-
141
-
142
-
143
-
144
-
145
-
146
-
147
-
148
-
149
-
150
-
151
-
152
-
153
-
154
-
155
-
156
-
157
-
158
-
159
-
160
-
161
-
162
-
163
-
164
-
165
-
166
-
167
-
168
-
169
-
170
-
171
-
172
-
173
-
174
-
175
-
176
-
177
-
178
-
179
-
180
-
181
-
182
-
183
-
184
-
185
-
186
-
187
-
188
-
189
-
190
-
191
-
192
-
193
-
194
-
195
-
196
-
197
-
198
-
199
-
200
-
201
-
202
-
203
-
204
-
205
-
206
-
207
-
208
-
209
-
210
-
211
-
212
-
213
-
214
-
215
-
216
-
217
-
218
-
219
-
220
-
221
-
222
-
223
-
224
-
225
-
226
-
227
-
228
-
229
-
230
-
231
-
232
-
233
-
234
-
235
-
236
-
237
-
238
-
239
-
240
-
241
-
242
-
243
-
244
-
245
-
246
-
247
-
248
-
249
-
250
-
251
-
252
-
253
-
254
-
255
-
256
-
257
-
258
-
259
-
260
-
261
-
262
-
263
-
264
-
265
-
266
-
267
-
268
-
269
-
270
-
271
-
272
-
273
-
274
-
275
-
276
-
277
-
278
-
279
-
280
-
281
-
282
-
283
-
284
-
285
-
286
-
287
-
288
-
289
-
290
-
291
-
292
-
293
-
294
-
295
-
296
-
297
-
298
-
299
-
300
-
301
-
302
-
303
-
304
-
305
-
306
-
307
-
308
-
309
-
310
-
311
-
312
-
313
-
314
-
315
-
316
-
317
-
318
-
319
-
320
-
321
-
322
-
323
-
324
-
325
-
326
-
327
-
328
-
329
-
330
-
331
-
332
-
333
 |
 |

31
Chapter 5: Setting up the Wireless-G Broadband Router
Using SecureEasySetup to Configure Your Notebook
Wireless-G Broadband Router with SpeedBooster
Using SecureEasySetup to Configure Your Notebook
This section explains how to use SecureEasySetup if you have a computer displaying the SecureEasySetup logo.
1.
After you have clicked Wireless Setup on the
Welcome
screen, the first screen that appears will describe the
two steps you will take to configure your notebook. Click the
Next
button to continue.
To exit the Wireless Setup Wizard, click the
Exit
button. If you need more information, click the
Help
button.
Figure 5-37: Configure Wireless Settings #2 Screen
Figure 5-36: Configure Wireless Settings #1 Screen