Computer Associates BABNWUP900NE6 Clients Agents Guide - Page 38
Enable Virus Scanning - antivirus
 |
UPC - 757943261509
View all Computer Associates BABNWUP900NE6 manuals
Add to My Manuals
Save this manual to your list of manuals |
Page 38 highlights
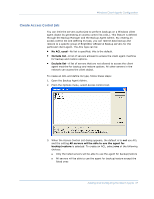
Windows Client Agents Configuration 4. Click Add to add client agent names to the access control list, including as many names as you need for the ACL. If you want to remove client agents from the list, click Remove for each client agent being removed. 5. Click OK when you are finished adding or removing client agent names. Enable Virus Scanning Computer Associates' premier antivirus system, eTrust™ Antivirus, is bundled with BrightStor ARCserve Backup and is available through the Backup Manager. The eTrust Antivirus software offers extra protection for your critical data, securing it from virus threats even during backup and restore activities. Using this option, you can configure the Windows client agent to automatically detect and repair viruses during a backup, copy, count, or restore operation. To enable virus scanning for Windows client agents, follow these steps: 1. Open the Backup Manager or the Restore Manager. 2. From the toolbar, click the Options button to display the Global Options dialog. 3. Click the Virus tab. 4. Select Enable Virus Scanning. 5. Click the virus scanning options that you want to apply to the client agent. Available options include: „ Skip-Do not back up or restore an infected file. „ Rename-Rename the infected files with the extension x.AVB (for example, 0.AVB, 1.AVB, 2.AVB). If a file with the same name and the extension AVB exists, the system will name the file with a numeric version of that extension, for example, AV0, AV1, AV2. „ Delete-Delete the infected file. „ Cure-eTrust Antivirus cures the files that have been found to be infected. With the Cure option, infected files are automatically repaired during a backup without user intervention. 6. If you want each archive's component files individually verified, enable Scan Compressed Files. Note: This option may reduce backup or restore performance. 38 Client Agents Guide
-
 1
1 -
2
-
3
-
4
-
5
-
6
-
7
-
8
-
9
-
10
-
11
-
12
-
13
-
14
-
15
-
16
-
17
-
18
-
19
-
20
-
21
-
22
-
23
-
24
-
25
-
26
-
27
-
28
-
29
-
30
-
31
-
32
-
 33
33 -
 34
34 -
 35
35 -
 36
36 -
 37
37 -
 38
38 -
 39
39 -
 40
40 -
 41
41 -
 42
42 -
 43
43 -
44
-
45
-
46
-
47
-
48
-
49
-
50
-
51
-
52
-
53
-
54
-
55
-
56
-
57
-
58
-
59
-
60
-
61
-
62
-
63
-
64
-
65
-
66
-
67
-
68
-
69
-
70
-
71
-
72
-
73
 |
 |
