Creative 0404 Owners Manual - Page 25
USB 2.0 Owner's Manual, Get Ready To Record, Record Another Track
 |
UPC - 054651129276
View all Creative 0404 manuals
Add to My Manuals
Save this manual to your list of manuals |
Page 25 highlights
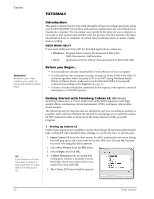
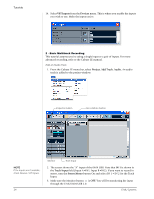
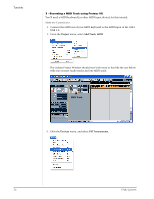
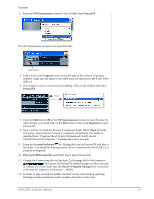
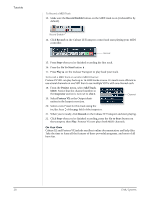
Tutorials 4. Press the Direct Monitor button on your E-MU 0404 USB 2.0. The LED should show Main. If you are recording a mono track, set Direct Monitor to Mono by pressing the Mono On button. Get Ready To Record 5. Plug in your instrument or microphone and set the input gain control for a good signal level. The meters should show signal activity, but the clip LED should never come on. 6. You should be hearing your instrument or microphone through your monitor speakers or headphones. If not, go back to steps 4 and 5. 7. Optional Step - Metronome: To toggle the Metronome on and off, press C on the computer keyboard. To adjust the metronome output level, press the transport Play control, then select Metronome Setup... from the Transport menu. Use the volume slider to set the desired metronome level. 8. Press the Go to Start button . 9. Make sure the Record Enable button on the track is on (it should be by default). Direct Monitor Main S/PDIF Off NOTE Turning on the metronome adds a 2-bar lead-in before recording begins. Record Enable 10. Press the Record button on the Cubase transport control panel. The button turns red and you're recording. Record Go to Start Stop Play 11. When you're finished recording your track, press the Spacebar, or press the Stop button on the Cubase Transport Control. 12. Press the Go to Start button . 13. Press the Spacebar or press the Play button to play back your new Track. Record Another Track 14. Press the Go to Start button . 15. Drag the audio chunk you just recorded down below itself and release the mouse button. A new track is automatically created with your recording. This is by far the quickest and easiest way to set up a new track in Cubase. Now you're all set to record again on Track 1. Drag 16. Press the Record button on the Cubase transport control panel and you're recording again. You'll hear your first track playing along with you. 17. Repeat steps 12-14 to record more audio tracks. 18. Press the Mute button to silence any tracks you don't want to hear. 0404 USB 2.0 Owner's Manual 25
-
 1
1 -
2
-
3
-
4
-
5
-
6
-
7
-
8
-
9
-
10
-
11
-
12
-
13
-
14
-
15
-
16
-
17
-
18
-
19
-
 20
20 -
 21
21 -
 22
22 -
 23
23 -
 24
24 -
 25
25 -
 26
26 -
 27
27 -
 28
28 -
 29
29 -
 30
30 -
31
-
32
-
33
-
34
-
35
-
36
-
37
-
38
-
39
-
40
-
41
-
42
-
43
-
44
-
45
-
46
-
47
-
48
-
49
-
50
-
51
-
52
-
53
-
54
-
55
-
56
 |
 |
