Creative 0404 Owners Manual - Page 46
Other Cool Tips
 |
UPC - 054651129276
View all Creative 0404 manuals
Add to My Manuals
Save this manual to your list of manuals |
Page 46 highlights
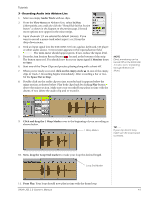
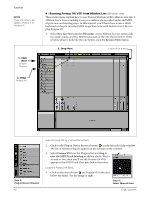
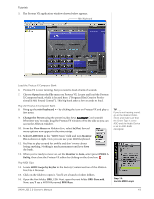
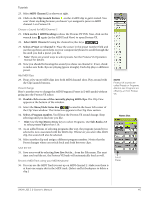
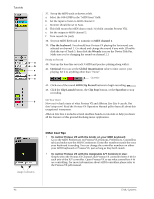
Tutorials 37. Set up the MIDI track as shown at left. a. Select the 0404|USB in the "MIDI from" field. b. Set the input to listen to MIDI channel 2. c. Monitor should be set to Auto. d. This field routes the MIDI data to track 3 (which contains Proteus VX). e. Set the output to MIDI channel 2. f. Turn record On (red). 38. Set your MIDI Keyboard to transmit on MIDI channel 2. 39. Play the keyboard. You should hear Proteus VX playing the last sound you selected on channel 2. Go ahead and change the sound if you wish. (Doubleclick the top of Track 3, then click the Wrench icon on the Device Title Bar. Make sure you're changing the sound on channel 2.) Ready to Record a 40. Start up the bass line on track 3 MIDI and practice playing along with it. b 41. Optional: You can set the Global Quantization value to time correct your c playing. Set it to anything other than "None". d e Quantize 42. Click one of the round MIDI Clip Record buttons to begin recording. 43. Click the Clip Launch button, the Clip Stop button, or the Spacebar to stop recording. On Your Own f Now you've had a taste of what Proteus VX and Ableton Live Lite 4 can do. But don't stop now! Read the Proteus VX Operation Manual pdf to learn all about this exceptional instrument. Ableton Live Lite 4 includes several excellent hands-on tutorials to help you learn all the features of this ground-breaking music application. Assign Controllers Other Cool Tips • To control Proteus VX with the knobs on your MIDI keyboard: Go to the MIDI Preferences on Proteus VX (Options, Preferences, Controllers tab) and make sure the MIDI Continuous Controller numbers match the ones your keyboard is sending. You can change the controller numbers on either your MIDI keyboard or Proteus VX, just as long as they both match. • To control Proteus VX with the Assignable X/Y Controls in Live: Simply select the Proteus VX Channel and Proteus VX controller letter A-M for each axis of the X/Y controller. Open Proteus VX to see what controllers A-M are controlling. For more information about MIDI controllers please refer to the Proteus VX pdf manual. 46 E-MU Systems
-
 1
1 -
2
-
3
-
4
-
5
-
6
-
7
-
8
-
9
-
10
-
11
-
12
-
13
-
14
-
15
-
16
-
17
-
18
-
19
-
20
-
21
-
22
-
23
-
24
-
25
-
26
-
27
-
28
-
29
-
30
-
31
-
32
-
33
-
34
-
35
-
36
-
37
-
38
-
39
-
40
-
 41
41 -
 42
42 -
 43
43 -
 44
44 -
 45
45 -
 46
46 -
 47
47 -
 48
48 -
 49
49 -
 50
50 -
 51
51 -
52
-
53
-
54
-
55
-
56
 |
 |
