Creative 0404 Owners Manual - Page 45
USB 2.0 Owner's Manual, Choose a Sound for MIDI Channel 2, Add MIDI Clips, Preset Change, Save the Set
 |
UPC - 054651129276
View all Creative 0404 manuals
Add to My Manuals
Save this manual to your list of manuals |
Page 45 highlights
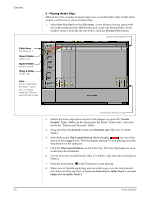
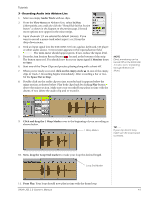
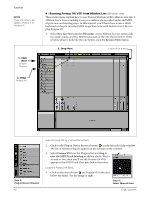
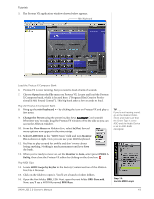
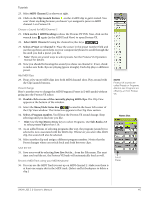
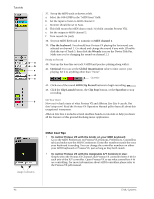
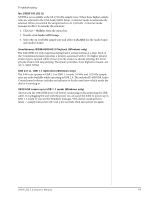
Tutorials 23. Select MIDI Channel 2 as shown at right. 24. Click on the Clip Launch Button on the 4 MIDI clip to get it started. You won't hear anything because you haven't yet assigned a preset to MIDI channel 2 on Proteus VX. Choose a Sound for MIDI Channel 2 25. Click on the 3 MIDI heading to show the Proteus VX VSTi. Next, click on the wrench icon again (in the MIDI Track View) to open Proteus VX. 26. Select MIDI Channel 2 using the channel inc/dec keys . 27. Select a Preset on Channel 2. Place the cursor in the preset number field and use the up/down arrow keys on your computer keyboard to scroll through the list until you find a preset you like. • Note: There are several ways to select presets. See the Proteus VX Operation manual for details. 28. Now you should be hearing the sound you chose on channel 2. If not, check to make sure both clips are playing (green triangle). Each clip plays a different preset. Add MIDI Clips 29. Drop a few more MIDI clips into both MIDI channel slots. Play around with the Clip Launch buttons. Preset Change Here's another way to change the MIDI Program (Preset in E-MU speak) without going into the Proteus VX editor. 30. Double-click on one of the currently playing MIDI clips. The Clip View appears at the bottom of the window. 31. Select the Show/Hide Notes Box located in the lower left corner of the Clip View window. The Notes box appears in the Clip View section. 32. Select a Program number. You'll hear the Proteus VX sound change. Keep selecting until you find one you like. • Hint: Use the Up/Down Arrow keys to select Programs. Use Sub-Banks 2-8 to select presets higher than 128. 33. As an added bonus of selecting programs this way, the program (sound) you selected is now associated with the MIDI clip. Whenever you select this MIDI clip, the sound will also be selected. 34. Select another clip and assign a different program number. Notice that the Preset changes when you switch back and forth between clips. Save the Set 35. Save your work by selecting Save Live Set As... from the File menu. The next time you load the set, the Proteus VX bank will automatically load as well. Record a MIDI Track using your MIDI Keyboard 36. You can use the MIDI Track you set up on MIDI channel 2. Make sure there is at least one empty slot in the MIDI track. (Select and hit backspace to delete a clip.) NOTE Proteus VX sounds are called Presets or Programs. Ableton Live Programs are offset by +1 from Proteus VX. Notes Box Select Preset 0404 USB 2.0 Owner's Manual 45
-
 1
1 -
2
-
3
-
4
-
5
-
6
-
7
-
8
-
9
-
10
-
11
-
12
-
13
-
14
-
15
-
16
-
17
-
18
-
19
-
20
-
21
-
22
-
23
-
24
-
25
-
26
-
27
-
28
-
29
-
30
-
31
-
32
-
33
-
34
-
35
-
36
-
37
-
38
-
39
-
 40
40 -
 41
41 -
 42
42 -
 43
43 -
 44
44 -
 45
45 -
 46
46 -
 47
47 -
 48
48 -
 49
49 -
 50
50 -
51
-
52
-
53
-
54
-
55
-
56
 |
 |
