Creative 0404 Owners Manual - Page 33
Record a Track, Optional Step - Metronome
 |
UPC - 054651129276
View all Creative 0404 manuals
Add to My Manuals
Save this manual to your list of manuals |
Page 33 highlights
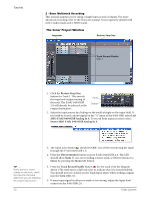
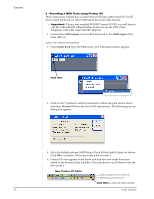
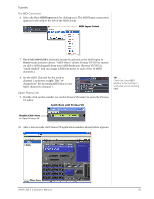
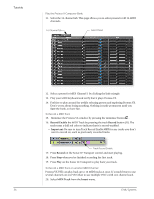
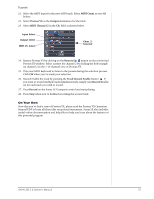
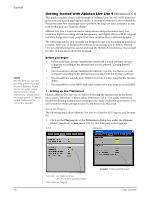
Tutorials 7. Optional Step - Metronome: First, select Toolbars from the View menu and check the Metronome Toolbar. Next turn Metronome During Record On by clicking the button. Record a Track 8. Press Record on the Sonar LE Transport control and start playing. Stop Record Return-To-Zero Play 9. Press Stop when you're finished recording the first track. 10. Press Play on the Sonar LE Transport to play back your track. 11. If you want to dump the track and start over, Right-click over the waveform display in the track and choose Delete. Record Another Track 12. Select Track 2 and click the Restore Strip Size button to expose the input and output routing. 13. Set the Input source for the track. Click on the little triangle on the right side of the track Input box. 14. Disable record for Track 1 by clicking on the Track Record button Off. 15. Enable recording for Track 2 by clicking on the Track Record button On. 16. Press the transport Record button and you're recording. Hot Tip: A quick way to record additional tracks using the same input is to simply drag the Part (audio region) you just recorded up or down to another track in the Sonar Project Window, then just hit Record again and go. (Choose Blend Old and New when asked in the Drag & Drop Options.) Save your Project 17. Choose Save As... from the Sonar LE File menu to save your project. Choose a name and location that will make the project easy to find later. TIP . . . You can create a new track by selecting Clone, from the Track menu. This handy feature duplicates the currently selected track complete with input/output routings. 0404 USB 2.0 Owner's Manual 33
-
 1
1 -
2
-
3
-
4
-
5
-
6
-
7
-
8
-
9
-
10
-
11
-
12
-
13
-
14
-
15
-
16
-
17
-
18
-
19
-
20
-
21
-
22
-
23
-
24
-
25
-
26
-
27
-
 28
28 -
 29
29 -
 30
30 -
 31
31 -
 32
32 -
 33
33 -
 34
34 -
 35
35 -
 36
36 -
 37
37 -
 38
38 -
39
-
40
-
41
-
42
-
43
-
44
-
45
-
46
-
47
-
48
-
49
-
50
-
51
-
52
-
53
-
54
-
55
-
56
 |
 |
