D-Link DCS-7110 Product Manual - Page 29
Close, Sensor Setting, Exposure, Preview, Restore, Profile 2, to recall the original - test
 |
UPC - 790069350207
View all D-Link DCS-7110 manuals
Add to My Manuals
Save this manual to your list of manuals |
Page 29 highlights
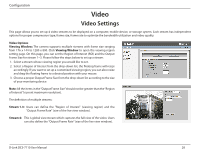
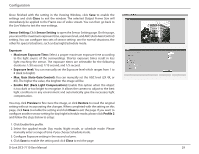
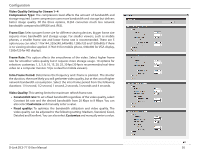
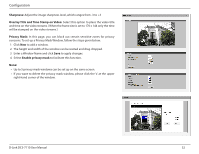
Configuration Once finished with the setting in the Viewing Window, click Save to enable the settings and click Close to exit the window. The selected Output Frame Size will immediately be applied to the Frame size of video stream. You can then go back to the Live Video to test the new settings. Sensor Setting: Click Sensor Setting to open the Sensor Setting page. On this page, you can set the maximum exposure time, exposure level, and AGC (Auto Gain Control) setting. You can configure two sets of sensor setting: one for normal situations, the other for special situations, such as day/night/schedule mode. Exposure • Maximum Exposure Time: Select a proper maximum exposure time according to the light source of the surroundings. Shorter exposure times result in less light reaching the sensor. The exposure times are selectable for the following durations: 1/30 second, 1/15 second, and 1/5 second. • Exposure level: You can manually set the Exposure level which ranges from 1 to 8 (dark to bright). • Max. Gain (Auto Gain Control): You can manually set the AGC level (2X 4X, or 8X). The higher the value, the brighter the image will be. • Enable BLC (Back Light Compensation): Enable this option when the object is too dark or too bright to recognize. It allows the camera to adjust to the best light conditions in any environment and automatically give the necessary light compensation. You may click Preview to fine-tune the image, or click Restore to recall the original setting without incorporating the changes. When completed with the setting on this page, click Save to enable the setting and click Close to exit the page. If you want to configure another sensor setting for day/night/schedule mode, please click Profile 2 and follow the steps below to setup: 1. Click Enable this profile. 2. Select the applied mode: Day mode, Night mode, or schedule mode. Please manually enter a range of time if you choose Schedule mode. 3. Configure Exposure setting in the second column. 4. Click Save to enable the setting and click Close to exit the page. D-Link DCS-7110 User Manual 29
-
 1
1 -
2
-
3
-
4
-
5
-
6
-
7
-
8
-
9
-
10
-
11
-
12
-
13
-
14
-
15
-
16
-
17
-
18
-
19
-
20
-
21
-
22
-
23
-
 24
24 -
 25
25 -
 26
26 -
 27
27 -
 28
28 -
 29
29 -
 30
30 -
 31
31 -
 32
32 -
 33
33 -
 34
34 -
35
-
36
-
37
-
38
-
39
-
40
-
41
-
42
-
43
-
44
-
45
-
46
-
47
-
48
-
49
-
50
-
51
-
52
-
53
-
54
-
55
-
56
-
57
-
58
-
59
-
60
-
61
-
62
-
63
-
64
-
65
-
66
-
67
-
68
-
69
-
70
-
71
-
72
-
73
-
74
-
75
-
76
-
77
-
78
-
79
-
80
 |
 |
