D-Link DGS-3048 Product Manual - Page 49
SNMP Group Table, SNMP View Table Configuration Window, Parameter, Description
 |
UPC - 790069287367
View all D-Link DGS-3048 manuals
Add to My Manuals
Save this manual to your list of manuals |
Page 49 highlights
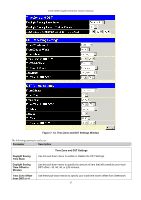
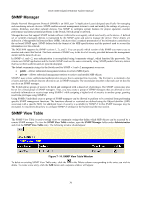
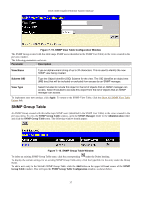
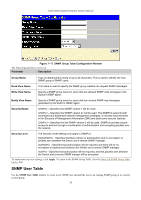
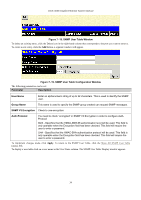
DGS-3048 Gigabit Ethernet Switch Manual Figure 7- 15. SNMP View Table Configuration Window The SNMP Group created with this table maps SNMP users (identified in the SNMP User Table) to the views created in the previous window. The following parameters can be set: Parameter Description View Name Type an alphanumeric string of up to 32 characters. This is used to identify the new SNMP view being created. Subtree OID Type the Object Identifier (OID) Subtree for the view. The OID identifies an object tree (MIB tree) that will be included or excluded from access by an SNMP manager. View Type Select Included to include this object in the list of objects that an SNMP manager can access. Select Excluded to exclude this object from the list of objects that an SNMP manager can access. To implement your new settings, click Apply. To return to the SNMP View Table, click the Show All SNMP View Table Entries link. SNMP Group Table An SNMP Group created with this table maps SNMP users (identified in the SNMP User Table) to the views created in the previous menu. To view the SNMP Group Table window, open the SNMP Manager folder in the Administration folder and click the SNMP Group Table entry. The following window should appear: Figure 7- 16. SNMP Group Table Window To delete an existing SNMP Group Table entry, click the corresponding under the Delete heading. To display the current settings for an existing SNMP Group Table entry, click the hyperlink for the entry under the Group Name. To add a new entry to the Switch's SNMP Group Table, click the Add button in the upper left-hand corner of the SNMP Group Table window. This will open the SNMP Group Table Configuration window, as shown below. 37
-
 1
1 -
2
-
3
-
4
-
5
-
6
-
7
-
8
-
9
-
10
-
11
-
12
-
13
-
14
-
15
-
16
-
17
-
18
-
19
-
20
-
21
-
22
-
23
-
24
-
25
-
26
-
27
-
28
-
29
-
30
-
31
-
32
-
33
-
34
-
35
-
36
-
37
-
38
-
39
-
40
-
41
-
42
-
43
-
 44
44 -
 45
45 -
 46
46 -
 47
47 -
 48
48 -
 49
49 -
 50
50 -
 51
51 -
 52
52 -
 53
53 -
 54
54 -
55
-
56
-
57
-
58
-
59
-
60
-
61
-
62
-
63
-
64
-
65
-
66
-
67
-
68
-
69
-
70
-
71
-
72
-
73
-
74
-
75
-
76
-
77
-
78
-
79
-
80
-
81
-
82
-
83
-
84
-
85
-
86
-
87
-
88
-
89
-
90
-
91
-
92
-
93
-
94
-
95
-
96
-
97
-
98
-
99
-
100
-
101
-
102
-
103
-
104
-
105
-
106
-
107
-
108
-
109
-
110
-
111
-
112
-
113
-
114
-
115
-
116
-
117
-
118
-
119
-
120
-
121
-
122
-
123
-
124
-
125
-
126
-
127
-
128
-
129
-
130
-
131
-
132
-
133
-
134
-
135
-
136
-
137
-
138
-
139
-
140
-
141
-
142
-
143
-
144
-
145
-
146
-
147
 |
 |
