D-Link DSA 5100 Product Manual - Page 9
Installation Requirements, Setting Up the DSA-5100
 |
UPC - 790069266492
View all D-Link DSA 5100 manuals
Add to My Manuals
Save this manual to your list of manuals |
Page 9 highlights
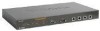
Installation Requirements 1. Standard 10/100Base-T, including four network cables with RJ-45 connectors. 2. All PCs need to install the TCP/IP network protocol. Setting Up the DSA-5100 1. Make sure the power of the DSA-5100 is turned off. 2. Connecting the WAN1 and WAN2 ports. Use one of the supplied straight-through cables to connect the DSA-5100 to the network not managed by the DSA-5100 system (such as and ATU router for ADSL, the Ethernet port of a cable modem, or a switch or hub on a LAN). 3. Connecting the Public LAN port. The Public LAN port is used to provide authentication based Internet access for Ethernet (with switch) or WLAN (with AP) clients. Use one of the supplied straight-through Ethernet cables if connecting to a hub or switch. Use the supplied crossover cable if connecting directly to an AP or PC. Warning: The Public LAN port cannot connect to a Layer 3 device. 4. Connecting the Private LAN port. The Private LAN port is used to provide Internet access without authentication for your existing Private Network. Use one of the supplied straight-through Ethernet cables if connecting to a hub or switch. Use the supplied crossover cable if connecting directly to an AP or PC. 5. Turn on the power. Plug the bundled power cord connector into the socket and then turn on the power. 6. Check the LED indicating light. After the power is ON, the power LED should be lit. The WAN1, WAN2, Public LAN, and Private LAN LEDs will light up with a valid Ethernet connection. 9
-
 1
1 -
2
-
3
-
 4
4 -
 5
5 -
 6
6 -
 7
7 -
 8
8 -
 9
9 -
 10
10 -
 11
11 -
 12
12 -
 13
13 -
 14
14 -
15
-
16
-
17
-
18
-
19
-
20
-
21
-
22
-
23
-
24
-
25
-
26
-
27
-
28
-
29
-
30
-
31
-
32
-
33
-
34
-
35
-
36
-
37
-
38
-
39
-
40
-
41
-
42
-
43
-
44
-
45
-
46
-
47
-
48
-
49
-
50
-
51
-
52
-
53
-
54
-
55
-
56
-
57
-
58
-
59
-
60
-
61
-
62
-
63
-
64
-
65
-
66
-
67
-
68
-
69
-
70
-
71
-
72
-
73
-
74
-
75
-
76
-
77
-
78
-
79
-
80
-
81
-
82
-
83
-
84
-
85
-
86
-
87
-
88
-
89
-
90
-
91
-
92
-
93
 |
 |