Dell 2130cn User Guide - Page 121
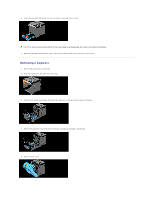
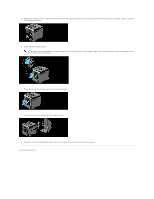
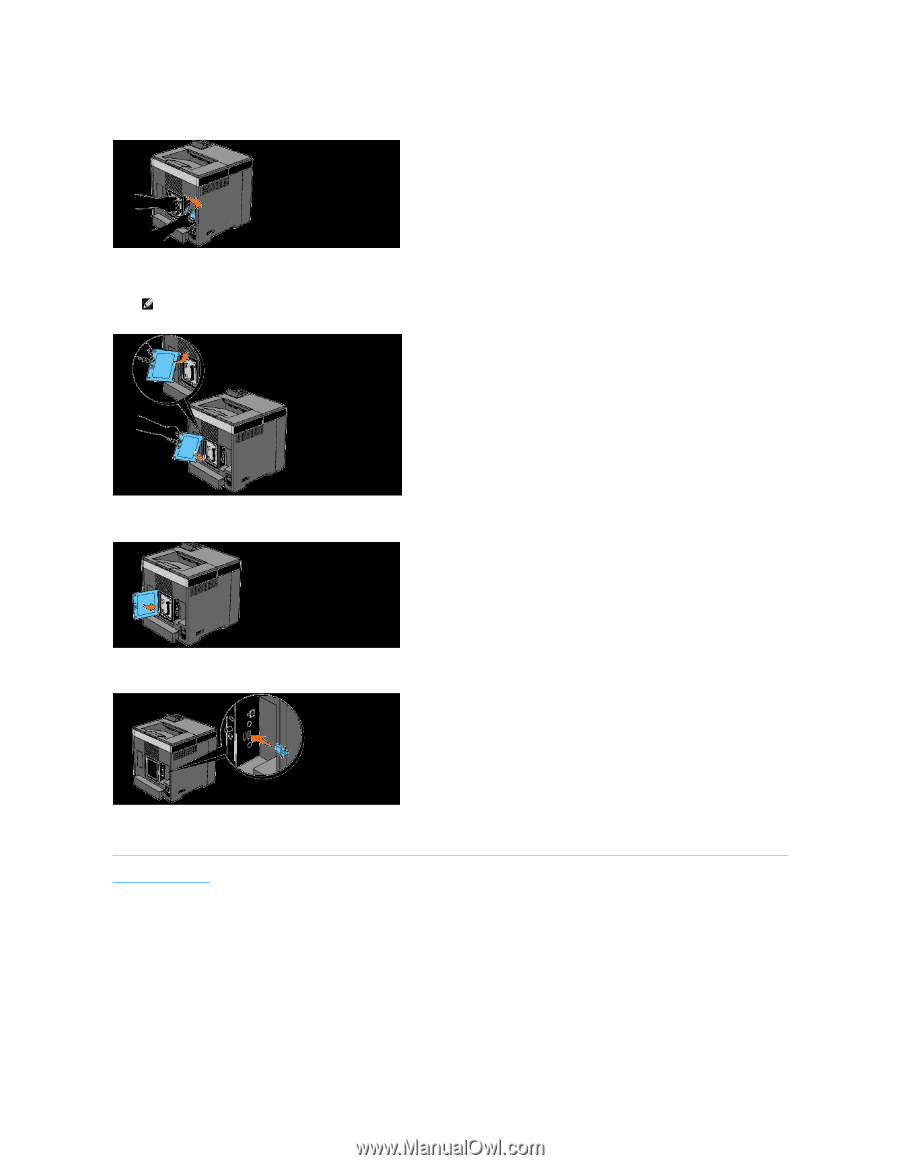
Insert the above hinge of the control board cover into the above slit on the printer. Next, insert
 |
UPC - 335521301238
View all Dell 2130cn manuals
Add to My Manuals
Save this manual to your list of manuals |
Page 121 highlights
4. Remove the wireless printer adapter from the printer by releasing the adapter's hook from underside of the wireless printer adapter socket as shown in the following illustration. 5. Install the control board cover. NOTE: Insert the above hinge of the control board cover into the above slit on the printer. Next, insert the below hinge of the control board cover into the below slit on the printer. 6. Close the control board cover and turn the screw clockwise. 7. Insert the cap into the wireless printer adapter socket. 8. Reconnect all cables including the power cable into the back of the printer and turn on the printer. Back to Contents Page
-
 1
1 -
2
-
3
-
4
-
5
-
6
-
7
-
8
-
9
-
10
-
11
-
12
-
13
-
14
-
15
-
16
-
17
-
18
-
19
-
20
-
21
-
22
-
23
-
24
-
25
-
26
-
27
-
28
-
29
-
30
-
31
-
32
-
33
-
34
-
35
-
36
-
37
-
38
-
39
-
40
-
41
-
42
-
43
-
44
-
45
-
46
-
47
-
48
-
49
-
50
-
51
-
52
-
53
-
54
-
55
-
56
-
57
-
58
-
59
-
60
-
61
-
62
-
63
-
64
-
65
-
66
-
67
-
68
-
69
-
70
-
71
-
72
-
73
-
74
-
75
-
76
-
77
-
78
-
79
-
80
-
81
-
82
-
83
-
84
-
85
-
86
-
87
-
88
-
89
-
90
-
91
-
92
-
93
-
94
-
95
-
96
-
97
-
98
-
99
-
100
-
101
-
102
-
103
-
104
-
105
-
106
-
107
-
108
-
109
-
110
-
111
-
112
-
113
-
114
-
115
-
 116
116 -
 117
117 -
 118
118 -
 119
119 -
 120
120 -
 121
121 -
 122
122 -
 123
123 -
 124
124 -
 125
125 -
 126
126 -
127
-
128
-
129
-
130
-
131
-
132
-
133
-
134
-
135
-
136
-
137
-
138
-
139
-
140
-
141
-
142
-
143
-
144
-
145
-
146
-
147
-
148
-
149
-
150
-
151
-
152
-
153
-
154
-
155
-
156
-
157
-
158
-
159
-
160
-
161
-
162
-
163
-
164
-
165
-
166
-
167
-
168
-
169
-
170
-
171
-
172
-
173
-
174
-
175
-
176
-
177
-
178
-
179
-
180
-
181
-
182
-
183
-
184
-
185
-
186
-
187
-
188
-
189
-
190
-
191
-
192
-
193
-
194
-
195
-
196
-
197
-
198
-
199
-
200
-
201
-
202
-
203
-
204
 |
 |
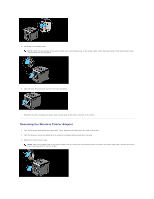
4.
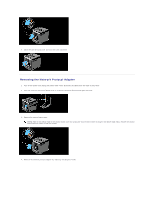
Remove the wireless printer adapter from the printer by releasing the adapter's hook from underside of the wireless printer adapter socket as shown in
the following illustration.
5.
Install the control board cover.
6.
Close the control board cover and turn the screw clockwise.
7.
Insert the cap into the wireless printer adapter socket.
8.
Reconnect all cables including the power cable into the back of the printer and turn on the printer.
Back to Contents Page
NOTE:
Insert the above hinge of the control board cover into the above slit on the printer. Next, insert the below hinge of the control board cover
into the below slit on the printer.