Dell 2130cn User Guide - Page 170
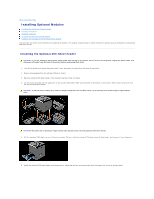
Installing a Duplexer
 |
UPC - 335521301238
View all Dell 2130cn manuals
Add to My Manuals
Save this manual to your list of manuals |
Page 170 highlights
c. Press button until the installed tray appears, and then press (Set) button. d. Press button until Paper Type appears, and then press (Set) button. e. Press button until the paper type for the installed tray appears, and then press (Set) button. f. Confirm that the selected paper type is marked with an asterisk(*), and then press Menu button. 11. If you installed the optional 250-sheet feeder after installing the printer driver, update your driver by following the instructions for each operating system. If the printer is on a network, update the driver for each client. For Windows Vista®/Vista x64 a. Click Start® Control Panel® Hardware and Sound® Printers. b. Right-click the printer icon of the Dell™ 2130cn Color Laser Printer and select Properties. c. Click the Options tab, and then select Get Information from Printer. d. Click Apply, and then click OK. e. Close the Printers dialog box. For Windows Server® 2008/Server 2008 x64 a. Click Start® Control Panel® Printers. b. Right-click the printer icon of the Dell 2130cn Color Laser Printer and select Properties. c. Click the Options tab, and then select Get Information from Printer. d. Click Apply, and then click OK. e. Close the Printers dialog box. For Windows® XP/XP x64/Server 2003/Server 2003 x64 a. Click start® Printers and Faxes. b. Right-click the printer icon of the Dell 2130cn Color Laser Printer and select Properties. c. Click the Options tab, and then select Get Information from Printer. d. Click Apply, and then click OK. e. Close the Printers and Faxes dialog box. For Windows 2000 a. Click Start® Settings® Printers. b. Right-click the printer icon of the Dell 2130cn Color Laser Printer and select Properties. c. Click the Options tab, and then select Get Information from Printer. d. Click Apply, and then click OK. e. Close the Printers dialog box. If the printer information is not updated automatically after clicking Get Information from Printer, follow these steps: 1. Click the Options tab, and then select 250 Sheet Feeder on the Items list box. 2. Select Available for the optional 250-sheet feeder setting. 3. Click Apply, and then click OK. 4. Close the Printers and Faxes (or Printers) dialog box. Installing a Duplexer 1. Ensure that the printer is turned off.
-
 1
1 -
2
-
3
-
4
-
5
-
6
-
7
-
8
-
9
-
10
-
11
-
12
-
13
-
14
-
15
-
16
-
17
-
18
-
19
-
20
-
21
-
22
-
23
-
24
-
25
-
26
-
27
-
28
-
29
-
30
-
31
-
32
-
33
-
34
-
35
-
36
-
37
-
38
-
39
-
40
-
41
-
42
-
43
-
44
-
45
-
46
-
47
-
48
-
49
-
50
-
51
-
52
-
53
-
54
-
55
-
56
-
57
-
58
-
59
-
60
-
61
-
62
-
63
-
64
-
65
-
66
-
67
-
68
-
69
-
70
-
71
-
72
-
73
-
74
-
75
-
76
-
77
-
78
-
79
-
80
-
81
-
82
-
83
-
84
-
85
-
86
-
87
-
88
-
89
-
90
-
91
-
92
-
93
-
94
-
95
-
96
-
97
-
98
-
99
-
100
-
101
-
102
-
103
-
104
-
105
-
106
-
107
-
108
-
109
-
110
-
111
-
112
-
113
-
114
-
115
-
116
-
117
-
118
-
119
-
120
-
121
-
122
-
123
-
124
-
125
-
126
-
127
-
128
-
129
-
130
-
131
-
132
-
133
-
134
-
135
-
136
-
137
-
138
-
139
-
140
-
141
-
142
-
143
-
144
-
145
-
146
-
147
-
148
-
149
-
150
-
151
-
152
-
153
-
154
-
155
-
156
-
157
-
158
-
159
-
160
-
161
-
162
-
163
-
164
-
 165
165 -
 166
166 -
 167
167 -
 168
168 -
 169
169 -
 170
170 -
 171
171 -
 172
172 -
 173
173 -
 174
174 -
 175
175 -
176
-
177
-
178
-
179
-
180
-
181
-
182
-
183
-
184
-
185
-
186
-
187
-
188
-
189
-
190
-
191
-
192
-
193
-
194
-
195
-
196
-
197
-
198
-
199
-
200
-
201
-
202
-
203
-
204
 |
 |
