Dell Dimension 4700 Owner's Manual - Page 85
Installing a CD/DVD Drive, Adding a Second CD or DVD Drive
 |
View all Dell Dimension 4700 manuals
Add to My Manuals
Save this manual to your list of manuals |
Page 85 highlights
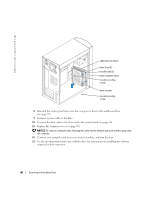
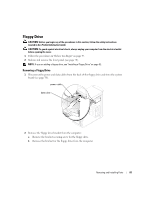
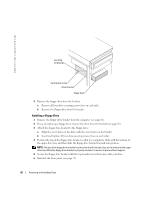
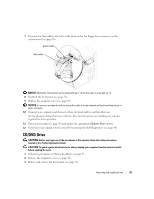
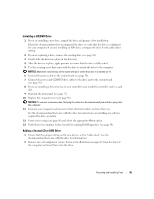
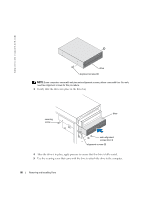
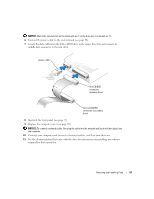
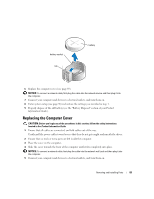
Installing a CD/DVD Drive 1 If you are installing a new drive, unpack the drive and prepare it for installation. Check the documentation that accompanied the drive to verify that the drive is configured for your computer. If you are installing an IDE drive, configure the drive for the cable select setting. 2 If you are replacing a drive, remove the existing drive (see page 84). 3 Gently slide the drive into place in the drive bay. 4 After the drive is in place, apply pressure to ensure that the drive is fully seated. 5 Use the securing screw that came with the drive to attach the drive to the computer. NOTICE: Match the colored strip on the cable with pin 1 on the drive (pin 1 is marked as "1"). 6 Connect the power cable to the system board (see page 56). 7 Connect the power and CD/DVD drive cables to the drive and to the system board (see page 56). 8 If you are installing a drive that has its own controller card, install the controller card in a card slot. 9 Reattach the front panel (see page 72). 10 Replace the computer cover (see page 89). NOTICE: To connect a network cable, first plug the cable in to the network wall jack and then plug it into the computer. 11 Connect your computer and devices to their electrical outlets, and turn them on. See the documentation that came with the drive for instructions on installing any software required for drive operation. 12 Enter system setup (see page 96) and select the appropriate Drive option. 13 Verify that your computer works correctly by running Dell Diagnostics (see page 40). Adding a Second CD or DVD Drive 1 Ensure that the jumper setting on the new drive is set for "cable select" (see the documentation that came with the drive for information). 2 Remove two extra alignment screws, shown in the illustration on page 86, from the front of the computer and insert them into the drive. Removing and Installing Parts 85
-
 1
1 -
2
-
3
-
4
-
5
-
6
-
7
-
8
-
9
-
10
-
11
-
12
-
13
-
14
-
15
-
16
-
17
-
18
-
19
-
20
-
21
-
22
-
23
-
24
-
25
-
26
-
27
-
28
-
29
-
30
-
31
-
32
-
33
-
34
-
35
-
36
-
37
-
38
-
39
-
40
-
41
-
42
-
43
-
44
-
45
-
46
-
47
-
48
-
49
-
50
-
51
-
52
-
53
-
54
-
55
-
56
-
57
-
58
-
59
-
60
-
61
-
62
-
63
-
64
-
65
-
66
-
67
-
68
-
69
-
70
-
71
-
72
-
73
-
74
-
75
-
76
-
77
-
78
-
79
-
 80
80 -
 81
81 -
 82
82 -
 83
83 -
 84
84 -
 85
85 -
 86
86 -
 87
87 -
 88
88 -
 89
89 -
 90
90 -
91
-
92
-
93
-
94
-
95
-
96
-
97
-
98
-
99
-
100
-
101
-
102
-
103
-
104
-
105
-
106
-
107
-
108
-
109
-
110
-
111
-
112
-
113
-
114
-
115
-
116
-
117
-
118
-
119
-
120
-
121
-
122
-
123
-
124
-
125
-
126
 |
 |