Dell Latitude E7240 Ultrabook Desktop and Notebooks Users Guide - Page 54
Printer Problems, AC Power Loss While the Computer Is Docked
 |
View all Dell Latitude E7240 Ultrabook manuals
Add to My Manuals
Save this manual to your list of manuals |
Page 54 highlights
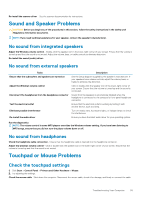
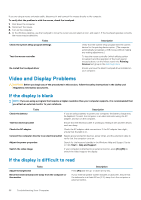
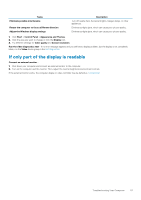
Docking Power Considerations If a computer is connected to a Dell docking station while the computer is running, presence of the docking device is ignored until the AC adapter is connected to the computer. Docking While the Computer Is Running If a computer is connected to a Dell docking station while the computer is running, presence of the docking device is ignored until the AC adapter is connected to the computer. AC Power Loss While the Computer Is Docked If a computer loses AC power while docked to a Dell docking station, the computer immediately goes into low-performance mode. Printer Problems CAUTION: Before you begin any of the procedures in this section, follow the safety instructions in the Owner's Manual. NOTE: If you need technical assistance for your printer, contact the printer's manufacturer. Ensure that the printer is turned on Check the printer cable connections • See the printer documentation for cable connection information. • Ensure that the printer cables are securely connected to the printer and the computer. Verify that the printer is recognized by Windows 1. Click Start > Control Panel > Printers and Other Hardware > View installed printers or fax printers. 2. If the printer is listed, right-click the printer icon. 3. Click Properties > Ports. For a parallel printer, ensure that the Print to the following port(s): setting is LPT1 (Printer Port). For a USB printer, ensure that the Print to the following port(s): setting is USB. Re-install the printer driver - See the printer documentation for instructions. Scanner Problems CAUTION: Before you begin any of the procedures in this section, follow the safety instructions in the Safety and Regulatory Information documents. NOTE: If you need technical assistance for your scanning device, contact the scanner's manufacturer. Check the scanner documentation - See the scanner documentation for setup and troubleshooting information. Unlock the scanner - Ensure that your scanner is unlocked if it has a locking tab or button. Restart the computer and try the scanner again. Check the cable connections • See the scanner documentation for cable connection information. • Ensure that the scanner cables are securely connected to the scanner and the computer. Verify that the scanner is recognized by Windows 1. Click Start > Control Panel > Printers and Other Hardware > Scanners and Cameras. 2. If your scanner is listed, Windows recognizes the scanner. 54 Troubleshooting Your Computer
-
 1
1 -
2
-
3
-
4
-
5
-
6
-
7
-
8
-
9
-
10
-
11
-
12
-
13
-
14
-
15
-
16
-
17
-
18
-
19
-
20
-
21
-
22
-
23
-
24
-
25
-
26
-
27
-
28
-
29
-
30
-
31
-
32
-
33
-
34
-
35
-
36
-
37
-
38
-
39
-
40
-
41
-
42
-
43
-
44
-
45
-
46
-
47
-
48
-
 49
49 -
 50
50 -
 51
51 -
 52
52 -
 53
53 -
 54
54 -
 55
55 -
 56
56 -
 57
57 -
 58
58 -
 59
59 -
60
-
61
-
62
-
63
-
64
-
65
-
66
-
67
 |
 |