Dell PowerVault 130T DLT Service Manual - Page 43
Removal, Replacement, Connect cables J41, J42, J44, and J15 S or
 |
View all Dell PowerVault 130T DLT manuals
Add to My Manuals
Save this manual to your list of manuals |
Page 43 highlights
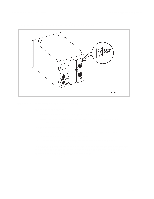
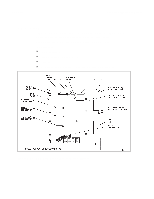
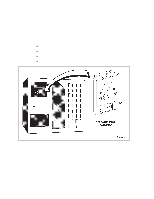
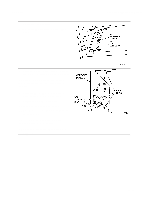
PowerVault 130T Service Manual CYC Card Removal 1. Try to view the library configuration information by accessing Library Utilities from the Operator Panel menu and selecting View Configuration. 2. Manually log all of the configuration information, including library SCSI ID, tape drive SCSI IDs, etc. 3. Remove the electronics module following the procedures beginning on page 3-20. 4. Disconnect cables J41, J42, J44, and J15S or D from their connectors. Refer to Figure 3-3 for connector locations. 5. Remove the 18 screws attaching the CYC card to the standoffs on the electronics module chassis using a Torx driver with a T-10 bit. Replacement 1. Remove the new CYC card from its packaging. 2. Align the card with the 18 standoffs on the electronics module chassis. 3. Install the 18 screws attaching the CYC card to the EM chassis using a Torx driver with a T-10 bit. 4. Connect cables J41, J42, J44, and J15 S or D to their connectors. Refer to Figure 3-3 for connector locations. 5. Replace the electronics module following the procedure beginning on page 3-23. 6. Reconfigure the new CYC card using the information you obtained from the View Configuration menu in step 1 of the removal procedure above. NOTE: Refer to Chapter 2 for instructions about setting library and tape drive SCSI IDs. A detailed configuration procedure is available in the PowerVault 130T User's Guide. 4473D 3-7
-
 1
1 -
2
-
3
-
4
-
5
-
6
-
7
-
8
-
9
-
10
-
11
-
12
-
13
-
14
-
15
-
16
-
17
-
18
-
19
-
20
-
21
-
22
-
23
-
24
-
25
-
26
-
27
-
28
-
29
-
30
-
31
-
32
-
33
-
34
-
35
-
36
-
37
-
 38
38 -
 39
39 -
 40
40 -
 41
41 -
 42
42 -
 43
43 -
 44
44 -
 45
45 -
 46
46 -
 47
47 -
 48
48 -
49
-
50
-
51
-
52
-
53
-
54
-
55
-
56
-
57
-
58
-
59
-
60
-
61
-
62
-
63
-
64
-
65
-
66
-
67
-
68
-
69
-
70
-
71
-
72
-
73
-
74
-
75
-
76
-
77
-
78
-
79
-
80
-
81
-
82
-
83
-
84
-
85
-
86
-
87
-
88
-
89
-
90
-
91
-
92
-
93
-
94
-
95
-
96
 |
 |