Dell PowerVault 130T DLT Service Manual - Page 49
DLT Drive Tray Assembly
 |
View all Dell PowerVault 130T DLT manuals
Add to My Manuals
Save this manual to your list of manuals |
Page 49 highlights
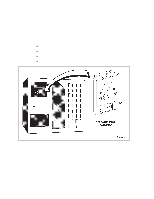
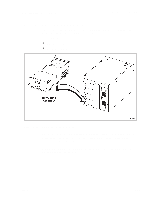
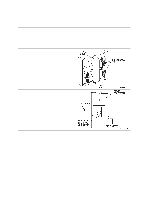
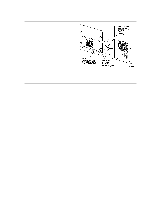
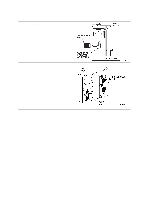
PowerVault 130T Service Manual DLT Drive Tray Assembly DLT Drive Tray Assembly The DLT drive tray assembly FRUs are located in the tape drive slots at the left rear of the library. This assembly is also a CRU. Tools required: ESD wrist strap Flat blade screw driver Figure 3-5. DLT Drive Tray Assembly NOTE: Tape drives are hot swappable, meaning they can be removed and replaced without powering off the library or interrupting its operations. Hot swapping should only be performed by trained technicians. WARNING: Do not apply power to the drive tray assembly when it is not installed in the library. 4473D 3-13
-
 1
1 -
2
-
3
-
4
-
5
-
6
-
7
-
8
-
9
-
10
-
11
-
12
-
13
-
14
-
15
-
16
-
17
-
18
-
19
-
20
-
21
-
22
-
23
-
24
-
25
-
26
-
27
-
28
-
29
-
30
-
31
-
32
-
33
-
34
-
35
-
36
-
37
-
38
-
39
-
40
-
41
-
42
-
43
-
 44
44 -
 45
45 -
 46
46 -
 47
47 -
 48
48 -
 49
49 -
 50
50 -
 51
51 -
 52
52 -
 53
53 -
 54
54 -
55
-
56
-
57
-
58
-
59
-
60
-
61
-
62
-
63
-
64
-
65
-
66
-
67
-
68
-
69
-
70
-
71
-
72
-
73
-
74
-
75
-
76
-
77
-
78
-
79
-
80
-
81
-
82
-
83
-
84
-
85
-
86
-
87
-
88
-
89
-
90
-
91
-
92
-
93
-
94
-
95
-
96
 |
 |

PowerVault 130T Service Manual
DLT Drive Tray Assembly
4473D
3–13
DLT Drive Tray Assembly
The DLT drive tray assembly FRUs are located in the tape drive slots at the left
rear of the library.
This assembly is also a CRU.
Tools required:
S
ESD wrist strap
S
Flat blade screw driver
Figure 3–5.
DLT Drive Tray Assembly
NOTE:Tape drives are hot swappable, meaning they can be removed and replaced
without powering off the library or interrupting its operations.
Hot swapping
should only be performed by trained technicians.
WARNING:
Do not apply power to the drive tray assembly when it is
not installed in the library.