Dell Precision 410 Dell Precision WorkStation 410 Desktop Systems User's Guide - Page 146
See Drives: Primary and Secondary
 |
View all Dell Precision 410 manuals
Add to My Manuals
Save this manual to your list of manuals |
Page 146 highlights
DC power cable EIDE cable IDE1 connector IDE2 connector power input connector on drive interface connector 10-14 To locate the IDE1 connector, see Figure 9-1. NOTE: After you remove and replace the cover, the chassis intrusion detector will cause the following message to be displayed at the next system start-up: See "Drives: Primary and Secondary" in Chapter 3. See Chapter 3, "Using the System Setup Program," for instructions. NOTE: If a setup password has been assigned by someone else, contact your network administrator for information on resetting the chassis intrusion detector. After you update the System Setup settings, reboot the system.
-
 1
1 -
2
-
3
-
4
-
5
-
6
-
7
-
8
-
9
-
10
-
11
-
12
-
13
-
14
-
15
-
16
-
17
-
18
-
19
-
20
-
21
-
22
-
23
-
24
-
25
-
26
-
27
-
28
-
29
-
30
-
31
-
32
-
33
-
34
-
35
-
36
-
37
-
38
-
39
-
40
-
41
-
42
-
43
-
44
-
45
-
46
-
47
-
48
-
49
-
50
-
51
-
52
-
53
-
54
-
55
-
56
-
57
-
58
-
59
-
60
-
61
-
62
-
63
-
64
-
65
-
66
-
67
-
68
-
69
-
70
-
71
-
72
-
73
-
74
-
75
-
76
-
77
-
78
-
79
-
80
-
81
-
82
-
83
-
84
-
85
-
86
-
87
-
88
-
89
-
90
-
91
-
92
-
93
-
94
-
95
-
96
-
97
-
98
-
99
-
100
-
101
-
102
-
103
-
104
-
105
-
106
-
107
-
108
-
109
-
110
-
111
-
112
-
113
-
114
-
115
-
116
-
117
-
118
-
119
-
120
-
121
-
122
-
123
-
124
-
125
-
126
-
127
-
128
-
129
-
130
-
131
-
132
-
133
-
134
-
135
-
136
-
137
-
138
-
139
-
140
-
 141
141 -
 142
142 -
 143
143 -
 144
144 -
 145
145 -
 146
146 -
 147
147 -
 148
148 -
 149
149 -
 150
150 -
 151
151 -
152
-
153
-
154
-
155
-
156
-
157
-
158
-
159
-
160
-
161
-
162
-
163
-
164
-
165
-
166
-
167
-
168
-
169
-
170
-
171
-
172
-
173
-
174
-
175
-
176
-
177
-
178
-
179
-
180
-
181
-
182
-
183
-
184
-
185
-
186
-
187
-
188
-
189
-
190
-
191
-
192
-
193
-
194
-
195
-
196
-
197
-
198
-
199
-
200
-
201
-
202
-
203
-
204
-
205
-
206
-
207
-
208
-
209
-
210
-
211
-
212
-
213
-
214
-
215
-
216
-
217
-
218
-
219
-
220
-
221
-
222
-
223
-
224
-
225
-
226
-
227
-
228
-
229
-
230
-
231
-
232
-
233
-
234
-
235
-
236
-
237
-
238
 |
 |

10-14
’HOO±3UHFLVLRQ±²³´±’HVNWRS±6\VWHPV±8VHU'V±*XLGH
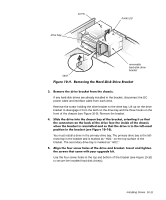
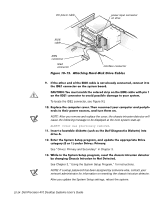
)LJXUH±´¿¶´·µ±±$WWDFKLQJ±+DUG¶’LVN±’ULYH±&DEOHV
³
,I²WKH²RWKHU²HQG²RI²WKH²(,’(²FDEOH²LV²QRW²DOUHDG\²FRQQHFWHG´²FRQQHFW²LW²WR²
WKH²,’(¶²FRQQHFWRU²RQ²WKH²V\VWHP²ERDUG³
&$87,21±²<RX²PXVW²PDWFK²WKH²FRORUHG²VWULS²RQ²WKH²(,’(²FDEOH²ZLWK²SLQ²¶²
RQ²WKH²,’(¶²FRQQHFWRU²WR²DYRLG²SRVVLEOH²GDPDJH²WR²\RXU²V\VWHP³
To locate the IDE1 connector, see Figure 9-1.
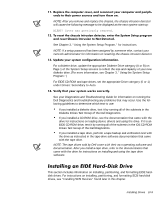
¶¼³ 5HSODFH²WKH²FRPSXWHU²FRYHU³²7KHQ²UHFRQQHFW²\RXU²FRPSXWHU²DQG²SHULSK¹
HUDOV²WR²WKHLU²SRZHU²VRXUFHV´²DQG²WXUQ²WKHP²RQ³
NOTE: After you remove and replace the cover, the chassis intrusion detector will
cause the following message to be displayed at the next system start-up:
$/(57Ʊ&RYHU±ZDV±SUHYLRXVO\±UHPRYHG³
¶¶³ ,QVHUW²D²ERRWDEOH²GLVNHWWH²ÄVXFK²DV²WKH²
’HOO±’LDJQRVWLFV±’LVNHWWH
ŲLQWR²
GULYH²$³
¶·³ (QWHU²WKH²6\VWHP²6HWXS²SURJUDP´²DQG²XSGDWH²WKH²DSSURSULDWH²’ULYH²
FDWHJRU\²Ä¼²RU²¶Å²XQGHU²’ULYHV±²3ULPDU\³
See “Drives: Primary and Secondary” in Chapter 3.
¶¸³ :KLOH²LQ²WKH²6\VWHP²6HWXS²SURJUDP´²UHVHW²WKH²FKDVVLV²LQWUXVLRQ²GHWHFWRU²
E\²FKDQJLQJ²&KDVVLV²,QWUXVLRQ²WR²1RW²’HWHFWHG³²
See Chapter 3, “Using the System Setup Program,” for instructions.
NOTE: If a setup password has been assigned by someone else, contact your
network administrator for information on resetting the chassis intrusion detector.
After you update the System Setup settings, reboot the system.
EIDE
cable
power input connector
on drive
IDE1
connector
IDE2
connector
DC power cable
interface connector