Dell S510n Dell Interactive Projector S510/ Users Guide - Page 42
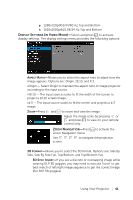
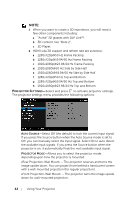
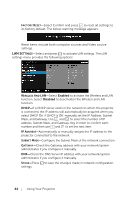
Projector Settings
 |
View all Dell S510n manuals
Add to My Manuals
Save this manual to your list of manuals |
Page 42 highlights
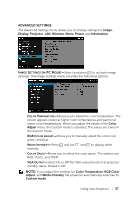
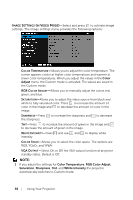
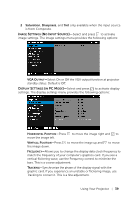
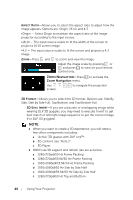
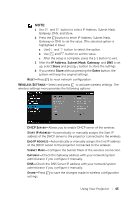
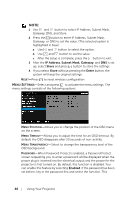
NOTE: 1 When you want to create a 3D experience, you will need a few other components including: a "Active" 3D glasses with DLP Link™. b 3D content. See "Note 2". c 3D Player. 2 HDMI 1.4a 3D support and refresh rate are as below: a 1280x720p@50 Hz Frame Packing b [email protected]/60 Hz Frame Packing c [email protected]/24 Hz Frame Packing d 1920x1080i@50 Hz Side by Side Half e [email protected]/60 Hz Side by Side Half f 1280x720p@50 Hz Top and Bottom g [email protected]/60 Hz Top and Bottom h [email protected]/24 Hz Top and Bottom PROJECTOR SETTINGS-Select and press to activate projector settings. The projector settings menu provides the following options: AUTO SOURCE-Select Off (the default) to lock the current input signal. If you press the Source button when the Auto Source mode is set to Off, you can manually select the input signal. Select On to auto detect the available input signals. If you press the Source button when the projector is on, it automatically finds the next available input signal. PROJECTOR MODE-Allows you to select the projector mode, depending upon how the projector is mounted. •Rear Projection-Wall Mount - The projector reverses and turns the image upside down. You can project from behind a translucent screen with a wall-mounted projection (for regular projection). •Front Projection-Wall Mount - The projector turns the image upside down for wall-mounted projection. 42 Using Your Projector
-
 1
1 -
2
-
3
-
4
-
5
-
6
-
7
-
8
-
9
-
10
-
11
-
12
-
13
-
14
-
15
-
16
-
17
-
18
-
19
-
20
-
21
-
22
-
23
-
24
-
25
-
26
-
27
-
28
-
29
-
30
-
31
-
32
-
33
-
34
-
35
-
36
-
 37
37 -
 38
38 -
 39
39 -
 40
40 -
 41
41 -
 42
42 -
 43
43 -
 44
44 -
 45
45 -
 46
46 -
 47
47 -
48
-
49
-
50
-
51
-
52
-
53
-
54
-
55
-
56
-
57
-
58
-
59
-
60
-
61
-
62
-
63
-
64
-
65
-
66
-
67
-
68
-
69
-
70
-
71
-
72
-
73
-
74
-
75
-
76
-
77
-
78
-
79
-
80
-
81
-
82
-
83
-
84
-
85
-
86
-
87
-
88
-
89
-
90
-
91
-
92
-
93
-
94
-
95
-
96
-
97
-
98
-
99
-
100
-
101
-
102
-
103
-
104
-
105
-
106
-
107
-
108
-
109
-
110
-
111
-
112
-
113
-
114
-
115
-
116
-
117
-
118
-
119
-
120
-
121
-
122
-
123
-
124
-
125
-
126
-
127
-
128
-
129
-
130
-
131
-
132
-
133
-
134
-
135
-
136
-
137
-
138
-
139
-
140
-
141
-
142
-
143
-
144
-
145
-
146
-
147
-
148
-
149
-
150
-
151
-
152
-
153
-
154
-
155
 |
 |
